• Skip to primary navigation
  • Skip to main content
  • Skip to footer

Steel Raven Farms

Where muck boots meet ground.

  • Animals
    • Chickens
    • Farm Dogs
    • Goats
  • Garden
    • Compost
    • Garden Projects
    • Seeds and Plants
    • Garden Journal
    • Working With Food
      • Recipes
      • Freezing Foods
      • Dehydrating Foods
      • Canning Tips And Tricks
        • Canning Inventory Sheets
  • Helpful Info
    • Welcome to the Homestead!
    • Emergency Preparedness
    • Frequently Asked Questions
    • Goal Setting
    • Project List
    • Shop Digital Products
      • Hay Calculator
      • Farm Expense And Income Tracker
      • Goat Crash Course: 101
      • Garden Journal Prompts
      • Schedule C Tracker
      • Schedule C Tracker
      • The Homestead Bundle
  • The Truths
  • Episode List
  • Start Here
    • Privacy Policy
    • Affiliate Disclosure
    • Let’s Get in Touch
    • Members Only Library
    • Welcome To Our Homestead

Garden

How To Create A Digital Seed Inventory

February 8, 2025 by Leigh Leave a Comment

Every year, it’s the same problem, “What seeds did I buy last year?” I have yet to meet a person that only buys exactly what they need. But most people forget what they purchased last year, if they liked it, how much they still have, etc. Every gardener, farmer, or homesteader, needs a seed inventory. There are about a million ways to create a seed inventory, from paper to digital to mental. But at the end of the day, it doesn’t really matter HOW you keep track of your seeds, as long as you do it. Today, I want to show you how and why I have a digital seed inventory and how you can do it too.

Before we get too far into this post, I wanted to give a suggestion about keeping a garden journal. A digital garden journal is a fantastic way to keep track of past, present and future gardens. Our Digital Garden Journal is a great way to keep up with everything without getting too overwhelmed.

Buy Now

Why Have A Seed Inventory

I want to say this first, you don’t have to have a digital seed inventory. In fact, if you want to keep it old school with a pen and paper? Go right ahead. I’m not here to judge. I just want you to be able to keep track of your seeds. In my garden planner, I’ve got several charts that help me track everything from seeds/seedlings, orchard information, pests, and more. This is my printed planner that helps me keep track when out in the garden. But I prefer my digital seed inventory for a lot of reasons.

First, when I order seeds, I am on my computer. Rarely, if ever, do I go into a store and buy seeds that I NEED. Those seeds are the seeds I saw and thought, “Hmm, that looks interesting.” And they get thrown in my cart. The seeds I need for my garden are bought online. That’s because I know exactly what I need, the amount I need, and I can usually get better deals that way.

Second, it helps me save a TON of money. I am an impulse buyer. No matter what I try to do to stop that, I am going to see something and snatch it up because it looks cool, could solve my problem and so much more. But the reality is that having a digital seed inventory on my phone tells me EXACTLY what I have on hand, and which storage bin it’s in.

Third, it helps me keep track of start times, harvests, and more. I enjoy being able to quickly look back at a seed in my inventory and see that it germinated well, produced a ton, and, probably most importantly, how many seeds I have on hand right NOW.

One of our five year goals is to feed ourselves and animals 75% from our land. That’s a ton of food. But to get to that goal, I need to make sure that I am only buying or saving the seeds that I know will work.
If you are interested in learning more about my favorite garden planner. I highly recommend Seedtime! This planner has been instrumental in helping me plan out my gardens with WAY more efficiency than I could ever expect! It has also reduced overwhelm, stress, and calmed my ADD/ADHD!

More Info!

Creating A Digital Seed Inventory

A simple spreadsheet is really all you need. It can be as fancy and in depth or as simple as you want. My physical garden planner is pretty in depth because I want to make sure that I can track as much information as possible. But sometimes there is a need for simplicity and I that is where my garden journal comes in.

If you are choosing to start your own digital seed inventory, then you need to write down the things that you want to track. Do you care what color the pepper is? Do you care if it’s a transplant or direct sow? Where you bought the seeds?

Logo 468x60

You also need to think about how you are going to access it when the time comes. Are you only going to use it at home? Then it probably doesn’t need to be web based. Are you looking for seeds from a local farmers market? Probably should be web based like Google Sheets.

Make sure that the things you want to know are easily accessible within that spreadsheet.

If you aren’t quite sure what you want in your spreadsheet, I have my digital seed inventory that you can purchase in our general store. This is the same one I use. The cool thing about it, is that while it is in depth, you can delete the things that you don’t want or need.

Logo 468x60

Need Help Organizing Your Seeds?

In my digital seed inventory, the first column is “location”. Pro tip? Get yourself a couple of photo storage bins like this and put your seeds in it! This is seriously the best garden purchase I have made to date. These storage bins have 18 4×6 storage containers.

On the outside of the bin, I write which bin it is A, B, C, etc. On the inside 4×6 bins, I write A1, A2, A3, etc of the corresponding bin. This way when I look at my inventory, I can see that corn seeds are in bins C12-C18. That way when I go to plant that corn, I don’t have to go find it, lug out a million seed packets, and risk losing a couple packets. This has been my hack for the last 10 years and I will always use it.

Using Your Digital Seed Inventory

One of the things I do every year, usually in July and December, is figure out how many seeds I actually have on hand. This really helps to make sure that I have plenty of seeds for the growing season. The hardest part of having a digital seed inventory (or really any inventory) is making sure that you are consistently updating the inventory.

No matter if you are using a box to store your seeds, a pen and paper to keep track of how many seeds you have, or going all digital and super organized. The reality is that if you are buying seeds, using them and growing food? You’re doing pretty amazing!

If you like the content I put out, feel free to buy us a coffee! It helps keep this site running, marketing and the goats in grain!

Buy me a coffee

If you like this post, feel free to share it and follow us below on our social media accounts!
  • Facebook
  • Pinterest
  • Instagram
  • YouTube
  • TikTok
  • Spotify
  • Threads

Filed Under: Garden, How To's, Seeds and Plants Tagged With: Fodder, Garden, veggies

JOIN TO OUR MAILING LIST!

Leave us your email to receive new posts and special offers for members only! Don't miss a thing!

Recent Posts

  • Fall Garden Guide
  • Top Mistakes With Goats
  • How To Bond With Your Goats

Don’t Be Afraid Of Being Prepared

February 1, 2025 by Leigh Leave a Comment

Years ago, the propaganda surrounding being a “prepper” got a lot of people scared of actually being prepared. For a long time, being called a prepper was this horrible thing that made a lot of people scared to talk about things like storing food, medicine, and other essentials in the face of an emergency. But over the last couple of years, we have realized that maybe being prepared isn’t such a bad thing.

The Ultimate Homesteader’s Starter Bundle – Only $47!

Get the tools you need to stay organized, track profits, and manage your homestead with ease!

Includes:
✅ Schedule F Tracker – Simplify tax prep
✅ Profit Calculator – Track earnings
✅ Hay Calculator – Plan livestock feed
✅ Garden Journal – Digital & printable
✅ Herd Health Tracker – Monitor animal care
✅ Simple Budget – Manage finances
✅ Backyard Homestead eBook – Essential tips

$99 value – now just $47! Start your homesteading journey today!

Buy Now

Don’t Be Afraid Of Being Prepared

I could write a huge blog post on all the ways you can start preparing your household for the worst case situations. And I have. You can see how I cook during power outages, handle our food security, and even emergency gardens.

In this post, though, I want to talk about the fears surrounding being prepared. It’s not just the fear about being called a prepper. It’s also realizing that you don’t have to prepare for emergencies from a place of fear. So many people fear the unknown and it causes them to do nothing. Instead, let’s talk about what emergencies are and why being prepared for them is important.

Are you getting overwhelmed in the garden? Stressed? Or just not enjoying the garden like you used to? Check out our garden prompts! We send out weekly emails that get you back in the garden and out of your head! Turn the garden back into a place of love and joy instead of frustration and headache!

Subscribe Now!

What Is Prepping?

Simply put, prepping is just preparing for situations that may arise. This could be anything from meal prepping to disaster planning and everything in between. Today, I am talking about preparing in a home sense, and yes, this includes disaster planning.

When we got hit by hurricane Helene, we realized that while we were okay, there were things that we could do better. That lead to a list of things that we needed to start working on before the next big thing hit.

Our preparations don’t come out of a place of fear, but comfort and thriving versus just surviving.

If you are new to heating with firewood and are looking to master the finer points of it. We’ve got a great eBook that goes in depth of what tools you should consider, how and where to stack, how to build a fire and so much more!

Buy Now

Prepping Out Of Fear

Prepping out of fear is the biggest issue I have seen so many people struggle with when it comes to prepping. Most of the “bad preppers” (and I use that term very loosely) are so into prepping for Armageddon that it scares the hell out of those that are just trying to figure out how to put up food for the winter. What a lot of people don’t understand is that there is a middle ground where most of us live.

I’m not preparing for Armageddon. I am preparing for another Helene. I’m preparing for the probability of power failure when we get another winter storm.

While you shouldn’t prep out of fear, you should be aware of the inherent dangers of not being prepared. It’s not fun trying to cook dinner when you have no power to work your stove and no other way to heat food. A job loss can come out of nowhere and you don’t have rice and beans stored. Or you have no idea how to start and care for a garden, and you have no ability to buy food.

These are all situations that are probabilities, not just possibilities. Having a way to thrive during hard times can make or break you mentally or emotionally. So have the hard conversations now, not during an emergency.

goat kidding

Before we get too far into this, I have a great course on the basics of goat care. I call it Goat Crash Course: Goat 101. In this course, I explain things like types of shelter, types of feeds and hays, basic assessments and so much more! Check it out!

Buy Now

Preparing Where You Can

I said I wasn’t going to get into the weeds on how to prepare, because I’ve already covered it. But I wanted to touch on a couple things.

I know that a lot of us grew up in an age were it is normal to only purchase enough groceries to last until the next paycheck. Also, I know that some of us are not able to stockpile huge amounts of food. Financially, it can be really hard to get a good food storage system in place. But there are some things that you can do.

Instead of buying a couple cans of beans, purchase a bag of dried beans. Purchase a 20# bag of jasmine rice instead of the boxes of ready to eat rice. Then learn how to cook those things. Just buying a bag of dried black beans is about $2/# instead of 4 cans of beans saves you about $2. A 20# bag of jasmine rice is about $16 instead of 7 3# boxes of instant rice, and saves you about $26.

Another thing to consider is how you are going to get water. This could be filtering rain water, or a manual pump for your well. If you can figure out your food and water, everything else is pretty easy…. ish.

The Ultimate Homesteader’s Starter Bundle – Only $47!

Get the tools you need to stay organized, track profits, and manage your homestead with ease!

Includes:
✅ Schedule F Tracker – Simplify tax prep
✅ Profit Calculator – Track earnings
✅ Hay Calculator – Plan livestock feed
✅ Garden Journal – Digital & printable
✅ Herd Health Tracker – Monitor animal care
✅ Simple Budget – Manage finances
✅ Backyard Homestead eBook – Essential tips

$99 value – now just $47! Start your homesteading journey today!

Buy Now

Having Hard Conversations With Your Significant Other

I think this might actually be the hardest part of emergency preparedness and being prepared. It’s easy to convince ourselves that we need to pick up an extra bag of rice or flour at the store. Sometimes, it’s incredibly difficult to bring it home and explain to your spouse why you bought it. Now, I’m blessed beyond measure because Jared is like, ok whatever about a lot of things.

The biggest thing to remember is grace, kindness and patience when it comes to having these conversations, at least with your significant other. Because if they don’t live with you, they don’t matter. I’ll get to that nugget in a minute.

When you are having the conversations with your SO, you need to really look at where they are coming from. Are they anxious about this kind of thing? Because I get very anxious when talking about these types of situations. Not scared anxious, more of a there’s so much to do anxious.

Are they more of an optimist and struggle to see the merit in spending money on things that probably won’t happen? Maybe they get scared by the possibility and just avoid the conversation.

I can’t tell you how to have this conversation with them. You know them better than I do. But if you come to them with kindness, grace and patience, you will get a lot further.

Our herd health bundle helps you keep track of your herd’s health. Includes the goat assessment, herd check sheets AND Herd Health Tracker!

Buy Now

What To Do With The People That Don’t Matter

You may get a lot of push back from relatives or friends, or you may not. This is something that you get to choose to tell them. Obviously, if you are storing 100# of rice in the coat closet, they may get curious if they come over. But over all, and one of the hardest things I have learned as an adult, is that if they don’t live with me, they don’t matter.

And I’m sure they do matter to you. But if they aren’t spending their money on your food, medicine, shelter, or anything else, their opinions don’t matter.

And yes, it’s still hard not to worry about the reactions of others. Especially, if you are a recovering people pleaser. But at the end of the day, what matters most is you, your family, and your home. Everything else should be secondary… or not matter at all.

cropped-3.jpg

Are you looking for garden journal prompts, but aren’t interested in a weekly email? Check out our 365 Garden Journal Prompts! This is an amazing, all in one, yearly product that you only pay for once.

Buy Now!

Don’t Be Afraid Of Being Prepared

If the last 8 years has shown us anything, it’s that the world is one crazy place. We are all struggling with something. It could be food, health, finances, or something else. But there is a certain level of comfort in knowing that I have enough food to last us a year. And in that year, we won’t just be surviving. We won’t be stuck eating rice and beans to try and survive.

This level or resiliency was created with hard work, dedication and a lot of blood, sweat and tears. But you can absolutely do this too!

If you like the content I put out, feel free to buy us a coffee! It helps keep this site running, marketing and the goats in grain!

Buy me a coffee

If you like this post, feel free to share it and follow us below on our social media accounts!

  • Facebook
  • Pinterest
  • Instagram
  • YouTube
  • TikTok
  • Spotify
  • Threads

Filed Under: Animals, Emergency Preparation, Garden Tagged With: Canning, Chickens, cooking, emergency, Goats, meat chickens, prepared

JOIN TO OUR MAILING LIST!

Leave us your email to receive new posts and special offers for members only! Don't miss a thing!

Recent Posts

  • Fall Garden Guide
  • Top Mistakes With Goats
  • How To Bond With Your Goats

Master Planting List

January 11, 2025 by Leigh Leave a Comment

Over the last several years, I have tried to figure out the best way to help new gardeners, garden effectively. Sometimes it helps new gardeners, other times? Maybe not so much. So today, I am going to give you my master planting list for my family of 4 and livestock. I’m also going to give you what I would have done differently if I needed to start over with the knowledge that I have now.

cropped-3.jpg

Are you looking for garden journal prompts, but aren’t interested in a weekly email? Check out our 365 Garden Journal Prompts! This is an amazing, all in one, yearly product that you only pay for once.

Buy Now!

My Master Planting List

The biggest problem with new gardeners that I have learned is that people expect gardening to be easy and then get discouraged when they struggle. They think they have a black thumb and give up. Or, the exact opposite happens. They have a GREAT year, and are overconfident next year. But if you aren’t exactly sure where you fall because this year is your first garden, let me help you out.

In this blog post, I am going to give you my master planting list but also how to figure out exactly how much space you need, how many plants to start or purchase, and then finally, how to put it all together.

How Much Space

Realistically, you only need about 100 Sq Ft (10ft x10ft) of space per person for a fresh eating garden. If you are looking to put up food for winter, then you need about 200 Sq Ft (10×20). This is going to vary greatly based the space you have, what you are growing, and how much meat you consume.

But what you “should” have may not be what you actually have. So how can you increase your space? Container gardens are a great option. Especially if you are focusing on fresh eating. A 5 gallon bucket with good soil and drainage can easily grow a tomato plant and it only has about a 12 inch footprint. And with vertical support, a cucumber plant can easily trellis and give you a ton of food.

Another thing to consider is adding additional plants within a space. A good example of this is planting green beans with tomatoes. A tomato needs about 12-18 inches of space between tomato plants. But that doesn’t mean that those 12-18 inches needs to be empty. You can plant something else in between those tomatoes.

As you stretch your gardening muscle and learn what works and what doesn’t, you will find more space for more plants.

How Many Plants

This is the nitty gritty of what everyone really wants to know when it comes to new gardeners. How many plants do I need…? There are a ton of formulas to figure this out, and to be honest, they are all really useful. And completely overwhelming.

If you are starting from scratch and you don’t have a clue what is going on, that’s totally ok. My rule of thumb is a minimum of 1 plant per person. At the very least, this gets you started on a garden and gives you plenty of information for your next garden.

If you are a family of 4, this means 4 tomato plants. If well cared for, that tomato plant will yield you about 25 to 40# of tomatoes depending on variety. But this doesn’t work well for say corn which only gives 1 or 2 ears of corn per stalk.

You will have to do some research about what you eat, what you are comfortable preserving, your space, etc. Which is why I say that you have to work on your gardening skills.

Putting Your Garden Together

First, let’s say that you have a 25ftx 50ft space that you can convert into a garden and are a family of 4. Then let’s say that you are not super comfortable with pressure canning but you have plenty of freezer space. Here is what I would plant within my garden:

50 Tomato Plants- That is 1 row in my garden and will give me approximately 400# for fresh eating and preservation. I can water bath can tomato sauce, dice tomato, and salsa.

4 Cucumber Plants- If put on a fence, cattle panel or something to get it off the ground, it will take up 4 sq ft and yield approximately 100#, if well cared for, for fresh eating and livestock food. If picked small, you can pickle them for shelf stability.

4 Zucchini or Summer Squash Plants- This will take up approximately 8 sq ft and yield approximately 40# of squash if reasonably cared for. Summer squashes do not can well but if flash frozen does well in the freezer to be used in soups and stews. Excess can be given to livestock.

50 Corn- Plant in a square instead of a row to increase pollination. This will yield between 50-100 ears of corn. It can be eaten fresh OR decobbed and put in the freezer for later. Cobs, husks and silks can all be fed to livestock.

8 Ft (16 plants) Green Beans- If you really like green beans and you have room, add more. They only need about 6in between plants. Green beans are super easy to grow, are delicious and usually yield about 1/2# per plant, if well cared for. They also hold up well to being frozen. Unfortunately, you should pressure can green beans.

8 Ft (16 plants) Peas- Now, peas are a cool ish weather crop. So make sure that if you are planting them in the summer, they are in shade and get well watered. Shelling peas usually yield about 2# for 16 plants but this will vary on variety and care.

10 Pepper Plants- If you don’t like peppers, plant extra tomatoes. Peppers do not need or want a ton of water and usually do well in high heat, high sun areas. You will get about 200 hot peppers or about 70 bell or sweet peppers with 10 plants. Peppers do not can well unless they are in something like salsa or relish. But they do freeze or dehydrate extremely well.

10 Potato Plants- Potatoes are the unsung hero in a world that tells us starch and carbs are bad for us. Personally, I freaking love potatoes and could eat them every day. Regardless, potatoes yield about 10# per plant and can store in a cool dry place for months. If you get an indeterminate variety, that number goes up to about 15#. You can pretty much forget about your potatoes and are all but guaranteed to get something.

Tips From A Not So Master Gardener

  1. Start where you are and learn as you go.
  2. Don’t panic if you can’t do all organic, everything. Simply growing your own food is better than nothing.
  3. Gardening should be fun, not a horrible chore.
  4. Gardening is not intuitive, it is a skill and should be treated as such.
  5. WRITE IT DOWN! Trust me, you will not remember.
  6. Learn to save seeds, but don’t sweat it if you can’t.
  7. Start small and grow as you learn.
  8. Gardening is not easy.
  9. Mulch is your friend.
  10. Learn to grow your own soil!

If you like the content I put out, feel free to buy us a coffee! It helps keep this site running, marketing and the goats in grain!

Buy me a coffee

If you like this post, feel free to share it and follow us below on our social media accounts!

  • Facebook
  • Pinterest
  • Instagram
  • YouTube
  • TikTok
  • Spotify
  • Threads

Filed Under: Garden, Homestead Planning Tagged With: cooking, Garden, Homestead, livestock, Planning

JOIN TO OUR MAILING LIST!

Leave us your email to receive new posts and special offers for members only! Don't miss a thing!

Recent Posts

  • Fall Garden Guide
  • Top Mistakes With Goats
  • How To Bond With Your Goats

Master Garden List

January 7, 2025 by Leigh Leave a Comment

At the end of every year, I go through all of my gardening stuff and make sure that I have everything that I need for the next season. As I was doing that, I realized that a lot of new gardeners may not have a clue about what all they will need. Then they end up making several hardware store runs or having to wait for packages to arrive. I decided to make my master garden list for you (there’s a printable at the end) so that you can avoid those hassles and make this year the best garden year yet!

cropped-3.jpg

Are you looking for garden journal prompts, but aren’t interested in a weekly email? Check out our 365 Garden Journal Prompts! This is an amazing, all in one, yearly product that you only pay for once.

Buy Now!

Master Garden List

I have broken this down into a couple of different sections, that include; tools/ extras, soil/ amendments, and seeds/bulbs. Then I’m going give you my master planting list for my family of 4 and our livestock. My hope is that you have everything you need to have a great garden season that doesn’t included last minute trips to the hardware store or unplanned seed orders.

Master Garden List- Tools

There aren’t many tools that I use regularly, but I have multiples of the items I use all the time. I do not need a ton of tools because of the way I grow my veggies and the way that I handle my soil. Because I do not till, I don’t need a tiller. Things like that. But I have a ton of shovels because there are four of us and when we do big work in the garden, we are all working. So let’s get into my list:

Hoses- Every year, we either buy new hoses or have to repair our old hoses. Do yourself a sold and don’t waste your money on the heavy duty, mac daddy hoses. They aren’t worth it. We’ve bought just about every brand out there and all of them have been destroyed within about 2 years. That being said, we aren’t gentle with our hoses. If you are, then buy the good hoses.

Sprayers- Again, don’t waste your money on super expensive sprayers and hose nozzles. We are lucky to get a full season out of them. And again, if you are gentle with your stuff, buy the expensive ones. We aren’t. But there are some things that the nozzle needs to do, shower and jet. I want power when I need it and I want gentle power on baby plants.

Hand Tools- I have three hand shovels for planting, but when it comes to filling me seed start trays, I use an old coffee mug that the handle has been broken off of. It just works better for me. But get yourself some good hand shoves, weeders, etc. This “kit” from Amazon is a good place to start if you aren’t sure which tools you want and which ones you’ll actually use.

Extra Tools To Make Life Easier

Shears/ Blades- Now, I am snobby when it comes to my hand tools. I am a Fiskars girl through and through. I have found that they stand up to a beating. Even the blades stay sharp and I am not careful. These little pruners have been a lifesaver for my hands. You should have at least two smaller pruners, a large branch cutter, and then a smaller leaf pruner. Honestly, if you’re short on cash, get the smaller pruners and be done. Whatever brand you choose, make sure that they are always sharp and try to remember to bring them inside….

Hemp/Jute/ String- Lastly, you will need string. Now, I prefer a natural fiber like hemp or jute, but that is more expensive than nylon or other fibers. You will need string for tying up tomatoes, peas, etc, or training squash. I’ve used old hay bale twine to fix gates and hang cattle panel. Do what makes sense for you. String has endless uses so make sure you’ve got plenty.

Soil/ Amendments

If you are starting your garden from scratch, or you just need a really, REALLY good brand of soil, I buy from Fox Farm. Yes, it’s incredibly expensive. But you are getting what you pay for. This soil has amazing microbes already thriving in it. And if you have dirt, but it’s not great, this soil will jump start your dirt and turn it into soil.

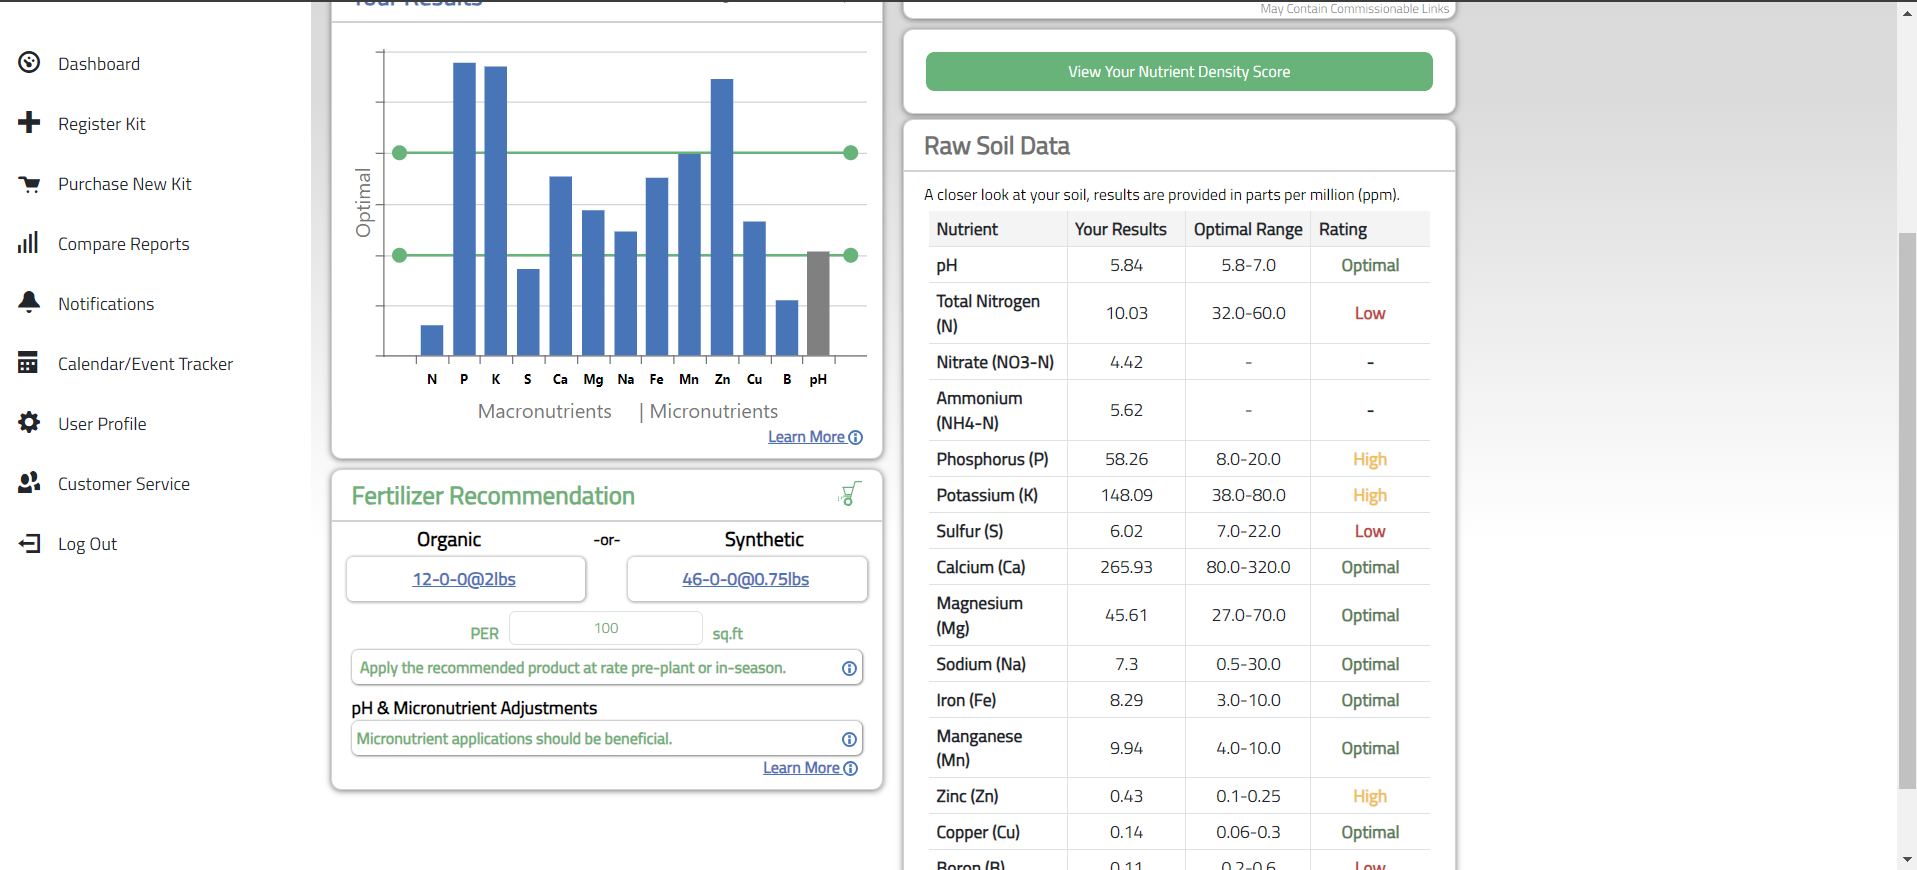
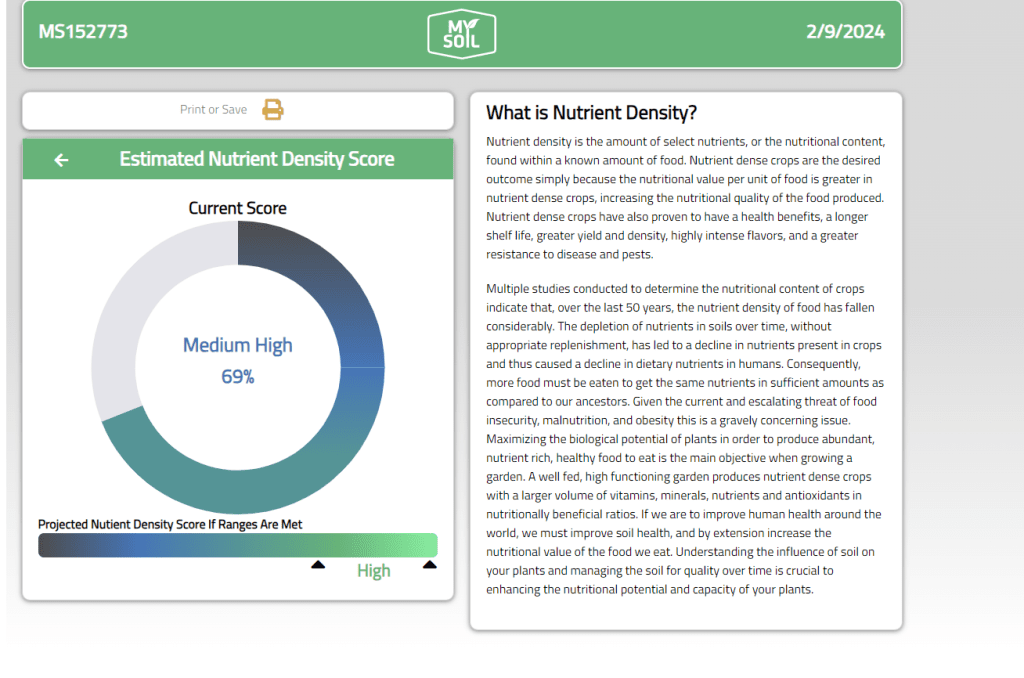
If you already have good soil, I recommend getting a soil test kit every year. I really like the My Soil test kits because it gives you suggestions for both organic AND conventional fertilizers based on your specific soil needs. They also tell you about your nutrient density and more. My Soil Test is who I will use every year.

I am incredibly picky about my soil and amendments but also incredibly lazy. I talked here about how I build my soil, so I don’t need a lot of soil amendments. In fact, I really only ever add goat bedding to fill the beds and that’s usually it.

BUT, if I am going to use any kind of amendments, it’s going to be OMRI listed and I need to be able to figure out where it came from. Things like fish emulsion, kelp, bone meal, etc are okay. And really, just doing the best you can here is the most important. Don’t get hung up on the details.

At the end of the day though, I know that I am not going to add any amendments to my soil. Not because the plants don’t need it, but because it’s just not something I’m thinking about. So again, do what you can.

Seeds/ Bulbs/ Tubers

I figure out my seed needs totally based on my seed horde and what grew well last year. This year (2025), we are focusing on putting up more food than we normally do. So we are focusing more on things like tomatoes for tomato sauce instead of cherry tomatoes for fresh eating and pickling cucumbers over slicers.

Typically, I bulk order my seeds from Botanical Interests, Eden Brothers, and Baker Creek Seed Company, with Botanical Interests being my favorite. My seed order is usually about $150, again depending on what I have left over from last year.

Every year, I order leeks, potatoes, sweet potatoes, and garlic. I haven’t successfully figured out how to start leeks yet but it’s something that I am continuing to work on. I also totally forget to set aside seed potatoes and garlic every year…. oops.

If you are looking to start your own seed horde and not sure where to start, I am working on my Master Planting List. But a good general rule of thumb is one or two packets of seeds for every type of plant that you know your family will eat. For example, if your family likes cucumbers, get one packet of slicers. But again, I get into the details of this in Master Planting List.

Master Garden List- Printable

If you would like to download my Master Garden List, sign up below and follow the prompts! Or if you are already subscribed to Steel Raven Farms, it is in the Member’s Only Library along with all my other downloads for you.

If you like the content I put out, feel free to buy us a coffee! It helps keep this site running, marketing and the goats in grain!

Buy me a coffee

If you like this post, feel free to share it and follow us below on our social media accounts!

  • Facebook
  • Pinterest
  • Instagram
  • YouTube
  • TikTok
  • Spotify
  • Threads

Filed Under: Garden, Homestead Planning Tagged With: flowers, Garden, Homestead, soil, soil testing, vegetables

JOIN TO OUR MAILING LIST!

Leave us your email to receive new posts and special offers for members only! Don't miss a thing!

Recent Posts

  • Fall Garden Guide
  • Top Mistakes With Goats
  • How To Bond With Your Goats

How To Build Raised Garden Beds

December 28, 2024 by Leigh Leave a Comment

While it’s definitely easier to just buy a raised garden bed, kits or other premade/ prefabricated beds, I do think that building them from scratch is a great way to go. I’ll explain why in a minute. The idea of using raised beds was, at first, a ridiculous idea to me. I’ve got great soil, why do I need a bed? But after our first garden flopped, maybe learning how to build raised garden beds is a better idea.

cropped-3.jpg

Are you looking for garden journal prompts, but aren’t interested in a weekly email? Check out our 365 Garden Journal Prompts! This is an amazing, all in one, yearly product that you only pay for once.

Buy Now!

What are raised garden beds?

Simply put, it is a structure that sits on the ground that you add soil, compost and other organic material to grow things. That’s it. But it is definitely more than that. You see, our soil in Georgia is usually red clay. But there’s a reason why Georgia is a huge agricultural state, we can grow just about anything in this soil. That also means that our weeds are super plants, too.

A raised bed is a great way to keep weeds from growing and stealing water and other nutrients from your plants.

Raised beds also help those with ailments or disabilities that can’t be on their knees in a garden.

Also raised beds help create a designated spot for fruits or vegetables that you want to save seeds from.

And they look prettier.

Susan over at Learning and Yearning as a great guide to raised beds. I took a lot of inspiration from her and Kathi over at Oakhill Homestead when I was brainstorming, designing and building our raised garden beds.

Are you getting overwhelmed in the garden? Stressed? Or just not enjoying the garden like you used to? Check out our garden prompts! We send out weekly emails that get you back in the garden and out of your head! Turn the garden back into a place of love and joy instead of frustration and headache!

Subscribe Now!

To Buy Or Build A Raised Bed

Well, that’s the question, isn’t it? There are somethings you need to consider when it comes to building a raised bed. Things like your skill level, cost of materials, and customization. If you are not handy with tools or don’t have any skill, building a raised bed may not be a good option. The cost of lumber is extremely high in some parts of the country and that makes building one out of reach for some people. If you are looking for certain dimensions, building one may be a better option.

When we were looking at raised beds, I wanted to conceal the area in front of our front porch. The gutters get overrun when it rains and creates a lot of issues with run off.

Our dogs like to dig and wreak havoc in the front yard. The goats like to hide under the porch and the chickens like to lay their eggs under there too.

So I wanted to help hide some of this as well as keep creatures out. In front of the front porch is a 12ft section on each side of the stairs. And one side has a walk way to the porch, and the other side is wide open. The raised beds/ planters had to be tall enough to keep goats from walking right up to it. Trying to find something that was prefabricated was going to either be insanely expensive or not the right size.

The Ultimate Homesteader’s Starter Bundle – Only $47!

Get the tools you need to stay organized, track profits, and manage your homestead with ease!

Includes:
✅ Schedule F Tracker – Simplify tax prep
✅ Profit Calculator – Track earnings
✅ Hay Calculator – Plan livestock feed
✅ Garden Journal – Digital & printable
✅ Herd Health Tracker – Monitor animal care
✅ Simple Budget – Manage finances
✅ Backyard Homestead eBook – Essential tips

$99 value – now just $47! Start your homesteading journey today!

Buy Now

It Was Better For Us To Build Raised Garden Beds

We found a couple of prefab’d raised beds like this one, and this one. But those are really expensive and still not the right fit for what we needed. So Jared and I brainstormed what we could do. I told him what I wanted: 2.5-3 feet wide, 12 feet long, and about 24 inches tall. He got to work designing and sketching and handed me a material list.

I went to Home Depot and got 45 dog ear pickets and 6 3x4x 8ft posts and he went to work. We also got some lattice to discourage the critters from going under the deck on the sides that would be open until we could build more beds.

cropped-3.jpg

Are you looking for garden journal prompts, but aren’t interested in a weekly email? Check out our 365 Garden Journal Prompts! This is an amazing, all in one, yearly product that you only pay for once.

Buy Now!

How To Build Raised Garden Beds

It was pretty easy for Jared to build the beds and he got them both done in a day.

He stared with cutting all of the lumber to size.

Cut List

Pickets- cut off the dog ear. Then find your half way point (should be 5′ 5″) and cut there. If you are doing a custom size, cut to that number

3×4- Cut in half

Take your extra pickets (we bought 5 extra) and cut those to 18 inches

Instructions

On a flat and level surface (unless you want your beds to follow the contour of the ground), screw each picket onto a 3×4 timber.

Do this with the front and back of your bed.

Line them up so that you can attach your side picket. Do the same for the other side. You should have a rectangle.

Then start attaching pickets all the way up until you have your desired height. Ours was four pickets high.

Then go in and screw those 18in pickets half way between the 3x4s to help stabilize the pickets to help keep them from bowing when the bed is filled with soil.

Prepping Your Garden Beds

To start, I highly recommend using a liner. Katie over at The Homesteading RD has a great article all about different liners and why you should use them. Now, we didn’t use the cedar like she suggested for two reasons; one, cedar is still pretty expensive and two, because I didn’t to go BACK out to the store. Instead, I used our woven ground cloth.

If you are going to use any kind of plastic or cloth for your beds, I suggest stapling it to the sides of your pickets. But make sure you use plenty of slack in your liner, the weight of the soil, compost and other filler will tear it.

If you are interested in learning more about my favorite garden planner. I highly recommend Seedtime! This planner has been instrumental in helping me plan out my gardens with WAY more efficiency than I could ever expect! It has also reduced overwhelm, stress, and calmed my ADD/ADHD!

More Info!

Filler

Since our beds were 12 feet long, 2.5 feet wide and 2 feet tall, we needed a TON of filler. Now, we could have gone and gotten a bunch of soil, but that’s expensive AND the soil will get compacted over time. That’s not what we want.

About 2 months ago, Jared went through the property and cut down a bunch of mountain laurel. If you don’t know, mountain laurel is extremely toxic to pretty much everything. But our goats didn’t get that memo and without fail someone always eats it and gets sick.

So I had this giant pile of laurel that needed to go. After a ton of research, including calling the Arbor Foundation, I found out that laurel doesn’t leach toxins as it decomposes. Score.

I filled the beds with as much laurel as possible. We cut down big branches and stuffed them in the bed, being careful not to puncture the liner. It took about half the pile but my beds were about 80% full.

I talk here about ways to fill your garden beds for cheap.

Compost

Next, Chase filled the beds with compost. He’s in that wonderful teenage stage where he likes to pick things up and put them down. Repeatedly. But hey, it works for me. He did a fantastic job and the beds were about 90% full….. Or so I thought.

I ordered my soil, peat moss and the rest of the things I needed for finishing off the rest of the area. Including Halloween Decorations.

I wish I would have realized before buying all of this that it was heavy. I knew it was heavy, but I guess I didn’t realize HOW heavy it would be.

Driving home, on curvy mountain roads was a test of not only my driving skills but also my patience. But we all made it home in one piece and nothing fell off the back of the truck. Score.

cropped-3.jpg

Are you looking for garden journal prompts, but aren’t interested in a weekly email? Check out our 365 Garden Journal Prompts! This is an amazing, all in one, yearly product that you only pay for once.

Buy Now!

Soil

What you fill your beds with is totally up to you. As I said above, I would highly recommend using some sort of filler that is decomposable and a liner. When it comes to soil, we used regular top soil since we were adding peat moss and already had compost and the laurel in the beds. Also, since we aren’t 100% sure what we will be planting in these beds long term, I didn’t want to put in something that was going to be highly acidic or alkalotic.

Plants

What does well in raised beds? Literally everything. I want these beds to house our garlic, onion, and carrots. I may even put our regular potatoes and sweet potatoes in there. Again, I’m not entirely sure. But for now, I threw in some great fall plants and we’ll see what they can do.

Our Take Away

We figured out that raised beds are a great way to go to help conceal the disaster of the front porch.

It takes a TON of soil and other filler to fill these beds so take that into consideration when building these things. Not just height but width and length too.

Logo 468x60

Run hardware cloth around the top if you want to keep chickens and goats out.

Do not compact the soil in these beds! As you add soil, spread it around so it can fill holes in your filler but don’t cram it in there.

The beds themselves only cost about $60 each to build but ended up running us about $100 each to fill. Keep that in mind when you start this project.

If you like the content I put out, feel free to buy us a coffee! It helps keep this site running, marketing and the goats in grain!

Buy me a coffee

If you like this post, feel free to share it and follow us below on our social media accounts!

  • Facebook
  • Pinterest
  • Instagram
  • YouTube
  • TikTok
  • Spotify
  • Threads

Filed Under: Garden, How To's, Projects Tagged With: Garden, Goats, Homestead

JOIN TO OUR MAILING LIST!

Leave us your email to receive new posts and special offers for members only! Don't miss a thing!

Recent Posts

  • Fall Garden Guide
  • Top Mistakes With Goats
  • How To Bond With Your Goats

Homestead Infrastructure

November 2, 2024 by Leigh Leave a Comment

Over the last several weeks, Jared and I have been going through our budget and project list for 2023. We decided that this year, we were really going to focus on the infrastructure of the homestead. I knew we couldn’t be the only one, so I wanted to put together a post on homestead infrastructure and what it means.

The Ultimate Homesteader’s Starter Bundle – Only $47!

Get the tools you need to stay organized, track profits, and manage your homestead with ease!

Includes:
✅ Schedule F Tracker – Simplify tax prep
✅ Profit Calculator – Track earnings
✅ Hay Calculator – Plan livestock feed
✅ Garden Journal – Digital & printable
✅ Herd Health Tracker – Monitor animal care
✅ Simple Budget – Manage finances
✅ Backyard Homestead eBook – Essential tips

$99 value – now just $47! Start your homesteading journey today!

Buy Now

Every homestead is different, so every infrastructure plan is going to be different. But I wanted to go through our list of homestead infrastructure with you so that you can get some ideas on what you want to do with your own homestead infrastructure and why. If you have your own ideas, please list them in the comments below!

What Is Homestead Infrastructure

The first thing we need to do is define infrastructure: “the basic physical and organizational structures and facilities (e.g. buildings, roads, power supplies) needed for the operation of a society or enterprise.”(Dictonary.com).

But what does that mean for a homestead? We aren’t necessarily operating as a society, community or enterprise. We are also not necessarily building roads, grids, or buildings on a large scale. But that doesn’t mean that the same idea doesn’t work.

When I talk about homestead infrastructure, I’m talking about barns, sheds, and other outbuildings. I’m also talking about fencing, pastures and gardens. It comes inside the house in the form of canning, storage, freezers, and energy efficiency. As your coming up with ideas on what your infrastructure will be, think about all the things in your local community.

Grocery stores= garden, fruit trees, canning

Milk, cheese, butter, eggs and meat= cows, pigs, goats, chickens

Roads= Trails or walk ways to barns, livestock pens, gardens, etc

Grids like water, electric, gas= wells, solar, firewood

Schools, community center, grocery store= home

By setting up your own infrastructure, you are going to prepare yourself, family and homestead for future success. Also remember, if you can’t do something like build a barn or put in an acre garden, that’s okay too. Just work on the things you can do.

Logo 468x60

Why Infrastructure Is Important

When you are setting up your homestead, it is incredibly easy to get overwhelmed with the things you want to do or think you should do. I wrote a couple blog posts about setting goals, mistakes we’ve made, and things we have learned, but the biggest take away is that you need to know what you want, and how to get there.

Infrastructure on your homestead is so easily overlooked because you think you’re doing it with every project you do. But if you really stop and think about it, are you actually setting up something that is going to last for years to come, or are you simply reacting to the things you think you should be doing?

For example:

We bought goats on an impulse. Then as we bought more goats and as winter was barreling down on us, we decided to build a goat barn. They say hindsight is 20/20, and they are right. That first barn kind of works but is also kind of a disaster. Does it keep them dry? Sorta. Does it keep them warm? Yes. Will it keep predators out? Uh, maybe?

The barn is built right in a rain run off area. When we built it, we had no idea. But now it’s becoming an issue with all the summer rains we have gotten. The entire thing has about 2 inches of muck building up the sides, there are leaks in the roof and the “ventilation” we thought was a great idea? Not so much.

That being said, the infrastructure we put in? Isn’t working. That’s okay-ish. It’s a learning experience. But it’s also expensive.

Had we planned our infrastructure better it would save us money, time and a ton of frustration. That’s why it’s so important. But the learning part? That’s important, too.

Setting Up Your Homestead Infrastructure

For the planners, this is the best step. If you’re a do-er, find yourself a planner. I say that because I am a planner and I have about a million lists floating around for different projects and plans. In fact, I have a “hard copy” of my Pinterest in a 3″ binder. Jared is a do-er. He has zero desire to plan and that is just fine.

Our list of infrastructure is five pages typed and while yours doesn’t have to be that long, it does need to be that thorough. What does it need to have on it? Check out the example below:

Project: Goat Barn

Dimensions or Specs: Current: 8×13, Increase to 12×16. Current “milking area” will turn into a weaning pen and new milk parlor and kidding space created. Door from inner barn to milking area to avoid having to haul goats outside to be milked. Inner barn area will be increase to 8×10 minimum. Storage area in kidding/milking area for milking supplies. Bedding racks to get them off the ground. Gutters to IBC’s to help with water.

Resources On Hand: current barn will be torn apart, bleached/cleaned and painted. Materials that are reusable will be reused.

Resources Needed: t1-11, studs, paint, new hardware, more roofing, plywood or similar for bedding racks, screws, concrete pavers to get wood off the ground and possibly gravel in barn and in dry lot that will be created around the barn

Plan of Action: Jared and I will build a couple new goat shacks so the girls can have a place to go for the days that their barn will be moved. Barn will be torn down, cleaned and painted. New area for barn will be cleared and leveled. Water run off trenches will be “installed” to divert water from barn. Pavers placed and walls built. Interior built and painted. Pavers for milking area. Gravel, if decided, will go into inner barn, weaning area and dry lot.

Estimated cost: $1000

Homestead Infrastructure Ideas

Below are just a few of the things on our infrastructure list and each one has it’s own Project Planning Worksheet in my binder

  • IBC’s for firewood and water
  • Fencing for new livestock
  • Meat animals
  • Fence in Upper Garden
  • Goat Barn
  • Firewood/wood lot
  • Energy Efficiency
  • Yard hydrants
  • Solar panels
  • Generator
  • Hay Barn
  • Outdoor kitchen/ butchering area
  • Erosion control
  • Food Storage Room
  • Well Bladder
  • Attic Gables

Before you get overwhelmed, remember, this is MY entire 2023 focus. Paralysis by analysis is a thing and you don’t need to get overwhelmed. Make a list and see what you can do. See what it’s going to take for you to do those things. Then get to work.

If you like the content I put out, feel free to buy us a coffee! It helps keep this site running, marketing and the goats in grain!

Buy me a coffee

If you like this post, feel free to share it and follow us below on our social media accounts!

  • Facebook
  • Pinterest
  • Instagram
  • YouTube
  • TikTok
  • Spotify
  • Threads

Filed Under: Animals, Canning, Chickens, Garden, Goats, How To's, Our Homestead, Pigs

JOIN TO OUR MAILING LIST!

Leave us your email to receive new posts and special offers for members only! Don't miss a thing!

Recent Posts

  • Fall Garden Guide
  • Top Mistakes With Goats
  • How To Bond With Your Goats

Benefits Of Raised Beds

September 7, 2024 by Leigh Leave a Comment

Oh, I love my raised beds. Let me count the ways! While it’s not a total love affair, it’s pretty close. In my 15 years of gardening, I’ve head a lot of different types of gardens. Container gardens when we lived in an apartment. In ground when we moved to the second military house. Raised beds in a couple different houses. And finally, a ton of raised beds in our forever home. But don’t get it wrong, I still have in ground spaces, but I greatly prefer my raised beds. The benefits of raised beds cannot be overlooked and I’m going to tell you al about them.

cropped-3.jpg

Are you looking for garden journal prompts, but aren’t interested in a weekly email? Check out our 365 Garden Journal Prompts! This is an amazing, all in one, yearly product that you only pay for once.

Buy Now!

Benefits Of Raised Beds

We all know the cons of raised beds. Mostly, that they can be really expensive to fill. I talked about raised beds vs row gardens here if you are interested in that. I also listed ways to fill raised beds for cheap here. But today, I want to talk about all the benefits of raised beds and how I converted my “row gardens are the only way to garden” hubbins into loving raised beds too.

Are you getting overwhelmed in the garden? Stressed? Or just not enjoying the garden like you used to? Check out our garden prompts! We send out weekly emails that get you back in the garden and out of your head! Turn the garden back into a place of love and joy instead of frustration and headache!

Subscribe Now!

Weeds

Depending on how you filled your raised bed, you will have little to no weeds. Now, we live in Georgia and have monster weeds. So we will always have some form of weeds to contend with, but for the most part, we don’t have to weed as much as with regular gardens.

A huge part of that is the fact that we just add mulch whenever we find a bunch of weeds. This helps the build the soil but also squash those weeds!

Depending on the height of your beds, and if you laid down some sort of barrier between your bed and the ground, you may never have to deal with weeds. On some of our beds, we laid down woven ground cover like this, to help suppress the weeds. While it works, I don’t love having a barrier between the ground and the bed. As weird as it sounds, I’d rather have the weeds than plastics in my soil. But to each their own. You do what works best for you!

If you are interested in learning more about my favorite garden planner. I highly recommend Seedtime! This planner has been instrumental in helping me plan out my gardens with WAY more efficiency than I could ever expect! It has also reduced overwhelm, stress, and calmed my ADD/ADHD!

More Info!

Height

Having some height to the garden has been a back saver! I’ve got a “bad” back. I’ve got scoliosis and for the most part struggle with sitting, standing, or walking for long periods. So being on my hands and knees weeding the garden or even harvesting is really difficult for me.

I’ve got 2 different height beds, 1 foot in the kitchen garden and 2 foot in the big garden. I haven’t decided which one I like better. The shorter beds make it a lot easier to reach into the beds and I can kneel on the edges. But the 2 foot beds means that I can lean my thighs on the beds.

Either way, I’m not on my hands and knees trying to get into the beds.

Plus, it is much easier to find issues and harvest veggies when I can actually see them!

goat kidding

Before we get too far into this, I have a great course on the basics of goat care. I call it Goat Crash Course: Goat 101. In this course, I explain things like types of shelter, types of feeds and hays, basic assessments and so much more! Check it out!

Buy Now

Containment

Another thing that I absolutely love about my raised beds is containment! Every spring, we have torrential downpours. To the point were it’s difficult to get off our gravel road. The first few garden seasons, we had an in ground (or row garden) and when I tell you that we lost a TON of soil, I’m not joking. It didn’t matter what we did, all the work we did that previous year to build the soil was toast.

Because we have raised beds, our soil stays put in the bed.

Another reason why raised beds are great for containment is because the plants, mostly, stay put. Yes, come August, the entire garden is overflowing it’s space. But for the most part, the plants stay within their designated areas. This makes mowing that area much easier.

Lastly, when we are buttoning up our gardens for the winter, we can chop and drop straight onto our beds without worrying as much about the wind, rain or animals spreading all that organic matter around. The bed keeps everything in the bed.

Are you getting overwhelmed in the garden? Stressed? Or just not enjoying the garden like you used to? Check out our garden prompts! We send out weekly emails that get you back in the garden and out of your head! Turn the garden back into a place of love and joy instead of frustration and headache!

Subscribe Now!

Animals

This one is a multifaceted benefit. We allow our animals to go into the gardens in between seasons. For example; August is an in between month. Most of our garden is toast due to high heat and low rain. So we allow our chickens to go into the beds and eat whatever we didn’t get to harvest.

But raised beds also create a barrier between the animals and our food. We can actually see the animals getting into the beds, so that helps to keep them out of it when we don’t want them in the beds.

Also, we have systems that allow us to place chickens into specific beds. We’ve got a couple tractors that we can put right over the top of our beds. It allows the chickens to be kept in that bed and “force” them to dig through it and eat all those bugs, eggs and larvae. This has single handedly reduced our hornworm, army worm, and Japanese beetle populations.

cropped-3.jpg

Are you looking for garden journal prompts, but aren’t interested in a weekly email? Check out our 365 Garden Journal Prompts! This is an amazing, all in one, yearly product that you only pay for once.

Buy Now!

Water

I left water for last because it’s going to take several minutes cover all the perks and benefits of raised beds. In fact, I could probably write an entire blog post about the benefits of raised beds and water conservation. But I’ll behave myself and just give you the “quick” answer.

This past summer, we had almost 2 months of zero rain. Like we didn’t even have dew in the mornings, zero rain. My plants had very little issues in regards to water loss. Sure, we had some scorching from direct sun, because full sun in south is totally different than full sun in other parts of the country. But it wasn’t until about week 6 that we needed to start watering our gardens!

The reason is because we have raised beds.

We dug down about halfway (about a foot for the big beds and about 8inches for the smaller beds) down the beds and found that the dirt was still damp and cool. Most of these beds didn’t even have mulch on top of the soil!

If you are interested in learning more about my favorite garden planner. I highly recommend Seedtime! This planner has been instrumental in helping me plan out my gardens with WAY more efficiency than I could ever expect! It has also reduced overwhelm, stress, and calmed my ADD/ADHD!

More Info!

The water retention of raised beds can’t be overlooked.

Two years ago, when I asked Jared to build me my kitchen garden raised beds, he was wholly and completely against the idea of raised beds. In fact, I had to incentivize him to build my kitchen garden beds. But after he saw the soil go from crappy top soil and goat bedding to rich, dark, light and fluffy soil? He was more okay with building me the raised beds in the big garden.

He absolutely disagreed. He didn’t think it was necessary. It was a waste of money and time….

Until we had a 2 month drought. All his buddies that had in ground gardens were telling him that their gardens were toast. Ours were still going strong. His buddies gardens were all drying out and the soil cracking. Ours? Still damp and cool.

Sure, we had to water about 6 weeks into the drought, but it was only the hottest beds that are in direct sun. Everything else was still going great. Once we started getting rain, our beds didn’t flood out like his buddies in ground gardens. Our beds retained all the water they got.

The Ultimate Homesteader’s Starter Bundle – Only $47!

Get the tools you need to stay organized, track profits, and manage your homestead with ease!

Includes:
✅ Schedule F Tracker – Simplify tax prep
✅ Profit Calculator – Track earnings
✅ Hay Calculator – Plan livestock feed
✅ Garden Journal – Digital & printable
✅ Herd Health Tracker – Monitor animal care
✅ Simple Budget – Manage finances
✅ Backyard Homestead eBook – Essential tips

$99 value – now just $47! Start your homesteading journey today!

Buy Now

Benefits of Raised Beds

So while there is a TON of expense that goes into raised beds, for us it has been worth it. We had our best garden yet due to these raised beds. Yes, each bed costs about $500 between materials, labor and soil. But that is a one time expense, at least until the bed needs to be replaced. It retains water to the point where I don’t have to worry about watering the garden in peak summer? Sold.

If you like the content I put out, feel free to buy us a coffee! It helps keep this site running, marketing and the goats in grain!

Buy me a coffee

If you like this post, feel free to share it and follow us below on our social media accounts!

  • Facebook
  • Pinterest
  • Instagram
  • YouTube
  • TikTok
  • Spotify
  • Threads

Filed Under: Garden

JOIN TO OUR MAILING LIST!

Leave us your email to receive new posts and special offers for members only! Don't miss a thing!

Recent Posts

  • Fall Garden Guide
  • Top Mistakes With Goats
  • How To Bond With Your Goats

When To Prepare Your Gardens

September 3, 2024 by Leigh Leave a Comment

As we head into fall garden season, I got to thinking about all the things I needed to do before I plant my first fall garden seed. As I was chopping and dropping spent plants, I realized that most gardening content is geared towards planting, but there wasn’t much about when or how to prepare your gardens. So here is what we do to prepare our gardens for planting as well as how to prepare them for winter.

cropped-3.jpg

Are you looking for garden journal prompts, but aren’t interested in a weekly email? Check out our 365 Garden Journal Prompts! This is an amazing, all in one, yearly product that you only pay for once.

Buy Now!

When To Prepare Your Gardens

There is no perfect time to prepare your gardens for planting, mainly because you will be preparing your gardens several times throughout the year. Sometimes, I don’t use a bed for a season. Other times, it’s a quick dump of goat bedding in a bed and move along with my plans. And sometimes, I just plant the bed without doing barely any prep work. But I wanted to talk to you about how I usually prepare my garden beds for planting or putting them to bed for winter. I also wanted to talk to you about how I START my beds just in case you are brand new to gardening and don’t know where to start.

The Ultimate Homesteader’s Starter Bundle – Only $47!

Get the tools you need to stay organized, track profits, and manage your homestead with ease!

Includes:
✅ Schedule F Tracker – Simplify tax prep
✅ Profit Calculator – Track earnings
✅ Hay Calculator – Plan livestock feed
✅ Garden Journal – Digital & printable
✅ Herd Health Tracker – Monitor animal care
✅ Simple Budget – Manage finances
✅ Backyard Homestead eBook – Essential tips

$99 value – now just $47! Start your homesteading journey today!

Buy Now

What Does Preparing Mean

Let’s talk first about what preparing your garden means. For me, prepping beds could range from filling with soil to adding organic matter or even just doing a chop and drop. But prepping beds always starts with an idea of what is going to happen with that bed within the current or next several seasons.

Having a plan for what that bed will look like in the coming season will tell you how you should prepare it. To give you some examples, I have a couple beds that I am going to allow to overwinter with nothing in them. I will throw a bunch of leaves over the top of the bed and call it good. If I am planning on using that bed, I will clean out the goat barn and add all that amazing goat bedding as organic matter AND fertilizer. It really depends on what I am doing with that bed.

But I have a plan, even if it’s just a loose guess of what I want to do with the bed.

cropped-3.jpg

Are you looking for garden journal prompts, but aren’t interested in a weekly email? Check out our 365 Garden Journal Prompts! This is an amazing, all in one, yearly product that you only pay for once.

Buy Now!

Preparing Your Gardens: Brand New Gardens

When you are starting a brand new space, you may have some questions about how to get started. This is really going to depend on if you are building raised beds or row gardens. Because I prefer raised beds, I don’t do much before I start planting except building and filling beds.

This year, we installed 12 4ft x 20ft raised beds in our big garden. It was a HUGE undertaking. But one of the things that we did was loaded the bottoms of each bed with logs, branches, leaves, etc. The reason we did this was several parts. First, I can’t afford to fill each bed with 6 cubic yards of soil (that’s about 215 bags of soil). Second, by loading the bottom half of the bed with brown matter (tree parts), it gives the organisms in the soil something to eat. Third, and possibly most important, by loading the bottom with tree parts, it reduces weeds!

However, because I am not going to use my raised beds for things like corn, potatoes, etc. I still need a place to plant those things. For these spaces, I will pick a spot, dump a ton of goat bedding on it and then till it under. While I don’t like tilling the soil, I live in Georgia where our soil is clay. So doing a no till isn’t ideal, at least at first.

After a season or two, I don’t need to till to break up the soil anymore. But it can be tricky to figure out when you’ve reached the point of not needing to till anymore. The other thing that I will do to keep weeds down in the off season is either plant cover crops or tarping. This is going to look different for everyone, but tarping allows you to kill weeds by blocking out all light to the soil. I use these from Bootstrap Farmer. You can plant cover crops and then tarp them about 2 months before needing to use that space. That’s usually enough time to kill the plant and start the composting cycle.

The Ultimate Homesteader’s Starter Bundle – Only $47!

Get the tools you need to stay organized, track profits, and manage your homestead with ease!

Includes:
✅ Schedule F Tracker – Simplify tax prep
✅ Profit Calculator – Track earnings
✅ Hay Calculator – Plan livestock feed
✅ Garden Journal – Digital & printable
✅ Herd Health Tracker – Monitor animal care
✅ Simple Budget – Manage finances
✅ Backyard Homestead eBook – Essential tips

$99 value – now just $47! Start your homesteading journey today!

Buy Now

Preparing Your Gardens: Established Space

Again, this is going to look different for various reasons. If you are doing row gardens, raised beds, planning to do a fall garden or just summer gardens, it will all require different things to prepare them. To keep this simple, I’m going to give you an overview.

When I am preparing raised beds for the next season (spring, summer, or fall), I will usually chop down whatever was growing and either give it to the chickens or goats or dump it into a bed that needs to be filled. Then dump a healthy amount of used goat bedding in the bed, water it, then in a day or so, plant the next round of vegetables.

goat kidding

Before we get too far into this, I have a great course on the basics of goat care. I call it Goat Crash Course: Goat 101. In this course, I explain things like types of shelter, types of feeds and hays, basic assessments and so much more! Check it out!

Buy Now

If the bed isn’t going to be used that season, I will chop and drop whatever was growing. Chop and drop is exactly what it sounds like. Cut the plant at soil level and drop it in the bed. That’s it. Sometimes, I will add a healthy layer of mulch, leaves or other organic matter that will break down during that bed’s off season. This feeds the organisms in the soil and allows the soil to replenish itself.

If I am working on an area that is in ground and not being used for the following season, I will usually hit it with the weed eater. Then I will either use cover crops or tarp it, most of the time both depending on the timing. But if I plan on using that area for something like sugar beets in the fall or corn in the summer, and the soil is not yet light and fluffy, I will dump used goat bedding on it and then till it under. If the soil is light and fluffy, I will cover it with a tarp until the weeds are dead (again about 2 months), then I will drop seeds and cover with compost or goat bedding.

If you are interested in learning more about my favorite garden planner. I highly recommend Seedtime! This planner has been instrumental in helping me plan out my gardens with WAY more efficiency than I could ever expect! It has also reduced overwhelm, stress, and calmed my ADD/ADHD!

More Info!

Overwintering Your Gardens

When your seasons are done, there are several things to keep in mind. First, you need to cover the soil. This could look like dropping a ton of leaves or mulch on the beds. It could look like cover crops. You just need something to cover the soil to prevent erosion, water loss, and weeds. You’ll also want something that will give back to your soil. I use this cover crop from True Leaf Market.

When we are done with our gardens, sometimes we will leave the plants in the ground. Yes, I have pulled out last years tomatoes out in February. For us, it’s not a big deal.

Also, if you plan on starting your own seeds, which I highly recommend, find your healthiest soil and pull several buckets of soil out of it. I use these totes from Home Depot. This allows me to use my own very healthy soil instead of having to purchase bagged soil.

Lastly, if you haven’t already, go here and grab a soil tester. I usually grab two, one for our kitchen garden and another for our big garden. This tells me how my soil is doing and what I need to add for the following year. But I’m going to be really honest with you, I didn’t add anything to the kitchen garden. The only thing I did, was what I do every year….add more goat bedding.

The two pictures below are from our 2024 test in the kitchen garden, test was taken in January of 2024. Not too shabby considering this is the first year of those garden beds and we only used cheap top soil from the gravel place down the road, used goat bedding and mulch from the local tree company.

Reoccurring Themes

If you have made it this far, you will notice that there is a reoccurring theme to my planting style. I have found over the years that I have a TON of goat bedding that needs a place to live. Especially at the end of winter. We use the deep litter method for our goats. This means that by the end of winter, I have about 30 bags worth of pine shavings, 4 months worth of poop and urine, that have been composting down in the barn. This is free organic matter, fertilizer and mulch!

Another theme that you have probably noticed is cover crops and tarping. Letting a garden plot go fallow is one of the worst things you can do to the soil. Fallow is basically ripping plants out of the soil and then not doing anything with it. The reason this is so bad is because your soil is going to run away with the water. All that hard work you did to get your soil fluffy, light and workable without having to till it, is gone. You’ve got to give the soil something to grab on to, like plants. This is going to help water retention, reduce loss of top soil, and keep the micro organisms in the soil happy. If your soil is happy, your plants will be very happy.

Lastly, I absolutely love my raised beds. It is the ultimate no till garden and I don’t have to worry about the soil, plants, or anything else going outside those beds. It’s contained and I love it. There are so many benefits to raised beds that I could go on and on… I even made a post about it! But don’t panic if you can’t do raised beds! I’ve said it a million times and I’ll say it a million more. A home garden is the best garden. It doesn’t matter how you grow plants, as long as you are growing plants!

If you like the content I put out, feel free to buy us a coffee! It helps keep this site running, marketing and the goats in grain!

Buy me a coffee

If you like this post, feel free to share it and follow us below on our social media accounts!
  • Facebook
  • Pinterest
  • Instagram
  • YouTube
  • TikTok
  • Spotify
  • Threads

Filed Under: Garden

JOIN TO OUR MAILING LIST!

Leave us your email to receive new posts and special offers for members only! Don't miss a thing!

Recent Posts

  • Fall Garden Guide
  • Top Mistakes With Goats
  • How To Bond With Your Goats

When To Plant A Garden

August 27, 2024 by Leigh Leave a Comment

Have you ever wondered when to plant a garden? If you live and breathe based on your zones, you could also be in for a world of hurt. But there are a lot of nuances to planting a garden that may make you freeze up and think, I can’t start a garden right now. But you CAN start a garden right now, you just need some insights to do it “right”. So when do you plant a garden? Let’s talk about it.

If you are interested in learning more about my favorite garden planner. I highly recommend Seedtime! This planner has been instrumental in helping me plan out my gardens with WAY more efficiency than I could ever expect! It has also reduced overwhelm, stress, and calmed my ADD/ADHD!

More Info!

When To Plant A Garden

To start with there are several different zones, frost dates, and ole timers that all say something different. But how do you know which is right for you? If you are new to gardening and don’t really have any experience or are just new to your area and aren’t sure about your specific growing climate, I suggest using your frost dates. I’m going to walk you through my entire system and how and when I actually plant my spring, summer and fall gardens.

Are you getting overwhelmed in the garden? Stressed? Or just not enjoying the garden like you used to? Check out our garden prompts! We send out weekly emails that get you back in the garden and out of your head! Turn the garden back into a place of love and joy instead of frustration and headache!

Subscribe Now!

Frost Dates

First thing first, you need to look up your frost dates. This is as simple as Googling “What are the frost dates for X city.” PS: X city is your city. Google may not be able to give you an answer for your specific zip code, so you may end up having to figure out your next closest city and use those frost dates. My first frost date is October 31st and my last frost is April 15th.

Next, grab a pocket calendar from your local dollar store or order one like this off Amazon. Put your dates in the calendar. You can use whatever calendar you have but it does need to be something that you are going to keep track of. We don’t want to put this much work into a planner to never touch it again….. Guilty.

Finally, you are going to count back from your first frost to your last frost. Google makes this really easy. Simply type “How many days from X date to X date.” Google will spit out the answer. You can also search for a week count that tells you how many weeks from this date to that date. I like to use days so that I can figure out how many days the plant needs vs how many day the plant will get.

cropped-3.jpg

Are you looking for garden journal prompts, but aren’t interested in a weekly email? Check out our 365 Garden Journal Prompts! This is an amazing, all in one, yearly product that you only pay for once.

Buy Now!

Tips For Frost Dates

Depending on what season you are in and your dates, there is usually something that you can plant year round. If you live far north or in extreme climates, you need to pay more attention to what you are planting and when, but for us that isn’t a problem.

Also, remember that just because your frost date is closing in, doesn’t mean that you can’t plant something. You may end up with plenty of time to plant extra plants. Or you may just need to take some precautions. If you wanted to plant some squash but you know you are going to be pushing close to your frost date, through a sheet or blanket over the plant at night time.

For example, I want to plant squash but I know I’m close to my frost date, I would look at my seed packet to see how many days to maturity. Summer squash usually takes 40-60 days. But the fruit doesn’t get to edible size until about 2-3 weeks later. So to make sure that I have plenty of days, I will assume that it will take 90 days from seed to table. That means that, for my first frost date of Oct 31st, I need to plant by August 2nd. But if I miss that date, and I plant summer squash on September first, I may have to protect that plant for a couple of weeks.

If you are interested in learning more about my favorite garden planner. I highly recommend Seedtime! This planner has been instrumental in helping me plan out my gardens with WAY more efficiency than I could ever expect! It has also reduced overwhelm, stress, and calmed my ADD/ADHD!

More Info!

Planting A Spring Garden

For us, a spring garden isn’t really “smart”. I do it anyways because come February I am begging to play in the dirt. The reason that a spring garden isn’t “smart” is because it tends to be a waste of time and seeds. Our springs in Georgia flip flop worse than a politician during election season. You will have an 80* day and a 25* night and the next day will be 40*. Then next day will be 80* again. You’ll have torrential downpours that turn to ice overnight. It’s insanity.

To plant my spring gardens, I check my calendar and see when my last frost is. Again, for me, it’s mid April. I know that come end of April to beginning of May, my summer gardens are going in so I don’t want to take up space in my gardens for things that aren’t going to be ready to go by then. Usually, I will start my spring stuff in January and put them in the greenhouse and plant in end of February to beginning of March. Usually, the weather has started to stabilize a bit and it’s not too crazy.

I don’t plant a ton of things because again, most of this stuff is going to bolt before I ever get a chance to harvest. This is almost exclusively for fresh eating and seed saving.

If you live in a climate similar to ours, where it goes from winter to summer in .388393 seconds, AND you have limited space, feel free to skip the spring garden.

The Ultimate Homesteader’s Starter Bundle – Only $47!

Get the tools you need to stay organized, track profits, and manage your homestead with ease!

Includes:
✅ Schedule F Tracker – Simplify tax prep
✅ Profit Calculator – Track earnings
✅ Hay Calculator – Plan livestock feed
✅ Garden Journal – Digital & printable
✅ Herd Health Tracker – Monitor animal care
✅ Simple Budget – Manage finances
✅ Backyard Homestead eBook – Essential tips

$99 value – now just $47! Start your homesteading journey today!

Buy Now

Planting A Summer Garden

Every gardener loves the summer garden…. at least at first. My summer gardens start in February when I start about 60% of my seeds. As the months go on, I start the rest of my seeds so that I have wave after wave of plants that will be going into the garden. Some things like melons, pumpkins, cucumbers, beans, etc can go in mid April. But there are some things that can’t go in until the threat of frost has completely past. This is stuff like tomatoes, peppers, okra, and other heat loving things.

As I stated above, I will start planting things mid April, pending the weather. This means that if I don’t have a 10 day stretch of non freezing nights, I don’t plant. If one night is less than 35*, I don’t plant. If I have one day that is less than 65*, I don’t plant. The 10 day stretch gets restarted until I have a whole stretch were the temps are at least above 35* and 65* respectively.

There are two really important things to remember when planting in the south. First, never rely on one set of crops if you are planning to put up your harvest. You will want to continue to succession sow until you have run out of days. The reason for this is because we have a ton of bugs here. Between the Japanese beetles and squash bugs, you will absolutely lose your harvest before you ever get the full bounty of that fruit.

The second most important thing to remember is that full sun in the south is not full sun anywhere else. Because we get more direct sun, you will absolutely scorch your garden if you are not careful. This means constant watering or even having to put up shade cloth. I talk more about the effects of full sun in the blog post above.

If you are interested in learning more about my favorite garden planner. I highly recommend Seedtime! This planner has been instrumental in helping me plan out my gardens with WAY more efficiency than I could ever expect! It has also reduced overwhelm, stress, and calmed my ADD/ADHD!

More Info!

Planting A Fall Garden

If I’m being really honest, this is my favorite garden. While I love most of the produce that comes out of the summer garden, the fall garden is hands down my favorite. I love kohlrabi, carrots, peas, cabbage, and broccoli. I love the fact that I am not going to have to worry as much about heat stroke. It’s an easier garden to tend and it’s not as fussy as the summer garden. That being said, it’s still a timing issue to get my plants in the ground.

Usually, I start my seeds for the fall garden mid August. I start them in the house where it’s cooler and then move them to the greenhouse after a few weeks. Once the temps drop to not Satan’s armpit, I will start planting. This is usually mid September.

Also, I will take down our cattle panels for the tomatoes, and use those to help create covers over the beds in case we get a light frost. Most brassicas and other cool loving crops can handle a light frost. In fact, carrots will taste better after a few frosts. But as we creep closer to December, we start getting pretty chilly nights that are closer to or at freezing.

cropped-3.jpg

Are you looking for garden journal prompts, but aren’t interested in a weekly email? Check out our 365 Garden Journal Prompts! This is an amazing, all in one, yearly product that you only pay for once.

Buy Now!

When To Plant A Garden

At the end of the day, you are going to have to look at your frost dates and experiment. We learned that planting in mid April is risky but not impossible, we just have to check the weather. We’ve learned that we can easily grow throughout winter, as long as we keep an eye on the weather and plant damage.

But that knowledge comes with experience for our area and our gardens. If you are new to the world of gardening, you will struggle. It’s just the reality. But paying attention to your frost dates and Googling “How many days till X date” or “How many days from X date to X date” will allow you to figure out how many days you plant needs to mature and produce a good harvest and how much time you actually have.

I hope this helps you figure out when to plant a garden and I hope that you look forward to your next planting season!

If you like the content I put out, feel free to buy us a coffee! It helps keep this site running, marketing and the goats in grain!

Buy me a coffee

If you like this post, feel free to share it and follow us below on our social media accounts!
  • Facebook
  • Pinterest
  • Instagram
  • YouTube
  • TikTok
  • Spotify
  • Threads

Filed Under: Garden Tagged With: Eggs, Garden, Goats, Homestead, vegetables, veggie garden

JOIN TO OUR MAILING LIST!

Leave us your email to receive new posts and special offers for members only! Don't miss a thing!

Recent Posts

  • Fall Garden Guide
  • Top Mistakes With Goats
  • How To Bond With Your Goats

Homestead Daily Schedule

August 13, 2024 by Leigh Leave a Comment

On our homestead, this looks a little different than most. Due to our work schedules, one of us is gone 48 of 72 hours. Sometimes more. However, the goats still need to be milked, fed and let out. Chickens and ducks still need feed, water, and be let out. Dogs are also hungry and need to go to the bathroom. And all the other chores need to be done. So regardless of who is home, the daily schedule looks pretty much the same.

The Ultimate Homesteader’s Starter Bundle – Only $47!

Get the tools you need to stay organized, track profits, and manage your homestead with ease!

Includes:
✅ Schedule F Tracker – Simplify tax prep
✅ Profit Calculator – Track earnings
✅ Hay Calculator – Plan livestock feed
✅ Garden Journal – Digital & printable
✅ Herd Health Tracker – Monitor animal care
✅ Simple Budget – Manage finances
✅ Backyard Homestead eBook – Essential tips

$99 value – now just $47! Start your homesteading journey today!

Buy Now

What Is Our Homestead Daily Schedule?

As I mentioned above, our days are set up on a 3 day rotation. On the first day, I go to work and Jared is the responsible party until he goes to work the next day. Day 2 is when I come home and handle my portion of the homestead chores. On day 3 we are both home and try to squeak out as much time together as possible.

Day 1 Daily Schedule

This is my work day, so Jared is home with the boys. He usually gets up with me and we drink coffee and hang out for a few minutes before I head to work. Sometimes, he will tell me about what he has planned for the day. But more often then not, I don’t really care per say. The way I see it, he is a grown ass man and knows what he needs to do for the day. Unless there is something pressing, I don’t worry too much about what he’s doing.

That being said, most of the time he is working on whatever project we are doing. In the summer, it’s usually firewood. In the winter, it’s usually household projects. Spring is reserved for garden projects and fall is for yard clean up.

He also makes sure that the boys are doing their school work and the house doesn’t burn down.

Day 2 Daily Schedule

This is the day that he goes to work and I am coming home. Normally, I get home a little later in the morning. After getting myself cleaned up and my stuff put away, I get the boys started on their school work and I start working on whatever inside projects need to be handled. Sometimes this is blog or household work. Other times this could be getting seeds together and planted. It really depends on what the season is.

But I can tell you that the day after a 24 hour shift is left really loose. I have run calls all night and come home with a pile of chores that HAVE to get done and it’s awful. Instead, we give ourselves and each other grace when it comes to the day after shift. We just don’t put a lot of stuff on ourselves.

That being said, the goats still need to be checked and fed. Chickens and ducks still need to be fed and let out. The garden still needs to be harvested, planted or maintained. But we don’t stress about getting the to do list done.

Day 3 Daily Schedule

For me, the day starts around 8am. Blu gets her morning meds and mom needs coffee. The first set of dogs are let out and showers start. I will usually start a load of laundry and work on it throughout the day.

If I have goats in milk, my day starts a little earlier so that I can get them milked before they are screaming for their food and to be let out. I also do a quick glance at the herd to make sure everyone is healthy and happy.

After I get the goats done, I am in the garden first thing to beat the heat. I try to get things harvested before the heat of the day really hits. I will also try to get the first batches of preservation going. Whether it’s dehydrating tomatoes or squash or getting a canner filled. Depending on the season, I may be planting more in the garden.

I will also start the boys on their homeschool stuff for the day. As the day heats up, I scramble into the house to keep from overheating (y’all the Georgia heat is no joke!). I will work on the blog or general household tasks until it cools down enough to be able to go back outside.

Then it’s dinner time. After dinner, the boys take care of their chores. I finish up laundry and head to bed, where I read for about 4 hours.

Homesteading Daily Schedule With Kids

One of the biggest issues that I see new homesteaders, and hell even parents, making is that they don’t give their kids chores. You will overwhelm yourself and your partner if you do not let those kids earn their keep. We have a pay to play rule which means that if you want to play video games, watch TV or do what YOU want to do, you have to “pay” for that by doing your chores, school work, etc. So make sure that your kiddos are helping.

After everyone is done and animals are fed, we start working on school work, this is usually around 930-10. Jared and I have different views on this. Usually I let them unschool and Jared is more structured. Unschooling is when the child directs what they would like to learn about. I feel like this gives them the opportunity to learn about the things that interest them and helps them learn better. Jared prefers to help them with “normal” school work.

Neither way is wrong and the boys seem to enjoy having the flexibility. Win Win.

We get them involved with various aspects of homesteading to not only teach them how to do things that are necessary for survival if the SHTF but also because this is invaluable information. And this still counts as their schooling since they are learning things like how to follow the instructions on how to put together a metal shed. Or how much firewood makes a cord and then measuring the stack that they’ve made. They also get crash courses in animal husbandry if an animal gets sick and needs medications. They’ve also been a huge help in the garden and ask a ton of great questions. Most that I don’t have an answer to, so we ask google a lot of questions.

Don’t Beat Yourself Up

One of the things that I see a lot of new homesteaders do, especially those of us that work off farm, is that they feel like they have to do ALL the things, RIGHT NOW! That can’t be further from the truth. In fact, the opposite is more true; you have time. I talk about homesteading goals and preparation here, but the short version is figure out where you want to be, and take small actionable steps to get there.

Homesteading, while hard work, should NOT be so stressful that you don’t want or can’t do it. You don’t have to get everything done right now! Take a breath and give yourself kindness and grace to make at a reasonable pace. You don’t need to burn yourself out within the first year.

If you like the content I put out, feel free to buy us a coffee! It helps keep this site running, marketing and the goats in grain!

Buy me a coffee

If you like this post, feel free to share it and follow us below on our social media accounts!

  • Facebook
  • Pinterest
  • Instagram
  • YouTube
  • TikTok
  • Spotify
  • Threads

Filed Under: Animals, Canning, Chickens, Garden, Goats, Homeschool, How To's, Our Homestead, Pigs, Projects Tagged With: Canning, cast iron, Chickens, Chicks, cooking, Eggs, Goats, Homestead, kitchen, Welcome

JOIN TO OUR MAILING LIST!

Leave us your email to receive new posts and special offers for members only! Don't miss a thing!

Recent Posts

  • Fall Garden Guide
  • Top Mistakes With Goats
  • How To Bond With Your Goats
  • « Go to Previous Page
  • Page 1
  • Page 2
  • Page 3
  • Page 4
  • Interim pages omitted …
  • Page 6
  • Go to Next Page »
  • Animals
    • Chickens
    • Farm Dogs
    • Goats
  • Garden
    • Compost
    • Garden Projects
    • Seeds and Plants
    • Garden Journal
    • Working With Food
      • Recipes
      • Freezing Foods
      • Dehydrating Foods
      • Canning Tips And Tricks
        • Canning Inventory Sheets
  • Helpful Info
    • Welcome to the Homestead!
    • Emergency Preparedness
    • Frequently Asked Questions
    • Goal Setting
    • Project List
    • Shop Digital Products
      • Hay Calculator
      • Farm Expense And Income Tracker
      • Goat Crash Course: 101
      • Garden Journal Prompts
      • Schedule C Tracker
      • Schedule C Tracker
      • The Homestead Bundle
  • The Truths
  • Episode List
  • Start Here
    • Privacy Policy
    • Affiliate Disclosure
    • Let’s Get in Touch
    • Members Only Library
    • Welcome To Our Homestead

Footer

  • Email
  • Facebook
  • Instagram
  • Pinterest

COME AND GET IT!

Leave us your email to receive new posts and special offers for members only! Don't miss a thing!

· Midnight Theme

Copyright © 2026 · Midnight Theme on Genesis Framework · WordPress · Log in