• Skip to primary navigation
  • Skip to main content
  • Skip to primary sidebar
  • Skip to footer

Steel Raven Farms

Where muck boots meet ground.

  • Animals
    • Chickens
    • Farm Dogs
    • Goats
  • Garden
    • Compost
    • Garden Projects
    • Seeds and Plants
    • Garden Journal
    • Working With Food
      • Recipes
      • Freezing Foods
      • Dehydrating Foods
      • Canning Tips And Tricks
        • Canning Inventory Sheets
  • Helpful Info
    • Welcome to the Homestead!
    • Emergency Preparedness
    • Frequently Asked Questions
    • Goal Setting
    • Project List
    • Shop Digital Products
      • Hay Calculator
      • Farm Expense And Income Tracker
      • Goat Crash Course: 101
      • Garden Journal Prompts
      • Schedule C Tracker
      • Schedule C Tracker
      • The Homestead Bundle
  • The Truths
  • Episode List
  • Start Here
    • Privacy Policy
    • Affiliate Disclosure
    • Let’s Get in Touch
    • Members Only Library
    • Welcome To Our Homestead

Leigh

Best First Aid Kits For Homesteaders

July 23, 2024 by Leigh Leave a Comment

As a paramedic in real life, I am constantly shocked by how many people don’t have a basic first aid kit! You would be surprised how many times we are asked for band aids! That being said… I don’t have a first aid kit…. It’s more like a pantry. You should have a first aid kit of some sort, whether it is bought or built doesn’t matter. So today I wanted to talk to you about first aid kits but also the ones I have found that fit into the best first aid kits.

The Ultimate Homesteader’s Starter Bundle – Only $47!

Get the tools you need to stay organized, track profits, and manage your homestead with ease!

Includes:
✅ Schedule F Tracker – Simplify tax prep
✅ Profit Calculator – Track earnings
✅ Hay Calculator – Plan livestock feed
✅ Garden Journal – Digital & printable
✅ Herd Health Tracker – Monitor animal care
✅ Simple Budget – Manage finances
✅ Backyard Homestead eBook – Essential tips

$99 value – now just $47! Start your homesteading journey today!

Buy Now

Best First Aid Kits For Homesteaders

The best first aid kits are going to be ones that actually work. It doesn’t matter how much money you spend (or don’t), the best kit is going to be one that you use, is easy to carry, and actually has the supplies you need. At the very bottom of this post, I am going to give tell you what is in my first aid pantry and my “go bag”.

I’m going to list these kits out in price ranges so that you can find something within your budget. Towards the bottom of this post, I’m going to give you extra purchases. These are items that I think you could absolutely use but most kits doesn’t have this stuff in them.

If you are looking to build your own, I did this blog post to help you out.

I’m going tell you which one of these kits are FSA/HSA eligible. Lastly, this post is affiliate link heavy. If you would like to learn more about our affiliate links, click here.

Please remember, this is coming from a paramedic, not a physician and is not meant to be medical advise.

Our herd health bundle helps you keep track of your herd’s health. Includes the goat assessment, herd check sheets AND Herd Health Tracker!

Buy Now

Best First Aid Kits Under $50

General Medi– This first aid kit would be pretty good for in your car, tractor, 4 wheeler or side by side. It is not meant to be an end all be all. But it will work well until someone could get to you with a bigger kit. It’s also got a CPR mouth guard which is fantastic. But since AHA is moving away from rescue breaths this is really a non issue. It’s FSA/HSA eligible and it’s less than $30 as of this writing.

M2 Basics- This one is better because it has more wraps and other bandaging supplies. It’s has a hard case and is mountable, which will make it easier to have at the house. You could absolutely put it in your car, tractor, etc but it will take up more room. I couldn’t find if it was FSA/HSA eligible. It’s less than $50 as of this writing.

Be Smart First Aid Kit– This kit is also mountable and has pretty much the same as the other kits, but with one main difference, there’s medications in this kit. It is also mountable but again, this is not a small kit so you will end up not being able to store it easily in cars, tractors, etc.

cropped-3.jpg

Are you looking for garden journal prompts, but aren’t interested in a weekly email? Check out our 365 Garden Journal Prompts! This is an amazing, all in one, yearly product that you only pay for once.

Buy Now!

Best First Aid Kits Under $100

Comprehensive First Aid– This kit is significantly better than those listed above. It gives you splinting materials, trauma dressings, and more. This is the bag that should be coming with you when you are going out to work on the homestead. It’s under $100 but I think this one is worth the price point. I can’t find if it’s FSA/HSA eligible though.

Ever Ready First Aid Kit– This kit is a great compact little kit that has almost everything you need for just about any situation… except, it doesn’t have splinting supplies. Not a deal breaker because you can make do without but moving someone with a broken bone hurts. It is FSA/HSA eligible and as of this writing is $85.

Lightening X– This kit is made by first responders/ EMT’s, which is weird because this isn’t necessarily the kit I would make. BUT it is a good kit for a civilian to have and everything in it is usable. This kit would be more for someone that has some first aid knowledge since it’s not labeled. But again, it’s got a lot of good stuff in it. It’s about $90 and I can’t find if it’s FSA/HSA eligible.

goat kidding

Before we get too far into this, I have a great course on the basics of goat care. I call it Goat Crash Course: Goat 101. In this course, I explain things like types of shelter, types of feeds and hays, basic assessments and so much more! Check it out!

Buy Now

Best First Aid Kits Over $100

Most of these kits you are paying for the bag, not necessarily the items in it. So keep that in mind as you are looking at these.

Luminary Tactical– This is a great, but bulky first aid kit. It has some things that you will probably never use, like OPA’s, C-collar, and sutures. But it’s there if you do know how to use them. This kit is pricey at $200 but again, it’s robust and covers most of your bases. I can’t find if it’s FSA/HSA eligible.

Lightening X Tac Med– Lightening X makes the list again. This one is more geared for an event medical personnel stand point but it is still a solid first aid kit. I love the removable pouches so that you can just grab that one pouch instead of having to empty out your entire kit. Again, there are things that you will probably never use, like the mask and oxygen tubing but that’s not a deal breaker. This kit is pretty pricey coming in at $330 but it is FSA/HSA eligible.

Advanced Aventurer– This bag would be perfect for most civilian, non medical person. It has just about everything to cover you from minor sprains to lacerations and just about anything in between. It’s a good sized bag without being overbearing like the other two in this list. It’s not horribly priced but definitely not cheap at $300.

The Ultimate Homesteader’s Starter Bundle – Only $47!

Get the tools you need to stay organized, track profits, and manage your homestead with ease!

Includes:
✅ Schedule F Tracker – Simplify tax prep
✅ Profit Calculator – Track earnings
✅ Hay Calculator – Plan livestock feed
✅ Garden Journal – Digital & printable
✅ Herd Health Tracker – Monitor animal care
✅ Simple Budget – Manage finances
✅ Backyard Homestead eBook – Essential tips

$99 value – now just $47! Start your homesteading journey today!

Buy Now

Take Aways For Best First Aid Kits

The importance of a good, well stocked first aid kit cannot be underestimated. Unfortunately for most people, they don’t put enough thought into their first aid kid (or lack or one) until it’s too late. And people don’t put enough thought into HOW to use their first aid kit. If they even have one, they just throw it in the car or under the sink and never think about HOW to use what’s in it. So do yourself and your loved ones a favor and learn how to use the kit, how to do CPR, and how to bandage, splint, etc.

As much as you may not want to, please take the time to learn the basics of CPR, how to stop bleeding, place a tourniquet, and bandaging/ splinting. I can’t tell you how many people I’ve encountered over the years that have told me, I wish I would have learned how to do this. Because a lot of the time, it’s their family member on the line.

Imagine with me, just for a second, that you are building a shed and your son walks past a panel of sheet metal. He gets nailed on the leg with that sheet metal and he now has a deep laceration on his leg. He’s bleeding everywhere. What are you going to do? Do you have anything on hand to help stop the bleeding? Do you know how to stop the bleeding? What if it’s shooting blood out? Do you know what that means?

That scenario happened to us, here on our homestead. My youngest son was walking past sheet metal as him and Jared were building the metal chicken coop. Thankfully, we had rags and knew what to do. Thankfully, it wasn’t spurting blood. But that was a trip to the emergency room for 3 stitches to reattach the muscle and another 13 to close him up.

Injuries can happen to ANYONE and if you don’t know what to do, you will be in a bind. So get the first aid kit.

If you like the content I put out, feel free to buy us a coffee! It helps keep this site running, marketing and the goats in grain!

Buy me a coffee

If you like this post, feel free to share it and follow us below on our social media accounts!

  • Facebook
  • Pinterest
  • Instagram
  • YouTube
  • TikTok
  • Spotify
  • Threads

Filed Under: Emergency Preparation Tagged With: emergency planning, First aid, Homestead, preparedness

JOIN TO OUR MAILING LIST!

Leave us your email to receive new posts and special offers for members only! Don't miss a thing!

Recent Posts

  • Fall Garden Guide
  • Top Mistakes With Goats
  • How To Bond With Your Goats

How To Pressure Can Green Beans

July 20, 2024 by Leigh 2 Comments

Jump to Recipe

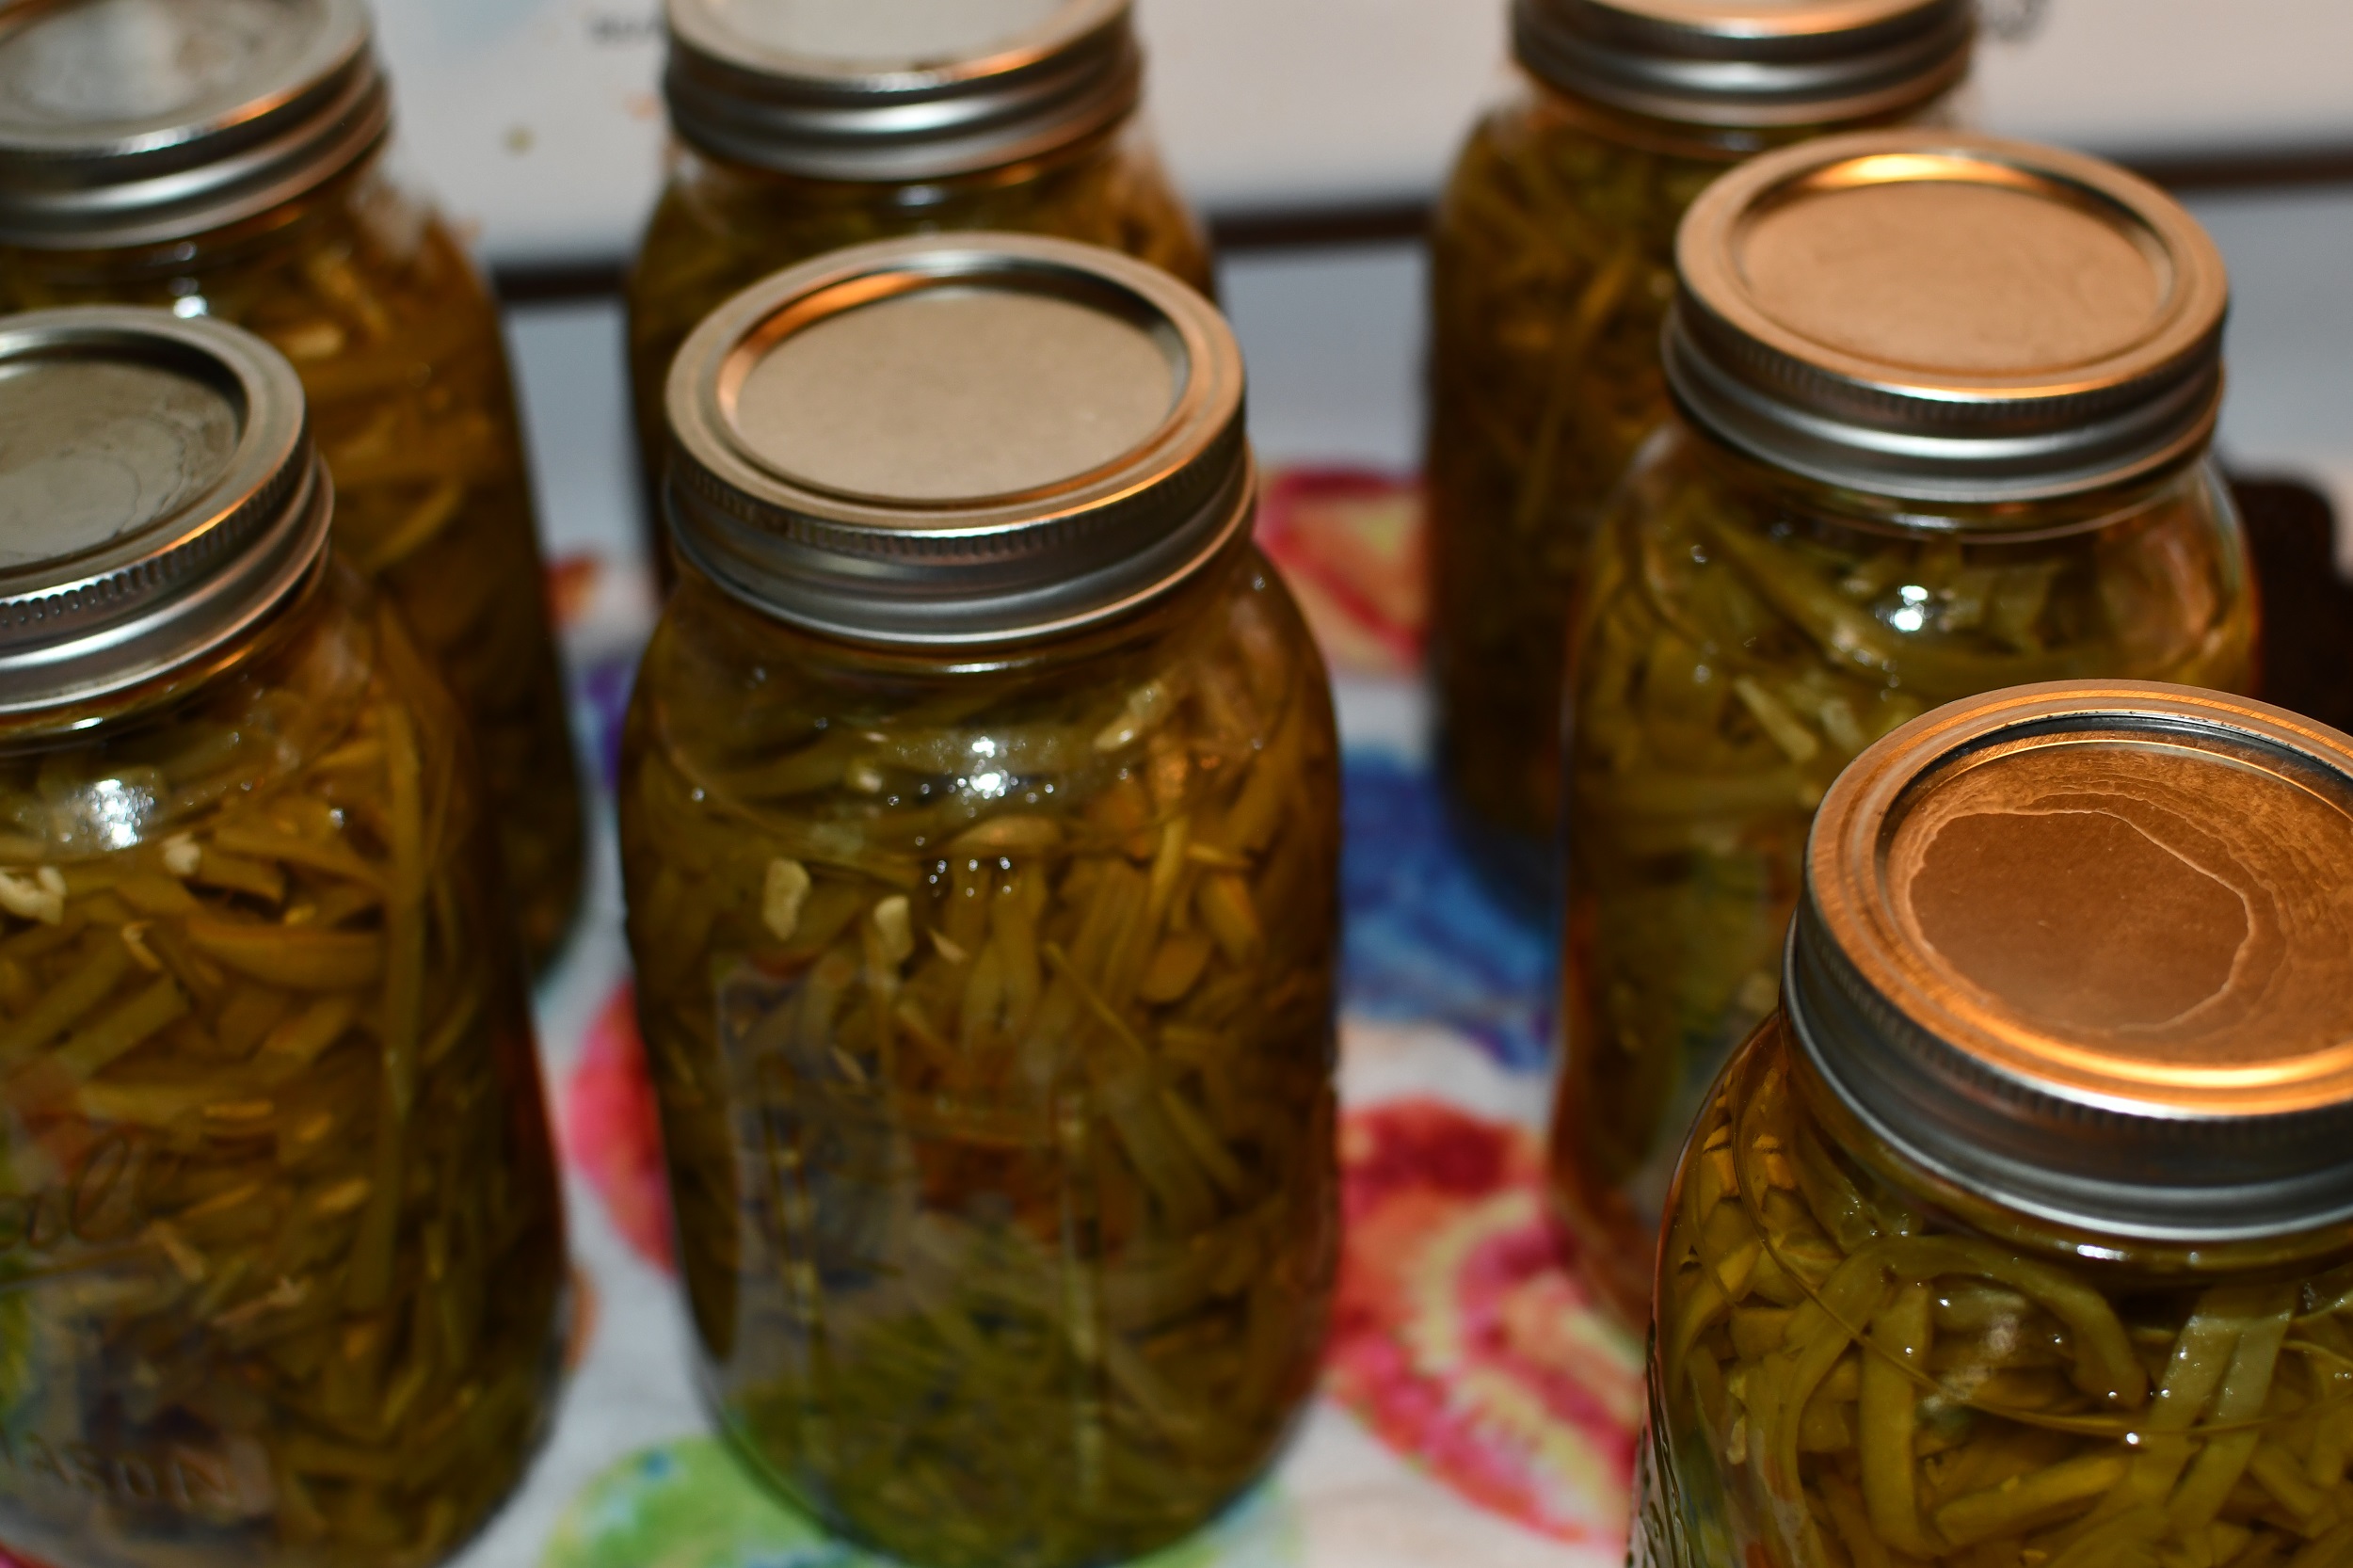
I am extremely picky when it comes to green beans. I cannot stand mushy green beans. The thought of the skin of the green bean scraping against my teeth is enough to make me want to vomit. So the only way I will buy, can or otherwise consume green beans is frenched green beans. Today, I went to my local farmers market for strawberries. Yes, they are worth the two hour round trip drive and I saw they had bushels of green beans! Score! So today I’m going pressure can green beans.

The Ultimate Homesteader’s Starter Bundle – Only $47!

Get the tools you need to stay organized, track profits, and manage your homestead with ease!

Includes:
✅ Schedule F Tracker – Simplify tax prep
✅ Profit Calculator – Track earnings
✅ Hay Calculator – Plan livestock feed
✅ Garden Journal – Digital & printable
✅ Herd Health Tracker – Monitor animal care
✅ Simple Budget – Manage finances
✅ Backyard Homestead eBook – Essential tips

$99 value – now just $47! Start your homesteading journey today!

Buy Now

Pressure Canning Green Beans

The first thing you need is fresh green beans. Straight from the garden is the best but today we are working with what we’ve got. I got a bushel which is about 30# of green beans and will yield about 25 quart jars of beans. This is not precise. Sometimes a bushel is only 25# and only 18# of usable green beans. So be prepared for less or more.

You’ll need a couple bowls, cold water for soaking, jars, pressure canner and the assorted tools that go with pressure canning.

Let’s Get Snapping

You’ll need a couple bowls so you can snap to your hearts content. This is seriously my favorite part. No one wants to help because it’s pretty mindless which is why it’s my favorite part. Last year I snapped two bushels of green beans in six hours. I took my time and got to watch my farm. I watched the goats play, the chickens scratch, and my boys help Jared build. All while I took a load off.

If you don’t know how to snap beans, it’s very simple. Snap off the ends at about 1/2 inch, roughly. Throw the ends in a bowl. Then snap the bean in half or thirds depending on how big you want your pieces. Just work through your bushel/ bag.

If you have goats or chickens, they will love you for giving them the ends. All of the animals fight over the beans, tops and bottoms and of course anything that gets dropped on the floor.

Soak Your Beans

Next clean your sink or a cooler and let them sit in cool water for about 30 minutes. You don’t have to do this step but I feel like it gets all the dirt and grime off your beans. You can do this before you start snapping, go for it, it’s totally up to you.

Also, I will “agitate” the water with my hands to help scrub off any dirt or debris that is on the beans.

I like using a cooler because I can just dump the processed beans straight into a cooler of cool water on the porch and I don’t have to move. Which is ideal considering I usually process 40-50 quarts of green beans at a time.

French Cut Green Beans

Once they are clean, I run them through the frencher. If you don’t have a frencher or don’t want french cut beans just skip this step. But make sure that you snap your beans a little smaller about an inch long.

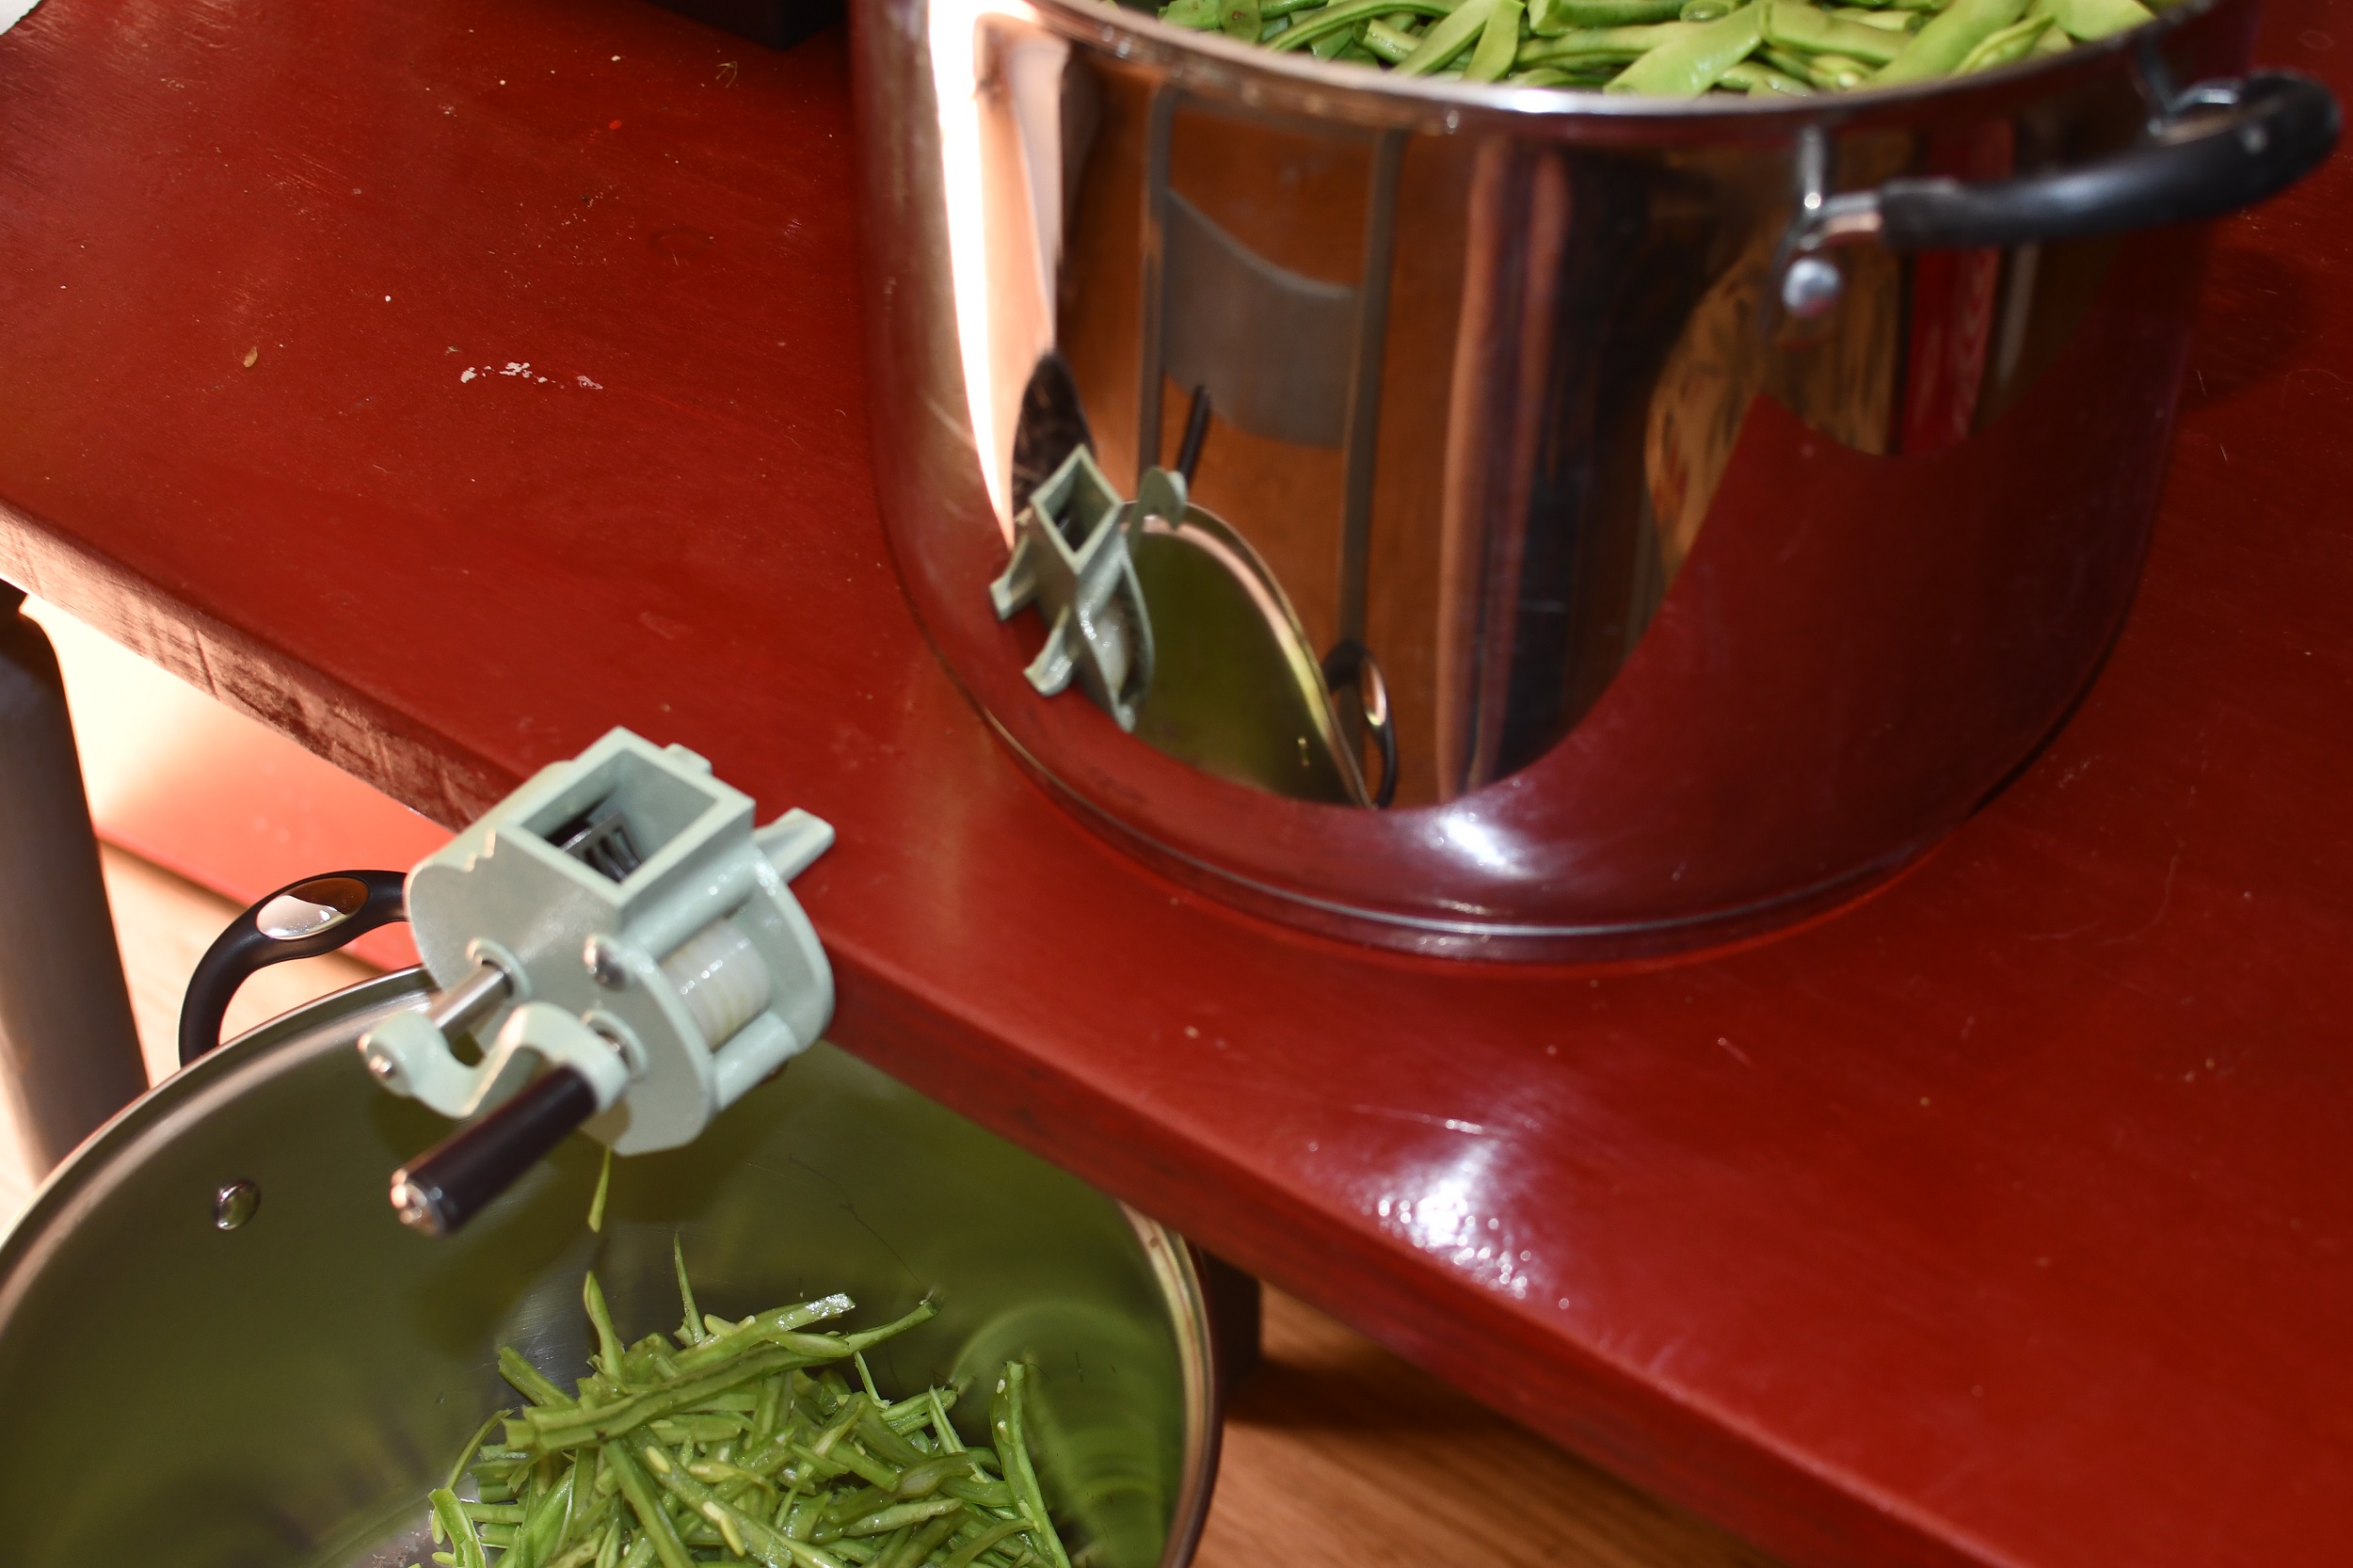
If I am canning green beans, which is the entire point of this post, I only can French cut green beans. So you’ll need a frencher like this one and while I love it, it does get stuck if the bean is too big or too hard. It also requires you to attach it to a counter, table, etc and sometimes it just doesn’t work that well. But it’s the best crank version and I don’t like the manual ones.

Get Your Canner Ready

Next, get your canners ready. You need a pressure canner. I have two similar to this one but mine don’t have the gauge. You don’t HAVE to have the gauge. If you head to your local Wal-Mart they should have one that doesn’t have a gauge. While you’re at Wal-Mart go ahead and get at least two cases of quart mason jars. Ball is the most common, but Azure Standard has some really great jars as well. Also pick up the tool pack that has a canning funnel, canning tongs, and the de-bubbler. It should look like this.

Your specific canner should tell you how much water to put into it. My canner says three quarts. It will not fill the canner, and you don’t want it to. Go ahead and fill it to your manufactures instructions and get the water boiling.

Pack Your Green Beans Into Jars

While waiting on your water to boil, you’re going to start packing your jars. Using your funnel and clean hands start packing your green beans into your jars. I usually pack till the green beans are about an inch and a half from the top. I usually push down to get as many beans in as possible but you also don’t want to pack it so full. Set it off to the side until you have a canner full. This is usually seven-ten quart jars depending on the size of your canner.

Once you have a full canner ready (not in the canner yet), go ahead and fill each jar with room temperature water till you have 1″ head space. Head space refers to the space from the top of the food/water to the top of the jar. Next, you’re going to use the de-bubbler to get all the air bubbles out.

I’m not going to lie to you, I gently tap the jar on the counter until all the bubbles are at the top. It’s worked well for me, usually because I can’t find the de-bubbler thing. Add more water to the jar to maintain the 1″ head space.

Then wipe the rim of the jar with a paper towel or rag dipped in vinegar. Put the lid and then ring on to finger tip tight and you are ready to put them in the canner. I usually place them in the canner all at once so that nothing starts cooking before I’m ready.

Loading Your Pressure Canner

By the time you are ready to start adding your jars, your water should be boiling or close. Go ahead and place your jars in the canner and place the lid per your canners instructions. The normal process for most canners is to let the canner vent for ten minutes before placing your weight on the vent. But again, follow your canners instructions.

My canners have a pressure lock that will pop up once it has come to pressure and shortly after that the rocker will rock. Your canner may be different.

Once the weight starts to rock, or you are up to your PSI on your gauge, you start your time. I will also usually drop the temp on the burner at this point too. I have it on high to get everything up to pressure but will usually drop it to medium to medium high once the weight is rocking. You only want the weight to rock about once every few seconds. Usually mine just gently jiggles.

Green beans need to be processed for 25 minutes. Depending on your altitude will depend on your actual times. I process mine at 25 minutes at 15 PSI for quarts because I am over 1000 feet above sea level.

PS Loading a canner is pretty universal. That process is pretty much the same for everything you are going to pressure can except headspace, time and pressure (Your PSI will never change unless you love altitude).

After Processing Your Pressure Canned Green Beans

When time is up, simply turn off the heat and wait about ten minutes. After that you can move your canner off the burner. Some people move it before, some never touch it. It’s up to you. If I’ve got multiple canners going, I will pull mine off the burner.

You MUST let your canner depressurize naturally! This is none negotiable. At best, you will ruin your food. At worst you can warp your canner or blow up your kitchen. Let’s not do that.

Once the pressure lock drops you can remove ONLY the weight. Once the pressure lock drops and you have removed the weight, give it about ten minutes or so and then you should be able to crack the canner open.

There will be steam that comes out so please be careful. Leave the lid on for another ten minutes or so. The other way you can do it is just put your canner off to the side and let it set for about an hour to hour and a half. This should give it plenty of time to depressurize naturally. When in doubt, leave it alone.

Unloading Your Canner

You can then take the lid off and carefully lift out the jars using the jar tongs. Again, be very careful. The contents of the canner and jars are still extremely hot. I put the jars on a folded towel to start to cool. Within 24hrs you will hear the sweet pinging of success! You can test your seal after 24hrs by pressing down on the lid. If there is give, it’s not sealed. If it sealed, you won’t feel or hear anything when you press it.

Anything that is not sealed needs to go into the fridge or be eaten within a couple of days.

Also, please, please, please remove your rings from the jars before storage. Normally, I am very much your kitchen, your rules. But on this one, I’m going to be a little more vocal…. The reason we remove rings from jars is because if that jar becomes unsealed for any reason, you will never know it if the ring is still on. As temperatures change in your storage area, seals can break. As bacterial get in and start growing, it could re-seal itself.

I’ve had a few jars that we forgot to take the ring off of and pulled months later? There was no way to tell that the lid resealed and the food inside looked perfectly fine. But there was a film on the top of the food. So be careful. Was the food safe, maybe? I wasn’t willing to risk it. So do yourself a favor and remove the rings.

But that’s it! You will love your green beans!

If you like the content I put out, feel free to buy us a coffee! It helps keep this site running, marketing and the goats in grain!

Buy me a coffee
Print Recipe
Print

Pressure Canned French Cut Green Beans

The best green beans that you can make and can yourself.
Prep Time6 hours hrs
Active Time2 hours hrs
Total Time8 hours hrs

Equipment

  • 1 Pressure Canner
  • 1 Canning Kit Funnels, Canning Tongs, and Debubbler
  • 1 Green Bean Frencher
  • 2 Cases of Quart Jars You can use pints but get double the amount
  • All Bowls and Stock pots You will probably need every last one by the time this is all said and done

Materials

  • 1 bushel Green Beans

Instructions

  • Snap your green beans by snapping off the top and bottom. Then snap them into desired lengths. I tend to snap mine in 2in sections but it's not a big deal if they are longer or shorter
  • Rinse beans well. I usually have a big stock pot full of water and I just throw the beans into that as I snap
  • Once you are either done snapping or you have filled your first pot, drain the water. Now you will start frenching. If you are using the crank tool then make sure you've got a pot under it. Start feeding your green beans through it.
  • When you arms feel like jello from cranking, take a break and fill up your pressure canner with water to per manufacture instructions. Mine says 3qts.
    Get it on the stove to start boiling.
  • Next start filling your jars with green beans. I tend to pack my jars pretty full. Fill with room temperature water, wipe the rim with a vinegar rag and place a lid and ring on it. Tighten ring to finger tight.
    Set it off to the side
  • Once you have a full canner of jars, gently set the jars into the canner. If the water is already boiling you can secure your canning lid. Follow manufacture instructions on using your canner. Every single one is different.
  • Process for 20 minutes for pints and 25 for quarts at 10# of pressure. Adjust for altitude.
  • When processing is over allow canner to depressurize naturally. This could take a couple hours depending on your model so be prepared.
  • Once canner is cool and safe to open, bring your jars out and allow them to cool. Listen for the ping and check your seals the next morning. Anything that doesn't seal, put in the fridge and eat within a couple of days.

If you like this post, feel free to share it and follow us below on our social media accounts!
  • Facebook
  • Pinterest
  • Instagram
  • YouTube
  • TikTok
  • Spotify
  • Threads

Filed Under: Canning, Canning Recipes, How To's Tagged With: Canning, cooking, green beans, Homestead, kitchen, pressure canning, Recipes

JOIN TO OUR MAILING LIST!

Leave us your email to receive new posts and special offers for members only! Don't miss a thing!

Recent Posts

  • Fall Garden Guide
  • Top Mistakes With Goats
  • How To Bond With Your Goats

Is My Goat In Labor?

July 16, 2024 by Leigh Leave a Comment

I have been a paramedic long enough to know that nothing ever happens when we WANT it to or are waiting for it. I also know that baby is coming when it wants to, not when the goat or I do. Until then, I can only take the things I have learned into account. But like any mammal, if you have to ask, is my goat in labor? They’re probably not “pooping out a baby” as my youngest once said. If you’ve got some of these signs and symptoms, and something important planned off farm? You may have a goat in labor.

goat kidding

Before we get too far into this, I have a great course on the basics of goat care. I call it Goat Crash Course: Goat 101. In this course, I explain things like types of shelter, types of feeds and hays, basic assessments and so much more! Check it out!

Buy Now

My Ways Of Telling If My Goat Is In Labor

As the years have progressed and I’ve gotten more comfortable with goat kidding, there is a lot more that I have learned and I wanted to pass that along to you. It is incredibly rare that your very first kidding will result in 2 stillborn babies like Champ’s first kidding. In fact, I would say that you will probably find a baby hanging out with mom before you ever realize that she was in labor.

Due to the nature of my full time job, I am home a lot more someone who works full time and homesteads. So I have had the pleasure of watching most of my girls labor and successfully kid. There have been a few glitches in the matrix but for the most part, it’s been normal. But I wanted to address some other concerns that I wish I had known prior to dealing with those glitches.

Before we get too far into this, I have a great course on the basics of goat care. I call it Goat Crash Course: Goat 101. In this course, I explain things like types of shelter, types of feeds and hays, basic assessments and so much more! Check it out!

Buy Now

Is She Pregnant?

This is the first question that needs to be asked. Is there ANY way that she could have gotten pregnant? If you don’t have a buck on site, then she probably isn’t pregnant and just has great body condition. But stranger things have happened.

A couple years ago, we didn’t even know our girls were pregnant. The vet came out towards the end of November and told us they weren’t pregnant based on ultrasound. Color all of us surprised when, towards the end of February both Bella and Champ suddenly had big ole belly’s AND a positive pooch test. In fact, we don’t usually know that are girls are successfully bred until we feel the kids moving.

Our herd health bundle helps you keep track of your herd’s health. Includes the goat assessment, herd check sheets AND Herd Health Tracker!

Buy Now

Kid Moving

When babies start moving and kicking, you usually have about a month or so before they are born. This is usually the first indicator that your doe is pregnant if you choose not to do blood tests or ultrasounds. You should feel this on the right side of their abdomen just past their ribs, her right side, not yours. At first it may feel like the rumen moving, but as time progresses you will feel a hoof, shoulder, or head.

When do you decide you need to start checking for movement? If your buck lives with your girls 24/7, then I would look at the pooch test. If not, you can start checking around month 3-4 from the time you think they got bred. You should feel the baby moving but don’t panic if you don’t. Like human babies, the goat kids will sleep or just not move around a lot. I will jiggle their belly and see if I can “wake up” the baby and get it moving. Of course the girls hate it, but oh well.

I also notice that as the babies get closer to delivery, they don’t move as much. To the point were I was second guessing myself on whether they were pregnant or not.

Before we get too far into this, I have a great course on the basics of goat care. I call it Goat Crash Course: Goat 101. In this course, I explain things like types of shelter, types of feeds and hays, basic assessments and so much more! Check it out!

Buy Now

Bagging Up And Vulva Swelling

As your doe progresses through her pregnancy, and you are coming up to the end, you will notice teat and udder development. This will look different for every single doe and every single pregnancy. Sometimes they don’t “bag up” until right before labor or right after. But the big thing to watch for is the development. Especially for first time fresheners (first time mommas).

Another thing that you will notice is that her vulva will start to swell and get pretty saggy looking. This is very progressive and will usually happen over the last few weeks. I take pictures of the back end of my goat to track progress. I pity the person who goes through my camera roll.

Our herd health bundle helps you keep track of your herd’s health. Includes the goat assessment, herd check sheets AND Herd Health Tracker!

Buy Now

Ligaments

One of the best ways to tell if your doe is getting close to laboring is to check their tail ligaments. But I don’t think it is a sign that is well explained, especially for first time owners. I am religious about checking ligaments once I feel the babies moving. I do this, even knowing I have a month or 2 until labor because I want to be able to track changes.

Now, I have had laboring goats on my farm for a couple years and it wasn’t until this summer, when Stella had her twins that I figured out what loose ligaments were actually supposed to feel like right before kidding. When people tell you that the ligaments will be soft and squishy 12-24 hours before labor. It should feel like someone stuffed a water balloon in her pelvis, right at her tail and hips.

As your goat progresses through pregnancy, you should start checking her tail webbing so you can get an idea of what it’s supposed to feel like. Telling you how to do with in writing is pretty difficult but you can YouTube how to check goat ligaments and a million videos will pop up. But again, without seeing/feeling it first hand, it’s incredibly difficult to explain.

goat kidding

Before we get too far into this, I have a great course on the basics of goat care. I call it Goat Crash Course: Goat 101. In this course, I explain things like types of shelter, types of feeds and hays, basic assessments and so much more! Check it out!

Buy Now

False Labor

You will be tricked into thinking your goat is in labor pretty often. It happens to the best of us. I did a TikTok about Bella being in labor…. She wasn’t. That’s okay. But goats will have braxton hicks, false labor, or even start pushing and there’s nothing there. I wish I could say you’ll know the difference, and you will, once that baby hits the ground.

Discharge

This one is usually a last sign right before labor. It is entirely possible that you will see a “slime trail” as we call it and next thing you see is a bulging water sack and feet coming. Other times you may see her discharging for days before giving birth.

This is another sign that you may never see. In my experience, once you see the slime trail, she is in labor. None of my girls have ever had a slime trail more than a few hours before labor.

Other Ways To Tell Your Goat Is In Labor

These are all antidotal but they are worth mentioning if you know your doe is close to labor.

She may paw at the ground a lot. Not all of my girls do this, in fact most didn’t. But Bella is a digger and you can tell that she’s very uncomfortable. But she doesn’t do it because she’s in labor… if that makes any sense.

She may yawn…. a lot. This is coined the silent scream because they are not actually yawning. You will know when you see it that labor is approaching or occurring right now.

Another thing to look for is your doe constantly getting up and down. Much like pregnant women, they are so uncomfortable that they are constantly shifting and moving. Plus, there is an elbow, hoof, head or 3 of them shoved into this tiny space. It’s got to be uncomfortable.

Before we get too far into this, I have a great course on the basics of goat care. I call it Goat Crash Course: Goat 101. In this course, I explain things like types of shelter, types of feeds and hays, basic assessments and so much more! Check it out!

Buy Now

Get Ready

Start getting your supplies ready for when your goat is in labor. I have a 5 gallon bucket that has shears, exam gloves, puppy pads and more ready to go. This helps because I can have one of the kids go grab it and not individual things.

Be ready to pull kids if they are stuck or momma is tired. Be ready to milk out momma if a kid isn’t doing well or if momma rejects it.

But most importantly? Be ready for the most amazing and adorable thing you have ever seen.

You can see Bella’s most recent birth by clicking this link. It’s to our YouTube channel and it’s pretty graphic.

Champ and Stella

If you like the content I put out, feel free to buy us a coffee! It helps keep this site running, marketing and the goats in grain!

Buy me a coffee

If you like this post feel free to share it on your social media and follow us on the social medial links below! And don’t forget to subscribe to stay up to date on all our posts!

If you like this post, feel free to share it and follow us below on our social media accounts!

  • Facebook
  • Pinterest
  • Instagram
  • YouTube
  • TikTok
  • Spotify
  • Threads

Filed Under: Goats Tagged With: Goats, Homestead, Labor

JOIN TO OUR MAILING LIST!

Leave us your email to receive new posts and special offers for members only! Don't miss a thing!

Recent Posts

  • Fall Garden Guide
  • Top Mistakes With Goats
  • How To Bond With Your Goats

How To Care For Goats

July 13, 2024 by Leigh 6 Comments

So you’re thinking about getting a goat. You’re doing your research and probably thinking, “Whoa, there’s a lot to learn.” You would be right, but don’t let that stop you. Just by having some basic supplies on hand and a willingness to learn, puts you ahead of the game. Learning how to care for goats is actually pretty simple with the right supplies, resources and attitude. It would be impossible to write one post about caring for goats. It’s simply too much. But this post is a good start and below you can find our goat crash course.

Before we get too far into this, I have a great course on the basics of goat care. I call it Goat Crash Course: Goat 101. In this course, I explain things like types of shelter, types of feeds and hays, basic assessments and so much more! Check it out!

Buy Now

How To Care For Goats

When we first started looking into goats, I was extremely hesitant. I knew from research that they were a ton of work and hard to keep alive, but I didn’t realize how much more there was to learn. I have learned a ton in the years that I’ve been raising and managing goats. From caring for hooves to goat assessments, what medicines to keep on hand, and what goats can eat, the opportunities for education and adventure is never ending with goats.

Our herd health bundle helps you keep track of your herd’s health. Includes the goat assessment, herd check sheets AND Herd Health Tracker!

Buy Now

Medications to keep on hand

This is by no means a comprehensive list or replacement for veterinarian advise or treatment.

Vitamin B Complex is another necessity. When your goat isn’t acting 100%, sometimes it’s simple vitamin deficiency. Other times, their entire system is out of whack and you need to start working to get them back on track. The real need with the B complex is actually the thiamine in it. Goats will usually make their own but when their rumen is out of whack, they can get really sick. If you can get your hands on thiamine from the vet, I highly suggest that you get some.

LA200, Tylan 200 or similar antibiotic. Sometimes your goat will have a cough, gunky eyes or nose, or other infection. Having antibiotics on hand helps save you from a vet visit. As of this revision, you need a vet to get antibiotics. If you have a good relationship with your regular vet, they may be able to help you when it comes to your livestock.

Dewormers- now I could go in depth about the various types of dewormers. Both chemical and natural. But I’m not going to. The reason is because there are so many different types of parasites and treatment protocols for them, it would make this blog post insanely long. What I will say is talk to the person you are getting your goats from and see what they are giving their animals. That will point you in the right direction for care. I do talk in depth about deworming goats here if you are interested in it.

BluKote– This amazing can of awesome has literally saved our goat’s lives. I was told by a farmer once that BluKote is so good, it will regrow legs. And while obviously, that’s not true, it will help keep the leg from rotting off. It’s an antifungal, kind of antibacterial and quick drying agent. Stella got tangled up in sheet metal and sliced up all four legs in various spots. Some deep enough to need sutures. But have you ever tried to suture a goat? We sprayed this on her, kept her contained for a few days and within about 6 hours she had scabs and within about 2 days she was almost completely healed. So no, it won’t regrow legs. But it does protect the ones they have.

Before we get too far into this, I have a great course on the basics of goat care. I call it Goat Crash Course: Goat 101. In this course, I explain things like types of shelter, types of feeds and hays, basic assessments and so much more! Check it out!

Buy Now

Supplies to have on hand to care for goats

A thermometer is number one for a reason. Goats must stay around 101-103. This tells you a lot about what you could be dealing with. Too cold and you need to start actively rewarming them. Too warm and you may have an infection.

Syringes and Needles– Having a variety of different syringes is huge. I’ve got goats that range from 5# to 100# so having everything from 3cc-60cc syringes is extremely helpful. Also make sure that whatever size you get they are Luer Lock! Seriously, you do not want to be sprayed in the face with an antibiotic because the pressure shot off the needle. Yes, it’s happened. With needles, I highly recommend getting 20 ga or 18 ga. Anything smaller than 20 gauge and you will have a really hard time getting medication into a squirming goat. We use 18ga as a rule but we have 20s as well.

Free choice baking soda is a mineral that goats will eat to help soothe their stomach. Goats can bloat or become acidotic and baking soda can help them help themselves.

Free choice minerals is very important in making sure that they have ample minerals that your area may be deficient in. We use these as the goats love them. *** As of this revision (6/24) we use the goat mineral buffet from Avalon Farms and our goats love it. We have seen huge improvements in their health and coats. If you can’t get this or don’t have the “right set up” regular free choice is fine.

All the buckets. When you think you have enough, grab a couple more. We use a 5gal buckets for water and 3gal buckets for feeding. I attach the feed buckets to the fence with strong clips so they have plenty of space for everyone to have something. I also hang a couple of these on the fences to give even more options. It really helps to keep everyone from crowding on each other.

As long as you have plenty of ruffage, you shouldn’t need a lot of feed for them. Bucks, male goats, don’t get grain or at least not a lot. We fed our goats off the land for the first year to help get everything clear. Now we are bringing in pellets and grains to help supplement the hay until our pastures take hold. But really we could put them back in the briars and they would be very happy.

Hoof Trimmers– A couple pairs of hoof trimmers are great. Even better if you can take them apart to sharpen them. We’ve got probably 5 or so pairs around the farm. I like to have extras just in case one set is dull or we need to clean them while trimming hooves.

goat kidding

Before we get too far into this, I have a great course on the basics of goat care. I call it Goat Crash Course: Goat 101. In this course, I explain things like types of shelter, types of feeds and hays, basic assessments and so much more! Check it out!

Buy Now

Other Resources

I would also recommend getting into a couple of different goat groups on Facebook. Most vets do not see livestock and if they do see livestock, they are probably not well versed in goats. That being said, these different groups on Facebook are people with years and years of experience. I have trusted them with my babies on multiple occasions and they have helped me pull my goats through when a vet was clueless. Successful Goating With Rosie and Goat Emergency Team are the two that I recommend.

Lastly, enjoy your goats. Seriously, they are some of the coolest critters and I am so glad that Jared talked me into getting them. When I am stressed to the max with work, the kids, or anything, I go out and sit with my babies. They make all of it go away. How can Midas’ antics not put a smile on your face?

If you like the content I put out, feel free to buy us a coffee! It helps keep this site running, marketing and the goats in grain!

Buy me a coffee

If you like this post, feel free to share it and follow us below on our social media accounts!
  • Facebook
  • Pinterest
  • Instagram
  • YouTube
  • TikTok
  • Spotify
  • Threads

Filed Under: Animals, Goats, How To's Tagged With: Goats, Homestead, Welcome

JOIN TO OUR MAILING LIST!

Leave us your email to receive new posts and special offers for members only! Don't miss a thing!

Recent Posts

  • Fall Garden Guide
  • Top Mistakes With Goats
  • How To Bond With Your Goats

How We Organize A Deep Freezer

July 9, 2024 by Leigh Leave a Comment

Seriously, how is it that I can organize our freezer and within a month it’s back to being a disaster. Every time! But I have finally figured it out! I saw this hack on Pinterest and figured what did I have to lose? If it doesn’t work, I can reuse the supplies. But if it works? Well, my sanity may just be returned. Maybe. So how did we organize a deep freezer?

The Ultimate Homesteader’s Starter Bundle – Only $47!

Get the tools you need to stay organized, track profits, and manage your homestead with ease!

Includes:
✅ Schedule F Tracker – Simplify tax prep
✅ Profit Calculator – Track earnings
✅ Hay Calculator – Plan livestock feed
✅ Garden Journal – Digital & printable
✅ Herd Health Tracker – Monitor animal care
✅ Simple Budget – Manage finances
✅ Backyard Homestead eBook – Essential tips

$99 value – now just $47! Start your homesteading journey today!

Buy Now

Organizing A Deep Freezer

The biggest problems with freezers, whether upright or a chest freezer is that things get lost in the shuffle. It doesn’t matter what you do or how well you organize, you are going to lose stuff in those freezers. Not to mention it’s not something that you go into every day. Or maybe you go into it, but only for the 30 seconds it takes to pull out a couple packs of meat.

And if you have kids, they aren’t going to take the time to gently move things around to find what they need. No, my teenagers just throw things around until they find whatever it is they are looking for and them move on with their life…. It’s infuriating.

Before we get too far into this, I have a great course on the basics of goat care. I call it Goat Crash Course: Goat 101. In this course, I explain things like types of shelter, types of feeds and hays, basic assessments and so much more! Check it out!

Buy Now

Starting To Organize A Deep Freezer

When you are sorting your deep freeze to organize it, make sure that you take the time to clean it out too. Over the years, I found that we tend to only clean out our deep freeze when we are getting a whole cow or hog, which is usually once a year per freezer. We usually purchase a whole cow in July and empty out that freezer, defrost it, and then scrub it out. And we do it for the whole hog in February.

This helps to make sure that any freezer burned meat is either used or given to the chickens. I tend to find a bunch of roasts and will can a bunch of soups for us for the winter. If the meat is just too burned, it goes to the dogs or chickens. I hate wasting food.

After it is sorted, make sure to defrost it. This allows you to get all those weird bits of meat, frost, and other random crap that gets lost in the freezer out. If you have had a freezer before, you know what I’m talking about. Especially, the upright freezers. Everything collects at the bottom of the freezer. Hunks of ice, broken caps, a random chicken wing. It ends up at the bottom!

If you are new to heating with firewood and are looking to master the finer points of it. We’ve got a great eBook that goes in depth of what tools you should consider, how and where to stack, how to build a fire and so much more!

Buy Now

Choosing The Right Size Freezer

When we purchase bulk meat like half/whole cows or whole hogs, we needed more freezer space than just one upright freezer. To give you some insight into freezer sizes, a whole cow will barely fit in an 16cu ft freezer. When I say barely, it’s a game of Tetris to get it all in there. Whole chickens take up a ton of space as well. I would say that you could probably fit 100 whole chickens in that same freezer.

I think it’s better to err on the side of caution and always go at least one “size” up from what you think you’ll need. Especially when it comes to getting whole animals. I have found that if you have the square footage to have a bigger freezer, get the bigger freezer. You will end up using the space. Trust me.

Another thing to consider with freezers is that an upright freezer will be easier to find things, but will not hold as much as you think they will. It is incredibly difficult to pack an upright freezer, no matter the size, due to the likelihood of things spilling out. And yes, milk crates will help with this, but just trust me, get a chest freezer if you are getting irregularly shaped things like packs of meat, veggies, etc.

Chest freezers are where it’s at in my opinion. Yes, it will become a holy terror of a disaster, but you get far more bang for your buck with them. Because it doesn’t matter if you organize it or not, you are able to use every square inch of that space.

The Ultimate Homesteader’s Starter Bundle – Only $47!

Get the tools you need to stay organized, track profits, and manage your homestead with ease!

Includes:
✅ Schedule F Tracker – Simplify tax prep
✅ Profit Calculator – Track earnings
✅ Hay Calculator – Plan livestock feed
✅ Garden Journal – Digital & printable
✅ Herd Health Tracker – Monitor animal care
✅ Simple Budget – Manage finances
✅ Backyard Homestead eBook – Essential tips

$99 value – now just $47! Start your homesteading journey today!

Buy Now

Enter Milk Crates To Organize A Deep Freezer

When it comes to organizing a deep freezer, you need to have the ability to sort those various things (packs of meat, froze veggies, etc) into some sort of organized chaos. I love using milk crates. But a word of caution. Don’t buy cheap file crates from Wal-Mart. You want to get something like this. The sturdier the better. We got the cheap ones from Wal-Mart and it’s gone about how you would expect.

Milk crates saved my sanity when Jared brought home the cow. I’m not going to lie, I was nervous that three coolers of meat was going to create more chaos than me. But we worked through it and got everything separated into five milk crates. They are overflowing but still stackable.

The idea with the milk crates is to have the ability to pick up and move them to get to what is below them. So far it has worked beautifully and I will be buying more crates for my upright freezer to handle that disaster.

The problem with the using milk crates in the upright freezer is not having the ability to see through them to what is inside. Yes, we could label them but if my kids won’t put things up where they go, do we really think that putting a label on the crate will help? I guarantee it won’t.

Our herd health bundle helps you keep track of your herd’s health. Includes the goat assessment, herd check sheets AND Herd Health Tracker!

Buy Now

Clearly Label What Is In The Freezer

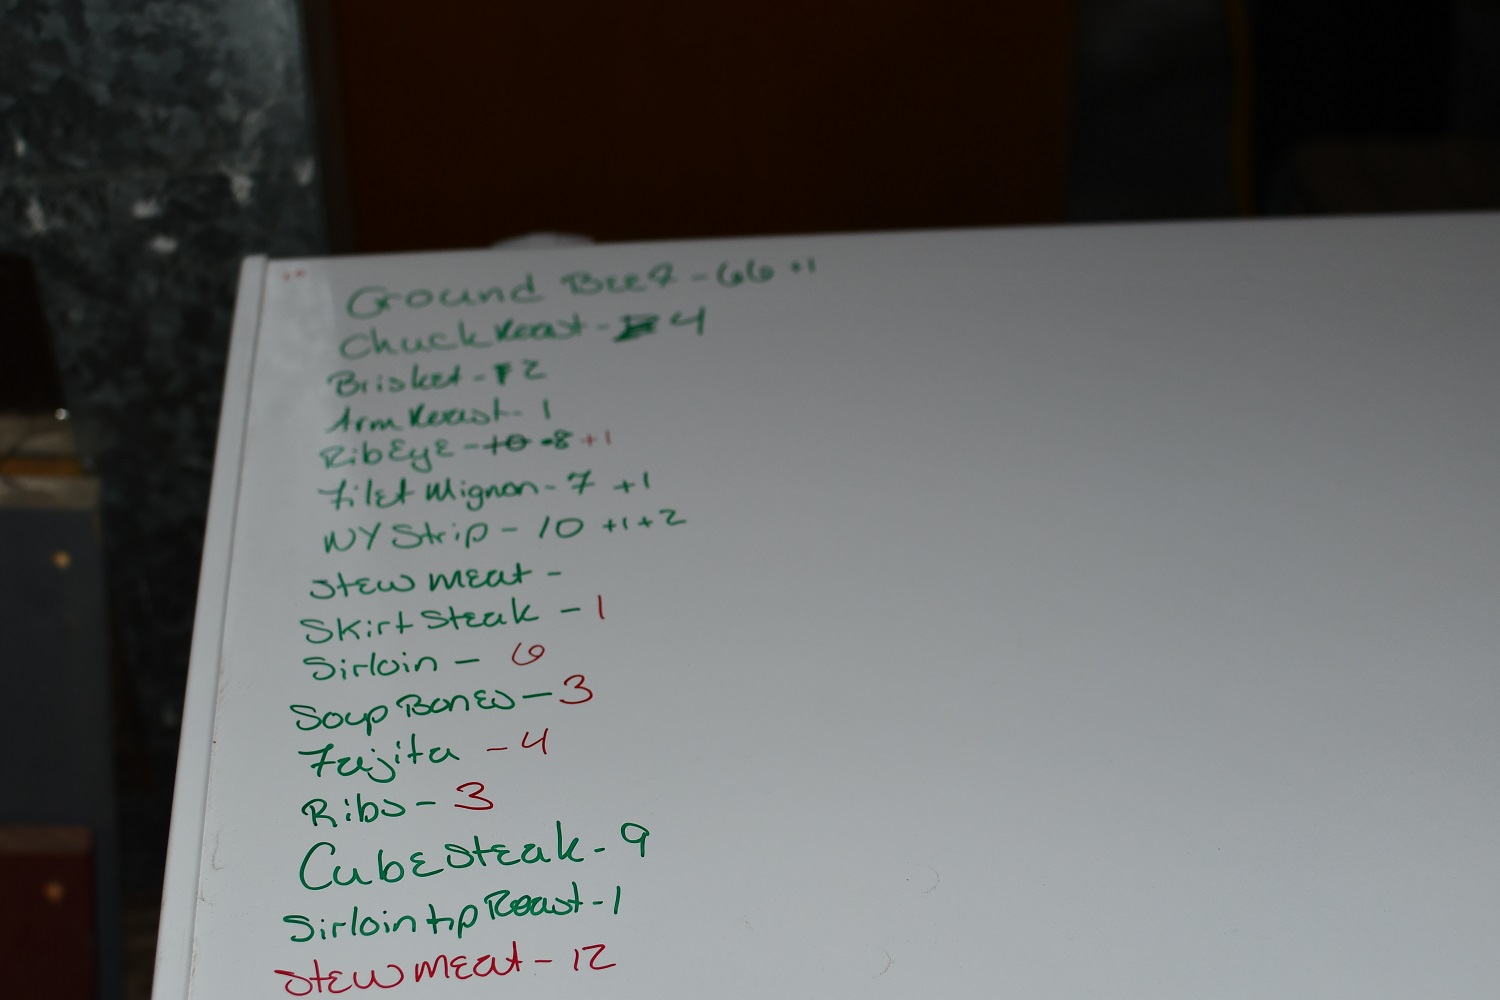
We write on our freezers. This helps keep an eye on inventory levels…. when someone remembers to deduct what they took out…. which no one does. But it’s a good idea. We know that one freezer is full of beef and the other is full of… well other. Unfortunately, what ends up happening, especially with teenage boys, is that they just shove things in the freezer.

That means that you could have cow in one freezer, hog in another and chicken in with the bacon. It’s extremely frustrating. But if you label the outside of the freezer, it could help you a lot more. We have gone so far as to list out how many packs of something is in the freezer. For example, when we load up the freezer with a whole cow, we will put 200 packs of ground beef or 17 sirloin steaks.

This has helped a ton but only if you keep up with it.

If you like the content I put out, feel free to buy us a coffee! It helps keep this site running, marketing and the goats in grain!

Buy me a coffee

If you like this post, feel free to share it and follow us below on our social media accounts!

  • Facebook
  • Pinterest
  • Instagram
  • YouTube
  • TikTok
  • Spotify
  • Threads

Filed Under: How To's, Projects Tagged With: Chickens, cooking, Homestead, kitchen, Organization

JOIN TO OUR MAILING LIST!

Leave us your email to receive new posts and special offers for members only! Don't miss a thing!

Recent Posts

  • Fall Garden Guide
  • Top Mistakes With Goats
  • How To Bond With Your Goats

Homesteading: Start Where You’re At

July 6, 2024 by Leigh Leave a Comment

If you are reading this and you want to homestead, but you aren’t there yet, I’ve got some great advice for you: Start where you’re at. That’s it. It doesn’t matter if you are in an apartment, a townhouse or in a subdivision with a quarter acre lot. Start where you’re at. You don’t need tens of acres in the country to start a garden. You don’t need to be in the country to have a couple chickens. You can absolutely start where you’re at and start pushing the needle to get to where you want to be.

The Ultimate Homesteader’s Starter Bundle – Only $47!

Get the tools you need to stay organized, track profits, and manage your homestead with ease!

Includes:
✅ Schedule F Tracker – Simplify tax prep
✅ Profit Calculator – Track earnings
✅ Hay Calculator – Plan livestock feed
✅ Garden Journal – Digital & printable
✅ Herd Health Tracker – Monitor animal care
✅ Simple Budget – Manage finances
✅ Backyard Homestead eBook – Essential tips

$99 value – now just $47! Start your homesteading journey today!

Buy Now

How To Start Where You’re At

One of the things I hear over and over from people who want to homestead is that they can’t start until they have X. Whether that is land, time, money, or any other made up reason. The reality is that they are excuses, however valid. I have yet to meet or talk to anyone that has a valid reason for not starting where they are.

In an effort to not have a million word blog post, I’m going to talk about the most common reasons that I have heard from people who want to homestead but have said they can’t. Those reason have ranged, but the most common ones I hear is: I don’t have the land. I don’t have the time. Or my favorite, I don’t know where to start.

goat kidding

Before we get too far into this, I have a great course on the basics of goat care. I call it Goat Crash Course: Goat 101. In this course, I explain things like types of shelter, types of feeds and hays, basic assessments and so much more! Check it out!

Buy Now

I don’t have the land to garden

Let me tell you this: you do not have to have a lot of land to start gardening. When we lived in Texas, we lived on a quarter acre and had a small 20x15ft garden. It was tiny, but it provided fresh eating! But more importantly, it taught me how to start and grow plants!

I’ve talked here about when to start a garden, and yes, it’s based on an emergency garden. But I specifically talk about how gardening is a muscle. You have to use it to grow it. I have gardened for over 15 years, but every place that you garden is different and there is so much to learn!

If you don’t have space for a garden because you live in an apartment, start with containers. You can effectively grow tomatoes in a gallon pot (though bigger is better). Squash, cucumbers, beans, strawberries, and so much more absolutely love containers! You don’t need to put them in the ground to have a garden!

Are you getting overwhelmed in the garden? Stressed? Or just not enjoying the garden like you used to? Check out our garden prompts! We send out weekly emails that get you back in the garden and out of your head! Turn the garden back into a place of love and joy instead of frustration and headache!

Subscribe Now!

I don’t have enough land to have animals

I don’t know what kind of animals you want to have, but you can absolutely have chickens in a small space. Sure, the more space they have, the better but you don’t have to have a ton of acreage to have a couple chickens.

But you live in the city? Check your local laws and regulations and see if you can have chickens. Most places, especially now, are fine with a couple chickens. Check it out.

If you live on a small plot but don’t have to worry about laws and regulations, sheep are a great way to keep your lawn mowed. Plus, most of them are happy to stay put. I don’t recommend goats in small spaces because they will Houdini out of a space if they want into your garden.

Yes, you will need space if you want larger livestock like cows. But there is no reason why you can’t start where you’re out and start working towards something bigger.

Our herd health bundle helps you keep track of your herd’s health. Includes the goat assessment, herd check sheets AND Herd Health Tracker!

Buy Now

I don’t have the time

Look, I get it. I don’t have a ton of time either and I HAVE a homestead. I work full time, plus have a couple part time jobs. Not to mention the homestead and homeschooling our boys. I understand the time crunch. But don’t let that get in the way.

There are a lot of ways to work gardening and animals into your life. For example, our kids take care of the goats and chickens while we supervise. We handle the gardens. If you don’t have kids, or they are too little, start small. Get the chickens in the winter when you don’t have much going on. Then expand as you have time.

Another thing that can be tough is harvesting and preserving the garden. The best way I have found to help with this is to dehydrate as much as possible. It really helps with storage space and it takes very little time to actually prep and put up.

cropped-3.jpg

Are you looking for garden journal prompts, but aren’t interested in a weekly email? Check out our 365 Garden Journal Prompts! This is an amazing, all in one, yearly product that you only pay for once.

Buy Now!

I don’t know where to start

I think out of all the reasons that people give to delay starting a homestead, this is the most valid. The reality is that most people weren’t raised to know how to plant a garden, harvest it and then use it later. People don’t know how to take care of animals. And while that is sad, there is a way around it.

I talked here about setting homestead goals and here about a brain dump. And these are two exercises to really look at why you want to homestead. Is it because you want to garden? Or do you want goats for milk? Why do you want to homestead? Once you’ve figured out why you want to homestead, you can start looking for ways to start where you’re at.

If you want to raise goats for milk, but you live in an apartment, this is a challenge. But you can start talking to goat owners about how it all works. YouTube is a great way to get started too. Learning everything you can while you are working towards getting land is a great way to be prepared when the time comes.

If you want to homestead for a garden? Start working what you have now. Depending on the space you have, you could absolutely have a container garden on your apartment patio! It may not feed you through the winter, but it can feed you now. Plus, you get to learn all the nuances of planting seeds, growing plants and harvesting. And all of this is on a scale small enough that you don’t have to freak out if something goes wrong.

Before we get too far into this, I have a great course on the basics of goat care. I call it Goat Crash Course: Goat 101. In this course, I explain things like types of shelter, types of feeds and hays, basic assessments and so much more! Check it out!

Buy Now

Don’t be afraid to fail

One of the biggest lies we have been told is that failure is bad. Failure is a teaching tool. It’s okay to fail, though sometimes the consequences for failure is death. We have lost more goats than I really want to admit. We’ve lost hundreds of chickens and ducks. The amount of food that has been “wasted” is kind of ridiculous. But at the end of the day, we are learning. We aren’t perfect.

We don’t have anyone to teach us how to live this life. No one to hold our hand and show us how to butcher animals, grow a garden, or any other skill that we have learned.

We plan for failure because that makes more sense than planning for everything to go right.

The Ultimate Homesteader’s Starter Bundle – Only $47!

Get the tools you need to stay organized, track profits, and manage your homestead with ease!

Includes:
✅ Schedule F Tracker – Simplify tax prep
✅ Profit Calculator – Track earnings
✅ Hay Calculator – Plan livestock feed
✅ Garden Journal – Digital & printable
✅ Herd Health Tracker – Monitor animal care
✅ Simple Budget – Manage finances
✅ Backyard Homestead eBook – Essential tips

$99 value – now just $47! Start your homesteading journey today!

Buy Now

Taking the first step

I know that sometimes that first step is the hardest to take. I know that it’s terrifying. I know that the fear of failure keeps a lot of us on the sidelines. But I also know that this life is the hardest and most rewarding things I have ever done.

If you like the content I put out, feel free to buy us a coffee! It helps keep this site running, marketing and the goats in grain!

Buy me a coffee

If you like this post, feel free to share it and follow us below on our social media accounts!

  • Facebook
  • Pinterest
  • Instagram
  • YouTube
  • TikTok
  • Spotify
  • Threads

Filed Under: Homestead Planning

JOIN TO OUR MAILING LIST!

Leave us your email to receive new posts and special offers for members only! Don't miss a thing!

Recent Posts

  • Fall Garden Guide
  • Top Mistakes With Goats
  • How To Bond With Your Goats

Training Dogs With Livestock

July 2, 2024 by Leigh Leave a Comment

The entire Farm Dog Series revolves around training “normal” dogs to be farm dogs. It doesn’t talk about training specifically bred dogs to do their tasks. Dogs like cattle dogs or livestock guardian dogs require training that I have not personally worked through. My dogs are pound pups and companion dogs. Their only job is my enjoyment AND raising the alarm. If you are in the same boat, then I am here to talk to you about training dogs with livestock, the pitfalls and triumphs. As well as some general how to’s to get you headed in the right direction.

The Ultimate Homesteader’s Starter Bundle – Only $47!

Get the tools you need to stay organized, track profits, and manage your homestead with ease!

Includes:
✅ Schedule F Tracker – Simplify tax prep
✅ Profit Calculator – Track earnings
✅ Hay Calculator – Plan livestock feed
✅ Garden Journal – Digital & printable
✅ Herd Health Tracker – Monitor animal care
✅ Simple Budget – Manage finances
✅ Backyard Homestead eBook – Essential tips

$99 value – now just $47! Start your homesteading journey today!

Buy Now

Training Dogs With Livestock

Training dogs with livestock isn’t really any different than regular introductions with other animals, except some key points. Most livestock is bigger than the dog and poultry is usually much smaller than the dog. Also, most livestock/ poultry are prey animals and most dogs are predators. Those key differences are pretty big. But the introduction phase is still always the same, regardless of the animals being introduced. The tools for introduction need to be on point because you don’t want your dog getting a cow riled up.

But before we get started into training dogs with livestock, I want to quickly mention a few things. First, your dog should already be decently trained. They should be able to walk on a leash without going crazy or dragging you around. They should have bonded with you before and during training to ensure that they will listen to you. Their recall should be damn near perfect. These things are absolutely essential in introducing your farm dog to livestock.

Before we get too far into this, I have a great course on the basics of goat care. I call it Goat Crash Course: Goat 101. In this course, I explain things like types of shelter, types of feeds and hays, basic assessments and so much more! Check it out!

Buy Now

Start With Introductions

As I stated above, your farm dog should be easily controlled. I NEVER recommend introducing animals to other animals without having some measure in place to maintain safety. In this instance, with dogs, the dog needs to be leashed. Period. I don’t care how well they respond t you, other animals or how well trained.

Due to the nature of dogs and livestock, especially large livestock, you should never put your animals in a position where they can get injured or killed. That means that Fido goes on a leash and the livestock is behind a fence. Initial introductions should always be made through a fence or other barrier. This will allow both animals to feel safer.

Once brought to the fence, you should then, keeping your dog calm and focused on you, allow your livestock to sniff or investigate the dog. If the dog feels threatened, then talk to them and work to calm them. You have to remember that a cow, horse, donkey, or other large animal can be absolutely terrifying to your dog. This thing is huge compared to them. Keeping your dog calm and reassured is key.

If the dog and livestock are both calm and neither are acting riled up. You can get the animals closer, and closer and closer until you are in the pen with the livestock. Sometimes, this never happens. Other times, it’s all within the same day or training session. It really depends on the animals involved.

Introductions for any animals should always be done with at least two CALM people. You don’t want to do this with someone, especially kids, that are going to be distracting or freaking out. Make sure that whoever is helping you is going to either control the dog or be with the livestock.

If you are new to heating with firewood and are looking to master the finer points of it. We’ve got a great eBook that goes in depth of what tools you should consider, how and where to stack, how to build a fire and so much more!

Buy Now

Introductions with smaller livestock

I wanted to talk briefly about introducing dogs to smaller livestock or poultry. When you have medium to extra, extra large dogs, you really want to be careful with introductions to other small animals. The biggest concern when introducing larger animals to smaller animals is the fact that the large animal is well…. large. If you don’t think you can control that animal, you do not need to start making introductions at all.

When you are introducing a 75# pound pup to a baby goat, you need to be ready that the dog is going to at a minimum try to play with the goat, at a maximum, try to kill it. We want to make sure that all animals being introduced are safe. So make sure that no matter what, you are able to control the dog.

You need to understand that small animals and poultry sound a lot like squeaky toys to dogs. And most of us have used squeaky toys to work with our dogs. This has taught them that chewing on these toys creates a squeak…. well guess what that dog is going to do with your baby goat, lamb, chicken, etc. So I recommend not introducing dogs, especially puppies, to small livestock or poultry until you have a Leave It command on point and it’s solid.

Our herd health bundle helps you keep track of your herd’s health. Includes the goat assessment, herd check sheets AND Herd Health Tracker!

Buy Now

Introducing Predator To Prey

One of the things that most people have forgotten is that their dog is a predator. I know, it’s shocking. But your dog is descendant of a wolf. And while we have bred most of those instincts out of them, they are at their core a predator. But as we start letting our dogs be dogs, you are going to find that your normally docile apartment dog is now chasing chickens. This is totally normal. Please don’t get mad at your dog because they are doing exactly what they should be doing. They are dogs and dogs are predators.

But most dogs don’t want to eat chickens, baby goats, and other animals. To be honest, every time Blu would catch a chicken, she would kind of freak out because she didn’t know what to do with it once she caught it! Most dogs are like that. They aren’t trying to hurt the creature, they were trying to play with it. But they do because they don’t know any better.

The best thing that you can do is to make introductions. Then make those introductions as stress free as possible for everyone, yourself included. The best way to do this is to teach your commands and basic obedience with your dog. The next step is make introductions through a barrier and with leashes. After that, start working on getting those two animals close to each other and let your dog know to leave it alone.

The Ultimate Homesteader’s Starter Bundle – Only $47!

Get the tools you need to stay organized, track profits, and manage your homestead with ease!

Includes:
✅ Schedule F Tracker – Simplify tax prep
✅ Profit Calculator – Track earnings
✅ Hay Calculator – Plan livestock feed
✅ Garden Journal – Digital & printable
✅ Herd Health Tracker – Monitor animal care
✅ Simple Budget – Manage finances
✅ Backyard Homestead eBook – Essential tips

$99 value – now just $47! Start your homesteading journey today!

Buy Now

Tools And Training Dogs With Livestock

I talked in depth about the tools to needed to train your dogs here. That list is full of all the things that I use to train my dogs. Since we are talking about potentially dangerous situations, I would hold off on all introductions with livestock until you get to the point that your dog is trained on an ecollar. The reason is that we want to protect our livestock. If for some reason everything goes to hell in a hand basket, that ecollar may be the only thing that keeps your goat or chicken alive.

Personally, I would not let any dog meet any livestock until they are damn near perfect on their recall, leash work, and your bond. Also, I wouldn’t let Fido anywhere near livestock until you have safe, effective fencing or barriers for your livestock/poultry.

In real life, I am a paramedic so that means that I meet a lot of dogs. And the vast majority of the time, every pet owner will say something along the lines of “Oh, he’s friendly. He doesn’t bite.” And my response is always the same…. “Maybe, but today could be the day.” That being said, your dog may be the friendliest dog out there, until there is a baby goat running around screaming and jumping. Even the best trained dog is going to be freaked out until they know what this thing is.

I am going to repeat what I said before. When it comes to training dogs with livestock, you first have to have adequate control and protection over both animals, dog and livestock. Then you start with introductions through the fence. Then you bring them closer and closer and closer until they can safely meet face to face. Provide tons of reassurance and praise when everyone is happy. Don’t be afraid to correct if either of the animals starts showing out.

Finally, patience. This training doesn’t need to happen in a day. If it takes a year to get your dog comfortable with livestock, then it takes a year. Period. Both animal’s safety is more important.

Before we get too far into this, I have a great course on the basics of goat care. I call it Goat Crash Course: Goat 101. In this course, I explain things like types of shelter, types of feeds and hays, basic assessments and so much more! Check it out!

Buy Now

Farm Dog Series

If you liked this post and want to read the rest of our farm dog series you can check those out here.

Other Posts From Training A Farm Dog Series

How I Train My Farm Dogs

How To Train Farm Dogs

Tips, Tools and Hacks For Training Farm Dogs

Best Breeds For Farm Dogs

Commands For Training Farm Dogs

If you like the content I put out, feel free to buy us a coffee! It helps keep this site running, marketing and the goats in grain!

Buy me a coffee

If you like this post, feel free to share it and follow us below on our social media accounts!

  • Facebook
  • Pinterest
  • Instagram
  • YouTube
  • TikTok
  • Spotify
  • Threads

Filed Under: Animals, Farm Dogs, How To's

JOIN TO OUR MAILING LIST!

Leave us your email to receive new posts and special offers for members only! Don't miss a thing!

Recent Posts

  • Fall Garden Guide
  • Top Mistakes With Goats
  • How To Bond With Your Goats

Breeding Goats Without A Buck

June 29, 2024 by Leigh Leave a Comment

I’m sure you’ve heard the horror stories of keeping a buck on the property with your does. You’ve probably heard that they stink to high heaven. Or that they will breed through fences… or say what fence. I’ve kept bucks since the beginning of our goating journey and while I don’t mind them, I can totally understand why people wouldn’t want to keep a buck. But if you are looking to breed for milk or meat or for whatever reason you decide, how do you go about breeding goats without a buck?

goat kidding

Before we get too far into this, I have a great course on the basics of goat care. I call it Goat Crash Course: Goat 101. In this course, I explain things like types of shelter, types of feeds and hays, basic assessments and so much more! Check it out!

Buy Now

Breeding Goats Without A Buck

First and foremost, breeding goats without a buck will not happen. You absolutely can’t do it. Basic biology says that you have to have sperm and an egg to make a fetus. BUT if you are not wanting to house bucks on your property long term, you do have some options. The 3 big ones are driveway breeding, seasonal bucks, or stud rentals….

Before we get into those ways of breeding without a buck, first I want to touch on why some people may not want a buck full time. I’ll tell you our experience with keep bucks full time so you can get a more rounded picture.

Why Not Keep A Buck Full Time

There are a lot of reasons not to keep a buck on your property full time. The first would be feeding. Bucks can consume a TON of food. And considering that for most farms or homesteads, they only have one purpose, to breed. So keeping around a buck that is going to eat a lot but only reproduce? That’s a tall order.

Another reason people don’t want to keep bucks is because they stink. Now, they only really stink during rut, but rut can last a long time. Rut is when bucks will fight other males, pee on their faces, and be a general nuisance.

cropped-3.jpg

Are you looking for garden journal prompts, but aren’t interested in a weekly email? Check out our 365 Garden Journal Prompts! This is an amazing, all in one, yearly product that you only pay for once.

Buy Now!

Fence jumping or fence breeding is another big concern with keeping bucks full time. We have had several very stubborn does that were going to get their man when they came in heat. Short of tethering those does, they were going to get bred through the fence. However, it was not uncommon for the bucks to jump fences to get to the girls.

Now that we’ve covered why not to have bucks, let’s talk about ways to breed without keeping a buck full time.

Our herd health bundle helps you keep track of your herd’s health. Includes the goat assessment, herd check sheets AND Herd Health Tracker!

Buy Now

Driveway Breeding

This option is exactly what it sounds like. You contact someone like me, who offers stud services, and tell them that you would like to use their buck to your does. This can be done in one of two ways. You bring your girls to the stud and let them do their thing in the driveway. Or they come to your does. Either way, the goal is the same, the hook up happens in the driveway.

There are some drawbacks to this option. The first is that if you missed your does heat cycle, you waste everyone’s time and stress the goats. The second is that if it doesn’t take, you have to do it again. Finally, trying to line up schedules to make sure that the goats get together at the right time can be a pain.

However, there are some pros to this style of stud service. Things like having full control over when babies are born, exactly what genetics you are adding to your herd, and not having the added expense and chores of a separated buck.

Before we get too far into this, I have a great course on the basics of goat care. I call it Goat Crash Course: Goat 101. In this course, I explain things like types of shelter, types of feeds and hays, basic assessments and so much more! Check it out!

Buy Now

Seasonal Bucks

Another great option, and the one most similar to what we use, is seasonal bucks. This is when you purchase a buck for the season and then either sell him at the end of your season or send him to freezer camp. I like this option the best because you don’t have to worry about trying to keep someone else’s buck alive for the season. This is your buck, not someone else’s.

Another reason why this is a good option is because you don’t have to keep a buddy for him. Remember, I told you here that goats are herd animals. That means that if you keep a buck full time and don’t keep your herd together at all times, you will have to have a wether for your buck to keep him company. But if you buy a buck in September for breeding spring and fall babies, and butcher in November, you don’t have to keep a wether.

The downside to this is the expense of purchasing a buck every year and then figuring out what to do with them afterwards. Especially, if you aren’t interested in sending it to freezer camp. I’ll tell you right now, it is extremely hard to sell bucks.

The Ultimate Homesteader’s Starter Bundle – Only $47!

Get the tools you need to stay organized, track profits, and manage your homestead with ease!

Includes:
✅ Schedule F Tracker – Simplify tax prep
✅ Profit Calculator – Track earnings
✅ Hay Calculator – Plan livestock feed
✅ Garden Journal – Digital & printable
✅ Herd Health Tracker – Monitor animal care
✅ Simple Budget – Manage finances
✅ Backyard Homestead eBook – Essential tips

$99 value – now just $47! Start your homesteading journey today!

Buy Now

Stud Rentals

This is something that we have done a few times with our bucks with mix results. Basically, you would contact your local goat or livestock group and ask if anyone rents out their bucks. You would select your buck, set terms like amount of time the buck will be at your homestead, any testing you would like done or have results for, and how much your willing to pay.

It’s not uncommon for stud rentals to be about $100/mo depending on what you are looking for. A show quality buck with all biosecurity testing could be upwards of $500/mo depending on your area. A registered buck could be a couple hundred. It really depends. Also, there is usually a contract of some sort that says if you break it, you buy it. Which is totally fair.

I think this could be the most bang for your buck if you know that you can’t send the buck to the freezer at the end of the season.

goat kidding

Before we get too far into this, I have a great course on the basics of goat care. I call it Goat Crash Course: Goat 101. In this course, I explain things like types of shelter, types of feeds and hays, basic assessments and so much more! Check it out!

Buy Now

Our Experience With Keeping Bucks

We have kept bucks full time from day one. I didn’t want the added expense and headache of trying to find stud services and constantly switch out bucks. There are some things of note that we have found work well for us.

We leap frog our bucks, getting a new one every year and sending the 2 or 3 year old buck to the freezer. Midas will be going to the butcher in November (2024) because he has fathered too many of our retained does. Maverick is our next herd sire, he will be allowed to hang with Midas and learn the ropes before it’s “his turn”. Then during kidding season (Early 2025), we will pick another buckling to be the following year’s herd sire. Maverick will have until November 2026 before he goes to freezer camp.

Our herd health bundle helps you keep track of your herd’s health. Includes the goat assessment, herd check sheets AND Herd Health Tracker!

Buy Now

Letting Bucks Be Bucks

Another thing we have found is that when we allow a buck to stay with his girls, he isn’t solely focused on breeding. In fact, he becomes a herd protector and has ran off coyotes and other predators. Is it full proof? No. But allowing animals to follow their natural instincts is amazing to watch.

We have found that if we keep our bucks separate from the girls, they are far stinky-er than if just leave them with the girls. So we will let the buck stay with his group of girls 24/7 and he doesn’t need to compete with the other bucks. However, they will absolutely pee all over themselves and get rowdy. But it’s not nearly as bad as when we have separated them.

I enjoy having the ease of keeping bucks on the farm. We will always have bucks here, especially because they will keep the girls in check and protected. That’s a win in my book.

If you like the content I put out, feel free to buy us a coffee! It helps keep this site running, marketing and the goats in grain!

Buy me a coffee

If you like this post, feel free to share it and follow us below on our social media accounts!

  • Facebook
  • Pinterest
  • Instagram
  • YouTube
  • TikTok
  • Spotify
  • Threads

Filed Under: Animals, Breeding, Goats Tagged With: Goats, Homestead

JOIN TO OUR MAILING LIST!

Leave us your email to receive new posts and special offers for members only! Don't miss a thing!

Recent Posts

  • Fall Garden Guide
  • Top Mistakes With Goats
  • How To Bond With Your Goats

What To Do With Squash

June 25, 2024 by Leigh Leave a Comment

Squash is a very prolific plant for us. We don’t have a ton of pressure from squash bugs, though we do have them. But it doesn’t take long before we are drowning in squash. If you have squash coming out of your ears, you have probably asked the magical Google what to do with squash. I’ve compiled a list of the various things we do with squash that not only feed us but our animals. Plus a bonus on what we do with winter squash.

The Ultimate Homesteader’s Starter Bundle – Only $47!

Get the tools you need to stay organized, track profits, and manage your homestead with ease!

Includes:
✅ Schedule F Tracker – Simplify tax prep
✅ Profit Calculator – Track earnings
✅ Hay Calculator – Plan livestock feed
✅ Garden Journal – Digital & printable
✅ Herd Health Tracker – Monitor animal care
✅ Simple Budget – Manage finances
✅ Backyard Homestead eBook – Essential tips

$99 value – now just $47! Start your homesteading journey today!

Buy Now

What To Do With Squash

Squash is one of the most versatile veggies in the garden. Probably second only to tomatoes and potatoes. It’s a fast growing and productive plant, that if you can keep healthy, will out produce EVERY plant in the garden. But when even you are rebelling against eating one more sauteed squash for dinner, it can be overwhelming.

There are two types of squash; summer and winter. Depending on where you live, you may be able to keep your winter squash without having to do anything with it. I’ll go over more on how to keep winter squash at the bottom of this post. But unless otherwise stated, this post is focused more on summer squash.

But I wanted to go over some of the ways that we use our squash so that we aren’t just throwing out moldy squash. There are three big things that we do with squash, besides fresh eating; freeze it, dehydrate it or give it to our animals.

Before we get too far into this, I have a great course on the basics of goat care. I call it Goat Crash Course: Goat 101. In this course, I explain things like types of shelter, types of feeds and hays, basic assessments and so much more! Check it out!

Buy Now

Freezing Squash

Freezing squash is a great way to extend the shelf life of this beloved veggie. Though there are some considerations. First is that very few things have the best texture when coming out of the freezer. So if that is going to be a problem, then don’t put your entire harvest in the freezer. Also make sure that you are washing your produce before you put it in the freezer!

When we put squash in the freezer, we usually slice it into half inch medallions and lay them on a tray with either parchment paper or silicone mats. This allows the squash to freeze separately before going in a bag. You don’t have to, but it makes thawing a lot easier. We will also cube it or grate it and store depending on what we need it for.

Squash will hold it’s shape well when thawing but it is usually going to taste better in soups, stews, or mashed up. We will use it in stir fry’s and have enjoyed it, but again, remember texture will be a thing.

Lastly, be aware that the more stuff you put in your freezer, the harder it will be to find it later. No matter how well you keep your freezers organized, it’s only a matter of time before you find a 6 year old bag of squash at the bottom of your freezer.

If you are new to heating with firewood and are looking to master the finer points of it. We’ve got a great eBook that goes in depth of what tools you should consider, how and where to stack, how to build a fire and so much more!

Buy Now

Dehydrating It

This is hands down my favorite way to store squash. It takes up less space and uses zero electricity to store. I also love the fact that I can set it and forget it, in the dehydrator. It’s not like it’s going to spoil sitting in a running dehydrator. I use this dehydrator and absolutely love it! Also, I go more in depth about dehydrating foods here.

I will chunk up several trays worth of various squash to put in the dehydrator. Then I turn it on to veggie and let it run until I remember it’s been going for 3 days…oops. Once it’s done, or I remember it exists, I will pump them into half gallon mason jars like this and store.

Now, you can and probably should put oxygen absorbers in there, but usually I don’t. I haven’t found any issues with not doing it. You can also use mylar bags, but I have found that keeping everything in jars is better for my set up. The reason I don’t bother with oxygen absorbers and bags is because I’m not usually storing for more than a year.

Are you getting overwhelmed in the garden? Stressed? Or just not enjoying the garden like you used to? Check out our garden prompts! We send out weekly emails that get you back in the garden and out of your head! Turn the garden back into a place of love and joy instead of frustration and headache!

Subscribe Now!

When it comes to using dehydrated squash, I usually throw it in soups and stews for extra veggies. It also helps absorb any extra water and flavoring.

To reconstitute dehydrated squash, I will fill the bottom of a bowl with however much I needed, then add boiling hot water over the top, covering the squash with several inches of water. If I need more water, I’ll add more as the squash absorbs it. But again, usually my dehydrated squash is going into soup.

Give Squash To Your Animals

Most animals can eat most squashes without worry. Yes, there will be outliers that can’t handle squash, but for the most part, squash is perfectly safe for animals to eat. But if you have questions, reach out to a vet. That being said, we will gladly give our animals excess squash.

Our chicken’s run is right next to the garden so when I fill my basket with squash, I will chuck whatever is ready but I can’t use over the fence to them. They love it! Plus this helps reduce our feed bill which is always a win win.

Also, the seeds from squash can act as a natural dewormer for your animals, so win, win, win.

When we feed squash to the goats, we do it in moderation AND we cut it into smaller pieces. Their mouths are not very big and we don’t want to cause them to choke.

goat kidding

Before we get too far into this, I have a great course on the basics of goat care. I call it Goat Crash Course: Goat 101. In this course, I explain things like types of shelter, types of feeds and hays, basic assessments and so much more! Check it out!

Buy Now

Storing Winter Squash

Finally, when it comes to winter squash, there are a few more things to consider. First and foremost, winter squash is grown for storage. The skin of it is thicker and able to withstand storage. Usually, you can store winter squash for about 3 months in ideal situations. This means a cool, dark place with good air flow.

The problem with that is I don’t really have an ideal place to store winter squash, whole. Come end of harvest season, my canning shelves are crammed with jars of food, storage items, potatoes, and other random bits. So my favorite way to store winter squash is to either can it or freeze it.

Usually, I will peel the squash, scoop the seeds and cube it. I will either flash freeze it (freezing on silicone mats or parchment paper) and put it into bags. Or I will go ahead and can it. I don’t usually dehydrate winter squash because it takes so long, but I’m not opposed to it either. It really depends on my mood and what I have going on at the time.

cropped-3.jpg

Are you looking for garden journal prompts, but aren’t interested in a weekly email? Check out our 365 Garden Journal Prompts! This is an amazing, all in one, yearly product that you only pay for once.

Buy Now!

I hope this helps you figure out what all you can do with your squash!

If you like the content I put out, feel free to buy us a coffee! It helps keep this site running, marketing and the goats in grain!

Buy me a coffee

If you like this post, feel free to share it and follow us below on our social media accounts!
  • Facebook
  • Pinterest
  • Instagram
  • YouTube
  • TikTok
  • Spotify
  • Threads

Filed Under: Dehydrating Food, Freezing, Garden, Working With Food Tagged With: Chickens, dehydrating, Eggs, food, freezing, Garden, Goats

JOIN TO OUR MAILING LIST!

Leave us your email to receive new posts and special offers for members only! Don't miss a thing!

Recent Posts

  • Fall Garden Guide
  • Top Mistakes With Goats
  • How To Bond With Your Goats

Traveling When You Homestead

June 22, 2024 by Leigh Leave a Comment

As I sit here writing this, I am supposed to be packing, cleaning and getting ready to hit the road in two days. We are going out of town for the Homesteaders Of America Conference in Virginia this weekend. Instead of packing and getting last minute chores done, I sit here thinking about all the things I need to do, but I am obviously not doing… Thanks ADD. But all of this did get me thinking that brand new homesteaders may be struggling with the logistics of traveling when you homestead.

The Ultimate Homesteader’s Starter Bundle – Only $47!

Get the tools you need to stay organized, track profits, and manage your homestead with ease!

Includes:
✅ Schedule F Tracker – Simplify tax prep
✅ Profit Calculator – Track earnings
✅ Hay Calculator – Plan livestock feed
✅ Garden Journal – Digital & printable
✅ Herd Health Tracker – Monitor animal care
✅ Simple Budget – Manage finances
✅ Backyard Homestead eBook – Essential tips

$99 value – now just $47! Start your homesteading journey today!

Buy Now

Traveling When You Homestead

When most people travel, they have to find someone to watch their dogs, cats, maybe a snake or lizard. Usually, it is not a big deal. But when you have gardens that need to be harvested, animals that need to be fed and watered, medications to be given, sometimes finding someone is extremely difficult.

Tractor Supply

I’m not going to lie, traveling when you homestead can be a logistical nightmare. It’s not as easy as it was pre homestead. But your days of traveling aren’t over, they just look a little different now. Some homesteaders rarely leave their property. Others will only travel a certain distance away. Still others will globe trot in the winter. There is no right or wrong answer to traveling and homesteading. It’s all about logistics.

goat kidding

Before we get too far into this, I have a great course on the basics of goat care. I call it Goat Crash Course: Goat 101. In this course, I explain things like types of shelter, types of feeds and hays, basic assessments and so much more! Check it out!

Buy Now

Our Travels

Pre-homestead, we just needed to find someone that could either stay at the house with our four dogs, two cats and three bearded dragons or at least let dogs out to go to the bathroom and feed them. Heading out for a quick overnight or weekend trip was as simple as calling one of Jared’s buddies from the fire department to have them do a drive by the house and let the dogs out. Rarely was it a big deal.

Post- homestead? There’s a lot more.

The first time we went out of town, we went to Yellowstone for a week. One of my friends from work was willing to stay the week and hang out with the animals. She had a crash course in goats and we prefilled their foods, medications and anything else we could to make her life easier. She did fantastic and I am extremely grateful for her.

The second trip is to Virginia for the conference. We were lucky that our neighbor is willing to help us out since he will be home all weekend. But how do you travel when you are knee deep in kidding season, or canning season?

Below is how I get prepared to leave the homestead for a few days.

If you are new to heating with firewood and are looking to master the finer points of it. We’ve got a great eBook that goes in depth of what tools you should consider, how and where to stack, how to build a fire and so much more!

Buy Now

Getting A Farm Sitter

The first thing to do is to line up your farm sitter for your trip. If you’ve got friends or family that is willing to help out, all the better. But if not, check with your local 4-H or FFA. There are a ton of kids that are well versed in farming and would love to make some money. You could also get in touch with your local feed store and see if they know of anyone that would be willing to come out and help.

There are a ton of people out there that are willing to help out if the pay is right. There is no set rate for this, either. Some people who only have a few chickens and need someone to harvest the garden is going to charge less than someone you load chores on.

Logo 468x60

Have your farm sitter come out to the farm to go over everything with you. I leave a typed list of all the things that need to be done in order of animals. So goats have their own list, dogs, chickens, etc.

If you have a friend coming over and they know nothing about feeding animals, go ahead and pre-fill buckets or jars with feed, so all they have to do is dump and go.

Save on Seeds

Clean Up Before You Go

This isn’t just cleaning your house. It’s mucking out the stalls, barns and coops and laying fresh bedding. Move chicken tractors, electric netting, etc. so that they don’t have to mess with it. It’s fresh sheets on the bed if they are spending the night. Make sure that they do not have to do that stuff while your gone.

When we leave, we make sure that the only thing they have to do is feed and water animals, let out dogs, and collect eggs.

Harvesting The Garden

First, let me just say this, planning a vacation in July/ August, is not the best possible scenario. Can it be done? Absolutely. But if there is a choice, maybe not go during peak harvest time.

If you are in mid swing with canning and harvesting the garden, life just got a little harder. But it’s still not impossible. When we went to Yellowstone, we told my friend, you can keep anything the garden produces and any eggs the hens lay. If you don’t want it, throw it to the chickens.

But if it’s the middle of August and you are harvesting the garden every day, that’s a lot of produce to “lose”. Here are some quick tips:

The farm sitter can have anything the garden produces.

Peppers can be frozen, tomatoes too.

Cucumbers and summer squash can go to the goats, chickens and pigs.

Watermelons can stay on the vine for a few days extra.

Look into other ways your produce can be saved until you get back and have your farm sitter do that.

goat kidding

Before we get too far into this, I have a great course on the basics of goat care. I call it Goat Crash Course: Goat 101. In this course, I explain things like types of shelter, types of feeds and hays, basic assessments and so much more! Check it out!

Buy Now

Other Random Chores

Sometimes you have to leave and you have a goat in milk. Or sometimes you had an accidental breeding and now you are going on vacation when your favorite doe is going to kid. You’ve got eggs in the incubator or you’ve got chicks in the brooder. Maybe you have a last minute trip and need to butcher chickens. Or you have a sick animal that needs medications.

All of these things happen. A good farm sitter is invaluable. In theory, you should find someone that is comfortable doing all of those things. The reality is Prior Proper Planning Prevents Piss Poor Performance. That’s not to say that anyone is at fault, quite the opposite. If you can plan around your vacation, and prepare your farm sitter, everything will be fine.

Tractor Supply

In the situation of a goat in milk, see if your farm sitter is comfortable milking. If not, try drying her up before you leave. If that won’t work, think about putting her baby back with her while you’re gone. Another option is to see if you have a goat friend that would be willing to keep her while you’re gone.

Prepare

The best thing you can do when you are preparing for travel is to be as prepared as possible. Our vet has our credit card on file so that if anything happens, we are good to go. We have lists for the farm sitter. Our neighbors are willing to help out and, not only do they have knowledge of animals but have actually met our animals.

Logo 468x60

Having a good infrastructure in place is also key to making sure that you are good to go. Setting up your farm to be automated, like automatic waterers for the garden and animals, helps tremendously.

Enjoy

Lastly, enjoy your trip! Seriously, you have probably earned it. Especially in the fall/ winter when everything is buttoned up for the season and it’s time to relax and plan for spring.

If you like the content I put out, feel free to buy us a coffee! It helps keep this site running, marketing and the goats in grain!

Buy me a coffee

If you like this post, feel free to share it and follow us below on our social media accounts!
  • Facebook
  • Pinterest
  • Instagram
  • YouTube
  • TikTok
  • Spotify
  • Threads

Filed Under: Animals, Chickens, Goats, How To's, Our Homestead, Pigs Tagged With: Eggs, Goats, Homestead, traveling

JOIN TO OUR MAILING LIST!

Leave us your email to receive new posts and special offers for members only! Don't miss a thing!

Recent Posts

  • Fall Garden Guide
  • Top Mistakes With Goats
  • How To Bond With Your Goats
  • « Go to Previous Page
  • Page 1
  • Interim pages omitted …
  • Page 7
  • Page 8
  • Page 9
  • Page 10
  • Page 11
  • Interim pages omitted …
  • Page 23
  • Go to Next Page »

Primary Sidebar

WELCOME

WELCOME

My name is Leigh and I am the lead chaos creator here at Steel Raven Farms. You will see throughout this blog that I am the crazy goat lady.

I am married to my high school sweetheart, Jared and we have two amazing boys.

FOLLOW ME

  • Amazon
  • Facebook
  • Instagram
  • Pinterest
  • TikTok

GET UPDATES!

Leave us your email to receive new posts and special offers for members only! Don't miss a thing!

In all the years that I’ve been growing a garden, the fall garden has steadily remained my favorite. Which is funny because I don’t really like any of the brassicas, which is what most people know the fall garden for. I prefer the root vegetables and cool air. But I have learned over the years…

Read More

  • Animals
    • Chickens
    • Farm Dogs
    • Goats
  • Garden
    • Compost
    • Garden Projects
    • Seeds and Plants
    • Garden Journal
    • Working With Food
      • Recipes
      • Freezing Foods
      • Dehydrating Foods
      • Canning Tips And Tricks
        • Canning Inventory Sheets
  • Helpful Info
    • Welcome to the Homestead!
    • Emergency Preparedness
    • Frequently Asked Questions
    • Goal Setting
    • Project List
    • Shop Digital Products
      • Hay Calculator
      • Farm Expense And Income Tracker
      • Goat Crash Course: 101
      • Garden Journal Prompts
      • Schedule C Tracker
      • Schedule C Tracker
      • The Homestead Bundle
  • The Truths
  • Episode List
  • Start Here
    • Privacy Policy
    • Affiliate Disclosure
    • Let’s Get in Touch
    • Members Only Library
    • Welcome To Our Homestead

Footer

  • Email
  • Facebook
  • Instagram
  • Pinterest

COME AND GET IT!

Leave us your email to receive new posts and special offers for members only! Don't miss a thing!

· Midnight Theme

Copyright © 2026 · Midnight Theme on Genesis Framework · WordPress · Log in