• Skip to primary navigation
  • Skip to main content
  • Skip to primary sidebar
  • Skip to footer

Steel Raven Farms

Where muck boots meet ground.

  • Animals
    • Chickens
    • Farm Dogs
    • Goats
  • Garden
    • Compost
    • Garden Projects
    • Seeds and Plants
    • Garden Journal
    • Working With Food
      • Recipes
      • Freezing Foods
      • Dehydrating Foods
      • Canning Tips And Tricks
        • Canning Inventory Sheets
  • Helpful Info
    • Welcome to the Homestead!
    • Emergency Preparedness
    • Frequently Asked Questions
    • Goal Setting
    • Project List
    • Shop Digital Products
      • Hay Calculator
      • Farm Expense And Income Tracker
      • Goat Crash Course: 101
      • Garden Journal Prompts
      • Schedule C Tracker
      • Schedule C Tracker
      • The Homestead Bundle
  • The Truths
  • Episode List
  • Start Here
    • Privacy Policy
    • Affiliate Disclosure
    • Let’s Get in Touch
    • Members Only Library
    • Welcome To Our Homestead

Working With Food

The Homestead Holiday Gift Guide

October 2, 2022 by Leigh Leave a Comment

The holidays are coming and with that comes the desire to get those that matter to us gifts that are meaningful and useful. If you are living on a homestead, or have relatives that do, this list is packed full of great ideas to help you get the most bang for your buck. While also get something that they will love. Some of the things on this list are things that are on our own holiday wish list. Others are things that we have already bought and absolutely love. This homestead holiday gift guide is sure to have something for your homesteader.

If you are a homesteader, and your family doesn’t know what to get you for the holidays? Share this with them. Or, if you are going to a holiday party and need a hostess gift? Check out the $0-$50 section below. It’s got a ton of great ideas.

Homestead Holiday Gift Guide

I have broken this guide up into price points because that’s important. No one wants to find the perfect gift and realize it’s outside of their price range. Also this entire post is filled with affiliate links. Buying from these links doesn’t charge you any extra but it does allow us to make some extra money for the farm. You can read more about our affiliate disclosure by clicking the link.

But First Some Housekeeping

The holiday season is a time for giving. As the giver, you are giving someone a gift that you thought they would like or that made you think of them. And friends? That is amazing. As the recipient, it is an awesome feeling when someone hands you a gift and says, “This made me think of you.” But also as a recipient, I don’t want you to waste your money on me. I would rather you donate that money to a good cause like animal rescue, save the bees, or really anything where the money actually goes to the cause.

Sometimes though, the gift giver simply wants to give you a gift. And if you are getting a gift for a homesteader, you may be a little lost on what to get them. You know they don’t want anything, but you are bound and determined to get them something. Most homesteaders would love to receive a gift that works on the farm. So let’s talk about homestead holiday gifts.

$0-$100 Gifts

First and foremost, GIFT CARDS. I can not stress this enough. I know, it seems like such an impersonal gift. But it is seriously the BEST gift I could receive and I know a lot of other people feel the same. I hate wasting money and when people buy things that I can’t use, it bothers me. Not because I’m spoiled, although that is true too. It’s because that person spent their hard earned money on things that won’t get used, can’t be returned, etc. So seriously consider gift cards to places like Home Depot, Tractor Supply and Amazon.

Tractor Supply

Digital Prints, Digital Art Work, or Printables– I have several different digital photography prints in my Etsy store and they are a huge hit. Unlike regular artwork, these are digital and can be printed at any size you want. These make fantastic hostess gifts, too. You will usually find prints for less than $10 and it doesn’t cost more than a few more dollars to have them printed at Walmart, Target, Sams, etc.

Ask About Their Amazon Wish List– Almost anyone that regularly shops on Amazon has at least one wish list. I have 10. But ask them for a link to their wish list so you can be sure to get something that they will love.

Donations– Every year there is that one person that you have absolutely no idea what to get them. I’ve got a family full of them. Instead of getting them a present that is going to hang out in the garage for the next 5 years, you know who you are, make a donation to their favorite charity. Get them a card, explain what you did, and put the receipt in the card.

Books– If your homesteader is a bookworm then I’ve got the list for you!

Homesteading

  • Back To The Basics
  • The Homesteader’s Herbal Companion
  • The Encyclopedia of Country Living
  • The First-Time Homesteader

Cookbooks

  • The Homestead Canning Cookbook
  • The Complete Guide To Pressure Canning
  • Preserving Everything
  • The Prepper’s Pantry

Animals

  • The Backyard Homestead Guide To Raising Animals
  • Butchering
  • The Ultimate Guide To Raising Farm Animals

Gear- Whether it’s stuff for butchering, milking, or building having extra gear is amazing. Gift cards would be amazing for this stuff as well because you may not know the difference between hoof trimmers to get, or which power tools they need batteries for. But I will tell you this, getting me gear so I can do my chores better? Score.

Sharp Things

  • Cold Steel Machete
  • Mtech Axe
  • Throwing Axes

Tools

  • Drill Bits, Saw Blades, and more
  • Hand tools: extra screw drivers, wrenches, socket sets, pliers and more.

Miscellaneous

  • Cast Iron, the good kind from antique stores.
  • Boots are always a plus
  • Coveralls! Seriously.

Seeds!!!!!!!! This would probably be better as a gift card, but I don’t know many homesteaders that will turn down packets of seeds. Tomatoes are usually pretty safe. Cucumbers are too if they have livestock. But check and see what they grow, and then check out Territorial Seed Company or Eden Brothers.

Logo 468x60

Plants- Territorial Seed has some great plants including coffee plants! Etsy is also another great place to get edible plants so consider berry bushes, grape vines, etc.

$100-$250 Gifts

You had better be pretty good to get something off this list. While I know I haven’t been super good, if my family is reading this? I would like this milker please!

Greenhouse– There are some greenhouses that will come in under $250 that are great for seed starts or house plants that are too big to come inside. If you know they are short on space, a greenhouse may be a great option.

Pressure Canners– I will never say no to an additional canner. I’ve been saving up for this canner, but just having another one is a time saver for me. The All American 931 can hold 19 quart jars and is a double stack. When I’m hip deep in canning season, this helps a lot. The Presto is a great canner and you can usually only get 7 quart jars in there.

Camp stove- Along the same lines as a pressure canner, having additional burners would be amazing. Not to mention not heating up the house. This camp stove has been on my list for a while and I’m hoping to get one before next canning season.

Bench Grinder– You have no idea how quickly sharp things get dull on the homestead. Having a good bench grinder is a great gift to give. Jared is able to sharpen all the knives, scissors, shovels, axes, and more with ours.

$250+ Gifts

If you’ve got a from scratch chef that has made you some amazing meals, check out this Kitchen Aid Mixer. Yes, it’s pricey but well worth the money spent, especially if that means you are going to get some awesome home cooking from it. This one is on my wish list as well

Got a homesteader that has goats? Or other hooved creatures? Hoof Boss is definitely a time and back saver. When we have to trim hooves, it takes hours. It’s hard on the back and trying to wrangle all the goats? Well, they’re lucky they’re cute.

Chainsaws– Now, this one will need a little bit of research, but an extra chainsaw is always great to have around. Not to mention the chains, sharpening equipment, etc.

At The End Of The Day

Your homesteader will love whatever gift you give them, we are grateful like that. But if you want to give them something that they will use, or need, check out some of the offerings on the homestead holiday gift guide. Or better yet, ask them what they want or need. I’m sure they would be ecstatic to receive something they need.

If you like this post, feel free to share it and follow us below on our social media accounts!

  • Facebook
  • Pinterest
  • Instagram
  • YouTube
  • TikTok
  • Spotify
  • Threads

Filed Under: Animals, Canning, Chickens, Garden, Goats, How To's, Our Homestead, Pigs, Projects Tagged With: Canning, cast iron, Chickens, Chicks, cooking, Eggs, Goats, Homestead, kitchen, Welcome

JOIN TO OUR MAILING LIST!

Leave us your email to receive new posts and special offers for members only! Don't miss a thing!

Recent Posts

  • Fall Garden Guide
  • Top Mistakes With Goats
  • How To Bond With Your Goats

How To Make Kombucha

August 8, 2022 by Leigh Leave a Comment

I did a whole post about how to bring back your kombucha. But I realized, I never did a post about starting booch in the first place! There are a million articles, blog posts and more about making kombucha but I wanted to tell you how I do it and the products I use to make kombucha.

I almost exclusively use Cultures For Health for all of my culture needs and Farmhouse Teas for our second batch needs. We do collect a commission from links at absolutely no cost to you. This helps us keep our blog and homestead up and running. You can read more that part here. Back to CFH and FHT.

Banner 468x60

The reason is because they are pretty much a one stop shop when it comes to all thing fermented or cultured. That being said, this post is heavily linked with their products but also products that we use on our homestead. Feel free to click through the links to find what you need.

Shopping List:

Vessel– I use one very similar to this one but mine is a thrift store find. You can absolutely use something smaller but make sure it is glass.

SCOBY– I bought mine from CFH. I have enjoyed their other cultures and have been very happy with their SCOBY and other cultures.

First Ferment Tea- This is where it gets a little tricky. While I love CFH, I prefer the Three Sisters Black tea blend from FHT. I’ve tried other tea blends and they’re okay, but I really like this tea for my base blend.

Second Ferment Teas- For my second ferment, I really like the Strawberry Mojitio and the Mango from FHT. Those are specific to their kombucha teas. BUT they also have some great teas that work with a second ferment. The first is their iced tea blends. If you like iced tea then you can make it on its own, but I don’t. I prefer to do a second ferment with it instead. The other is using their herbal teas. They have so many different fruity flavors that really make your booch delicious.

Bottles- I really like old GT kombucha bottles, but it can get confusing when I end up having to buy some and can’t remember which is which. So I also get these swing top or Grolsch bottles. I use these swing tops for everything from booch, tea, lemonade or creamers.

Make it

Pulled from Bringing Back Your Booch from here

First, brew your new sweet tea. I like my tea a little stronger and sweeter so I use 6 teaspoons of half black/ half green tea. While I have a kettle going for water, I add a cold brew filter to a wide mouth, half gallon mason jar and add my tea to the filter. Once the water is boiling, I pour over the filter and let it sit for about 10 minutes or until I remember I have it steeping. I could set a timer, but I usually don’t remember I even have one.

***** Very important! Use dechlorinated water!!!!! If you are on city water or are unsure if you have chlorinated water, use bottled spring water or leave a gallon of water out on the counter for 24 hours. If you use chlorinated water you will kill all the good bacteria we are trying to grow!******

Banner 468x60

While the tea is steeping I add about a quart of cold water to my vessel. I also use ice to get the water nice and cold so that I can keep the process to a minimum time wise. I use a vessel very similar to this, but mine is a thrift store find. The biggest thing to remember is that any spigot that you use will get clogged with debris from the SCOBY so make sure you are cleaning it whenever you make a new batch of booch. Rinse REALLY well because we do want GOOD bacteria to grow, not the bad kind.

Once the tea is done steeping, I remove the filter and compost the tea. Then I stir in about 1 1/4 cup of plain sugar into the mason jar with the tea. I stir until the sugar is almost completely dissolved. Then I add the tea to the vessel and add about another 2.5-3 quarts of cold water. I usually just use the half gallon mason jar so I can get any tea or sugar that is left behind. Before adding your SCOBY and starter tea, make sure that none of it is more than about 70*. If it is, add more ice or cold water if necessary to hit that 70*. A little colder is fine, too hot and it will cook your SCOBY and probably kill it.

Tractor Supply

Once your sweet tea is cool and in the vessel, add your starter and then finally your SCOBY. It’s worth repeating though, you don’t want to add your starter or SCOBY to tea that is too warm because it will kill your SCOBY. Anything over 75* will start to cook the good bacteria and yeast that makes up your SCOBY.

This is all called your first brew. This takes the longest time but gives you just under a gallon of booch for pennies compared to the store.

I love kombucha. As a former soda addict, it gives me the fizziness and flavor from soda without having all those harsh chemicals.

  • Facebook
  • Pinterest
  • Instagram
  • YouTube
  • TikTok
  • Spotify
  • Threads
  • Facebook
  • Pinterest
  • Instagram
  • YouTube
  • TikTok
  • Spotify
  • Threads

Filed Under: How To's, Recipes Tagged With: cooking, Homestead, kitchen, Kombucha

JOIN TO OUR MAILING LIST!

Leave us your email to receive new posts and special offers for members only! Don't miss a thing!

Recent Posts

  • Fall Garden Guide
  • Top Mistakes With Goats
  • How To Bond With Your Goats

Bringing Back Kombucha

March 15, 2022 by Leigh Leave a Comment

I’m a bad brewer, I left my kombucha on my counter for about six months. Much like everything else, I got busy and forgot about it. I’m not going to lie to you, I really thought I was going to have to scrap the whole thing and start over. While it’s not vinegar, it’s a little too tangy for my liking. But apparently forgetting about your kombucha over winter isn’t that bad, especially when your kitchen regularly sits at 65* or lower. Today, I want to go over bringing back your kombucha.

xr:d:DAGB721PTgQ:224,j:1804116298246832362,t:24041214

PS: the best place I have found for kombucha SCOBY is Cultures For Health. They have a ton of different cultures and I’ll go over how to start their dehydrated kombucha SCOBY in depth below.

Banner 468x60

Kombucha Is Pretty Forgiving

Lucky for most of us super forgetful people, kombucha is very forgiving…. for the most part. As long as your first ferment isn’t an odd one, like you’ve only added sweet tea in the first place, you can pretty much leave it alone for months on end. In fact that’s how SCOBY hotels got started. But it’s not a great idea to just let it sit without taking the steps to let it go dormant. The longer your SCOBY sits, the more likely it is to get moldy, especially if the environment that it’s in isn’t super clean. Think kitchens with open produce, flies, etc.

I’m not saying your kitchen is dirty, quite the opposite. But I know that no matter how clean my kitchen is, I’ve got fruit flies thanks to the amount of produce my garden is giving me. No matter how often I clean my kitchen or process my produce, it’s still going to have flying critters around it.

How To Bring Your Booch Back?

To start you need to wash your hands and dig that SCOBY out and put it in a CLEAN bowl or on a plate. Make sure to place it somewhere were flies, children or a cat (yes, that almost happened) will get to it. SCOBY stands for Symbiotic Culture of Bacteria and Yeast and I use this one from Cultures for Health.

This recipe will make approximate 1-1.5 gallons of booch. If you don’t want that much booch, just half or quarter the recipe.

Banner 468x60

If you order this from Cultures for Health, you will get a small jerky looking SCOBY and you will need several days-weeks to get it started. It’s not hard, just not exactly what I was expecting when I ordered mine. However, it has been a strong starter for me and I would gladly buy another if I did actually end up killing mine. Stick around and I will explain how to start their SCOBY at the end. They do have a live culture that I would recommend if you are looking for a faster start with your booch.

Next, take a cup or two of old kombucha out of the vessel and set aside as your starter.

Giant SCOBY

Next, brew your new sweet tea. I like my tea a little stronger and sweeter so I use 6 teaspoons of half black/ half green tea. While I have a kettle going for water, I add a cold brew filter to a wide mouth, half gallon mason jar and add my tea to the filter. Once the water is boiling, I pour over the filter and let it sit for about 10 minutes or until I remember I have it steeping. I could set a timer, but I usually don’t remember I even have one.

***** Very important! Use dechlorinated water!!!!! If you are on city water or are unsure if you have chlorinated water, use bottled spring water or leave a gallon of water out on the counter for 24 hours. If you use chlorinated water you will kill all the good bacteria we are trying to grow!******

While the tea is steeping I add about a quart of cold water to my vessel. I also use ice to get the water nice and cold so that I can keep the process to a minimum time wise. I use a vessel very similar to this, but mine is a thrift store find. The biggest thing to remember is that any spigot that you use will get clogged with debris from the SCOBY so make sure you are cleaning it whenever you make a new batch of booch. Rinse REALLY well because we do want GOOD bacteria to grow, not the bad kind.

Once the tea is done steeping, I remove the filter and compost the tea. Then I stir in about 1 1/4 cup of plain sugar into the mason jar with the tea. I stir until the sugar is almost completely dissolved. Then I add the tea to the vessel and add about another 2.5-3 quarts of cold water. I usually just use the half gallon mason jar so I can get any tea or sugar that is left behind. Before adding your SCOBY and starter tea, make sure that none of it is more than about 70*. If it is, add more ice or cold water if necessary to hit that 70*. A little colder is fine, too hot and it will cook your SCOBY and probably kill it.

SCOBY doing SCOBY stuff

Once your sweet tea is cool and in the vessel, add your starter and then finally your SCOBY. It’s worth repeating though, you don’t want to add your starter or SCOBY to tea that is too warm because it will kill your SCOBY. Anything over 75* will start to cook the good bacteria and yeast that makes up your SCOBY.

This is all called your first brew. This takes the longest time but gives you just under a gallon of booch for pennies compared to the store. The 2nd brew is where we get to have all the fun! I will be posting that one when this batch of booch is ready to be bottled.

Bringing your kombucha back is not difficult. In fact, it’s really no different from brewing a brand new batch. As long as there is no mold on your SCOBY, you are pretty much good to go.

Save on Seeds

I hope you will at least take the chance on kombucha. I first drank it at the urging of a coworker after I had complained for the umpteenth time about the amount of times I had gone to the bathroom. Within a few hours my stomach cramps went away and I was fine. Now, I drink it several times a week and it really helps with regularity. In hopes of saving some cash, I have revived my booch and hope to start experimenting with flavors very soon!

Using Cultures For Health Dehydrated SCOBY

Cultures for Health has 3 SCOBY’s that you can purchase. The first one is dehydrated, the second is for black tea and the third is for green tea. If you are in a hurry get either the second or third one. Now, when I ordered my first one, I wasn’t paying the slightest bit of attention and ordered the dehydrated SCOBY. It has been a fantastic SCOBY but does present a lot of challenges if you are not ready for it.

When using this SCOBY for the first time you have to create a starter for it. Since we are just starting a SCOBY and not actually making Kombucha, just use a wide mouth, quart mason jar to start. You will also be using:

2-3 cups hot water for tea

.25 cup white sugar

2 tea bags or 1-1.5 teaspoons of loose tea. (I prefer loose tea)

Simply use the steps above to make your sweet tea. Make sure everything is cool and then add to your vessel. Next, add the .5 cup vinegar to your vessel. Add your SCOBY and then dampen a coffee filter with a little vinegar and cover your mason jar. Secure with a rubber band or even the ring for the mason jar. Allow it to sit out of direct sunlight for about 30 days.

Your SCOBY may not look any different, mine did, but it is ready to go. You can either dump the first batch (saving 1-2cups) or use in in whatever vinegar recipes you may want.

Now you are ready to make another batch of Kombucha. Just repeat the steps in the main blog post, adjusting for your vessel size. And remember don’t use chlorinated tap water!

  • Facebook
  • Pinterest
  • Instagram
  • YouTube
  • TikTok
  • Spotify
  • Threads
  • Facebook
  • Pinterest
  • Instagram
  • YouTube
  • TikTok
  • Spotify
  • Threads

Filed Under: Recipes Tagged With: cooking, Homestead, kitchen, Kombucha

JOIN TO OUR MAILING LIST!

Leave us your email to receive new posts and special offers for members only! Don't miss a thing!

Recent Posts

  • Fall Garden Guide
  • Top Mistakes With Goats
  • How To Bond With Your Goats

Unbelievable Biscuits

March 6, 2022 by Leigh Leave a Comment

Jump to Recipe

I’m not going to lie to you, I was never really a homemaker, from scratch cooker, or any other buzz word worthy person. Cookies came out of a premade roll, biscuits came out of a can and the closest thing I got to from scratch was pancakes, and that came out of a box.

But when the pandemic hit, it was hard to find some items in the grocery store. So I learned how to make rolls. It took about a million tries before I figured out what I was doing and could make some yeast rolls that were to die for. But biscuits still eluded me.

Save on Seeds

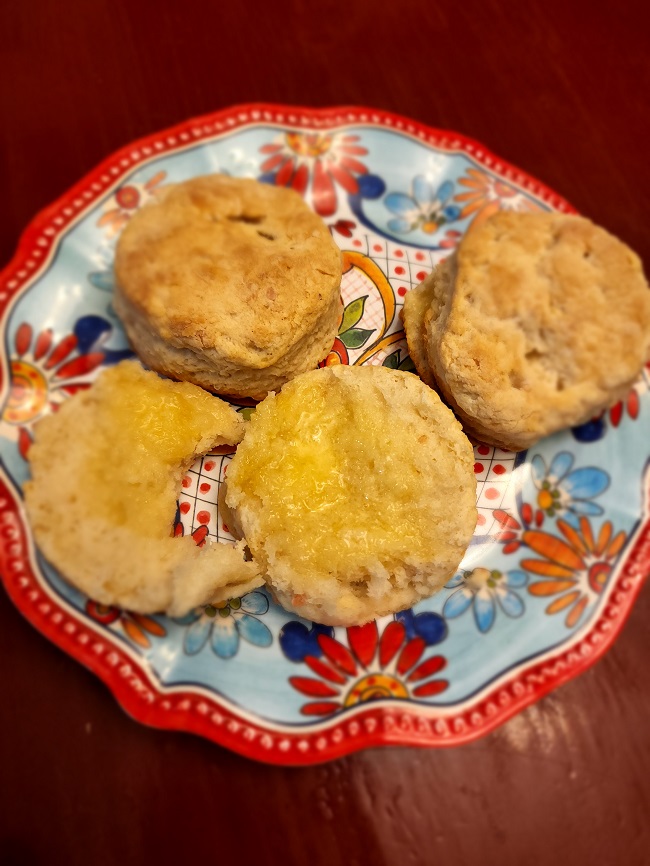
I tried my hand at biscuits so many times over the years, that I figured I just didn’t have what it takes to make them. Let’s be real, they are not as easy as they look. But I recently figured it out. After four years, I finally make some bomb biscuits that even my southern husband absolutely loves.

We use a cast iron skillet to cook these biscuits because I don’t like the way they turn out on cookie sheets. One day I may get a baking stone and try that but for now, this works well for us.

I really hope you enjoy these biscuits! And if at first you don’t succeed? Try again and again because it costs pennies to make these biscuits vs the $3+ at the store!

Banner 468x60

One quick side note. You can make these biscuits and not cook them. Just flash freeze them, line a cookie sheet with parchment paper and then the biscuits on them and freeze. Once frozen put them in a ziplock and cook later. Add a few more minutes and remember not to open that oven and they will taste just as good fresh.

  • Facebook
  • Pinterest
  • Instagram
  • YouTube
  • TikTok
  • Spotify
  • Threads
  • Facebook
  • Pinterest
  • Instagram
  • YouTube
  • TikTok
  • Spotify
  • Threads
Leigh

Bomba$$ Biscuits

Simply the best biscuits that you will ever eat…. once you get the rhythm of the recipe right.
Print Recipe Pin Recipe
Prep Time 20 minutes mins
Cook Time 16 minutes mins
Total Time 36 minutes mins
Servings: 8
Course: Appetizer, Breakfast
Cuisine: American
Ingredients Equipment Method Notes

Ingredients
  

  • 1 TBSP Vinegar
  • 1 Cup Milk
  • 2 Cup all-purpose flour
  • 1¼ TBSP Salt
  • ¼ tsp baking soda
  • 6 TBSP Butter COLD, cut into 1T chunks
  • 1 TBSP Baking powder

Equipment

  • 1 2" biscuit cutter or wide mouth jar ring

Method
 

  1. Preheat oven to 475
  2. Add milk and vinegar in small bowl and set off to side
  3. Grease cast iron pan
  4. Add all dry ingredients: Flour, salt, baking soda, baking powder and mix well
  5. Then add chunks of COLD butter. This will allow the butter to steam as the biscuits cook. This is the secret to amazing biscuits
  6. Once it is incorporated add the milk and mix well. Dough will be sticky but not terrible. Add more flour if dough is not pulling away from the sides when you mix
  7. Spread flour on a clean, flat surface and roll out your dough on it. You are going to stretch and fold at least 5x. On that last fold you can use your hands to spread the dough out to at least 1" tall
  8. Using your biscuit cutter or wide mouth jar lid cut your biscuits and place on your cast iron pan
  9. Cook for 16 minutes at 475. DO NOT OPEN THE OVEN for the first 10minutes! The steam from the butter is working it's magic! It's better to wait as long as possible.
  10. At the 14-15min mark do a quick peak and see if the tops are starting to get golden brown. If so pull them and serve. If not, keep going to 16minutes.

Notes

The secret to amazing biscuits is cold butter, cold milk, and not disturbing them once they are in the oven. 
I do not keep buttermilk on hand. We just don’t use it often enough. But to get that tangy flavor, vinegar and milk works really well.
I usually add a smidge of extra salt because I like the slightly salty biscuits. 
 
I really hope you enjoy these biscuits because they are a family favorite for us

Banner 468x60

Filed Under: How To's, Recipes Tagged With: cast iron, cooking, Easy, Freezer

JOIN TO OUR MAILING LIST!

Leave us your email to receive new posts and special offers for members only! Don't miss a thing!

Recent Posts

  • Fall Garden Guide
  • Top Mistakes With Goats
  • How To Bond With Your Goats
  • « Go to Previous Page
  • Page 1
  • Page 2
  • Page 3
  • Page 4

Primary Sidebar

WELCOME

WELCOME

My name is Leigh and I am the lead chaos creator here at Steel Raven Farms. You will see throughout this blog that I am the crazy goat lady.

I am married to my high school sweetheart, Jared and we have two amazing boys.

FOLLOW ME

  • Amazon
  • Facebook
  • Instagram
  • Pinterest
  • TikTok

GET UPDATES!

Leave us your email to receive new posts and special offers for members only! Don't miss a thing!

In all the years that I’ve been growing a garden, the fall garden has steadily remained my favorite. Which is funny because I don’t really like any of the brassicas, which is what most people know the fall garden for. I prefer the root vegetables and cool air. But I have learned over the years…

Read More

  • Animals
    • Chickens
    • Farm Dogs
    • Goats
  • Garden
    • Compost
    • Garden Projects
    • Seeds and Plants
    • Garden Journal
    • Working With Food
      • Recipes
      • Freezing Foods
      • Dehydrating Foods
      • Canning Tips And Tricks
        • Canning Inventory Sheets
  • Helpful Info
    • Welcome to the Homestead!
    • Emergency Preparedness
    • Frequently Asked Questions
    • Goal Setting
    • Project List
    • Shop Digital Products
      • Hay Calculator
      • Farm Expense And Income Tracker
      • Goat Crash Course: 101
      • Garden Journal Prompts
      • Schedule C Tracker
      • Schedule C Tracker
      • The Homestead Bundle
  • The Truths
  • Episode List
  • Start Here
    • Privacy Policy
    • Affiliate Disclosure
    • Let’s Get in Touch
    • Members Only Library
    • Welcome To Our Homestead

Footer

  • Email
  • Facebook
  • Instagram
  • Pinterest

COME AND GET IT!

Leave us your email to receive new posts and special offers for members only! Don't miss a thing!

· Midnight Theme

Copyright © 2026 · Midnight Theme on Genesis Framework · WordPress · Log in